

Introduction: The Critical Role of Sump Pumps in Home Protection
Flooded basements are every homeowner’s nightmare—ruined flooring, damaged belongings, mold, and expensive repairs. Yet, many only think about water intrusion after it becomes a costly problem. Sump pumps are the unsung heroes that quietly protect your home’s foundation from groundwater and stormwater infiltration, especially in areas prone to heavy rain, rapid snowmelt, or high water tables. But not all sump pumps are created equal, and a poorly chosen or neglected system can fail when you need it most. In this comprehensive guide, we dive deep into the world of sump pumps: how to choose the right type for your property, step-by-step installation insights, crucial maintenance routines, and advanced backup solutions. Whether you’re a new homeowner seeking peace of mind or an experienced DIYer looking to upgrade your current setup, you’ll find actionable advice to ensure your basement stays dry year-round.
Understanding Sump Pumps: Types and Key Features
What Is a Sump Pump?
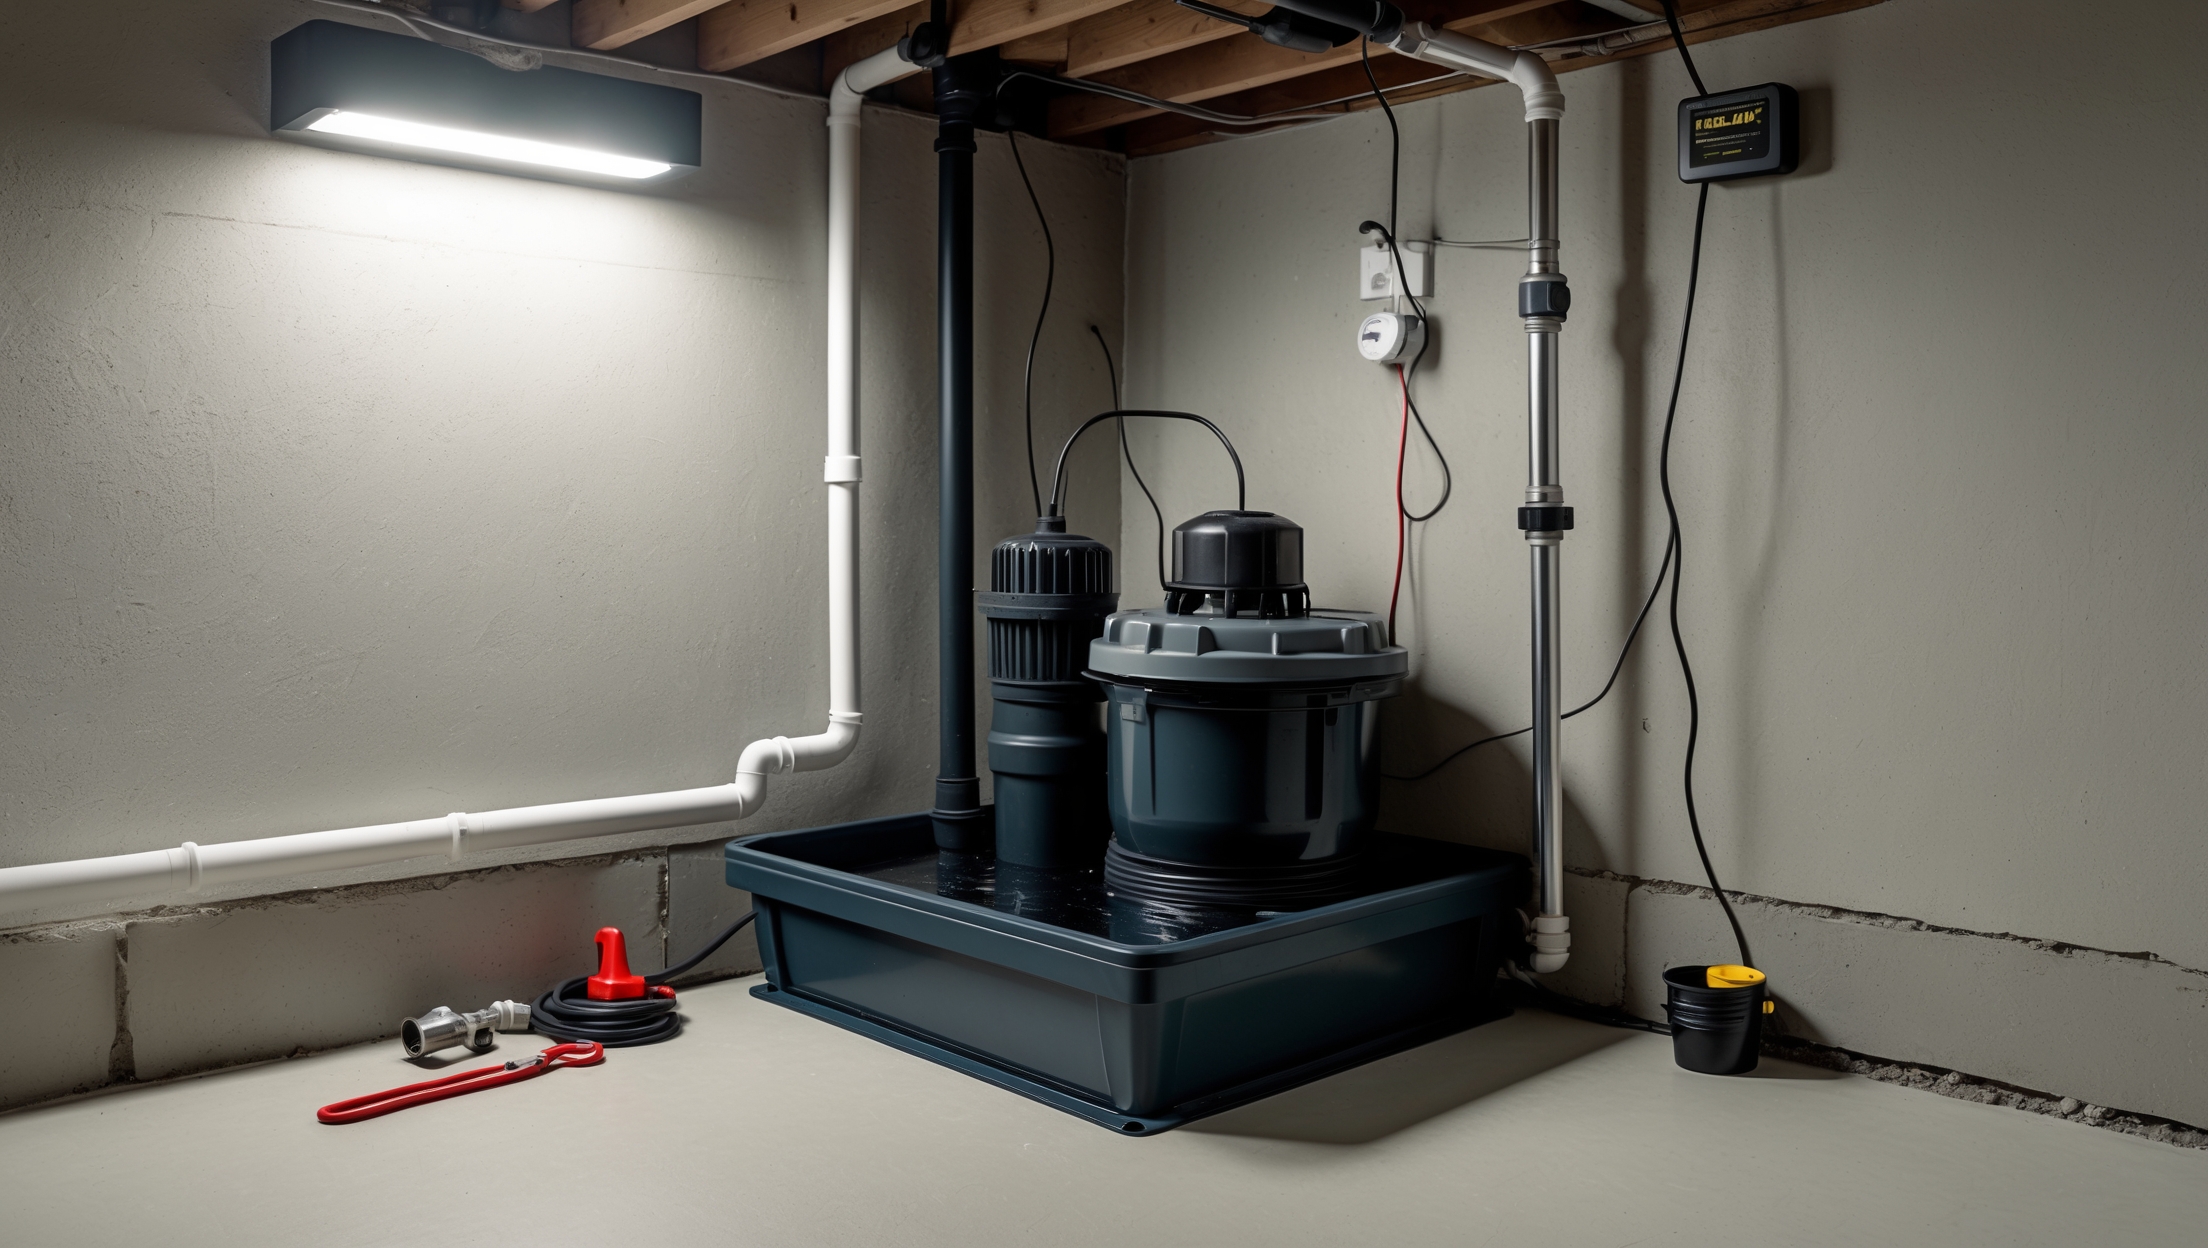
A sump pump is a device installed in the lowest part of a basement or crawlspace, designed to pump out water that accumulates in a sump basin, preventing flooding and moisture damage. When the water level in the pit rises to a certain point, the pump activates and redirects water away from your home’s foundation, typically via a discharge line to a safe drainage area.
Main Types of Sump Pumps
- Submersible Sump Pumps: Installed inside the sump basin and designed to operate underwater. These are quieter, more powerful, and suitable for frequent or heavy-duty use.
- Pedestal Sump Pumps: The motor is mounted above the sump pit, while only the impeller sits in the water. These are easier to service but noisier and less powerful, making them ideal for smaller spaces or occasional use.
- Water-Powered Backup Pumps: Use municipal water pressure to operate, providing protection during power outages without electricity.
- Battery Backup Sump Pumps: Secondary pumps with their own battery supply, ensuring operation if the main pump fails or the power goes out.
Key Features to Consider
- Pumping Capacity (GPH): Measured in gallons per hour, this indicates how much water the pump can move. Choose a pump rated for your area’s typical rainfall and water table.
- Switch Type: Float switches are common, but electronic switches offer more reliability and less risk of sticking.
- Durability: Look for pumps with cast iron or stainless steel housings for longevity, especially in high-use scenarios.
- Alarm Systems: Modern pumps may include water level alarms or Wi-Fi connectivity for remote monitoring.
- Discharge Pipe Size: A larger diameter (typically 1.5 inches or more) reduces risk of clogging and improves flow.
Choosing the Right Sump Pump for Your Home
Assessing Your Basement and Water Risks
Start with a thorough inspection of your basement or crawlspace. Identify the lowest point where water tends to collect. Consider the following factors:
- Frequency of Water Intrusion: Do you experience regular seepage after rainstorms, or only during extreme weather?
- Basement Size and Layout: Larger or multi-room basements may benefit from multiple pumps or higher-capacity models.
- Local Water Table: Homes in low-lying areas or near bodies of water often require more robust solutions.
- Power Reliability: Frequent outages point to the need for a backup system.
Comparing Pump Specifications
- Calculate the vertical distance (head height) the pump must move water to the discharge point.
- Estimate peak water inflow during storms; a professional can help gauge this, or use rainfall history as a guide.
- Choose a pump with a GPH rating that exceeds your estimated needs by 25% for safety.
- Check compatibility with your existing sump basin or plan for a new installation if upgrading from pedestal to submersible.
When to Consider Backup Systems
If your basement is finished, stores valuables, or serves as living space, a backup pump is a wise investment. Battery backups keep you protected during power failures, while water-powered backups offer an alternative if you have municipal water (not suitable for well systems).
Step-by-Step Sump Pump Installation
Essential Tools & Supplies
- Sump pump with appropriate capacity
- Sump basin (if new install)
- Gravel, concrete mix (for setting basin)
- PVC piping and fittings (discharge line)
- Check valve (prevents water backflow)
- Drill, hole saw, and pipe cutter
- Utility knife, level, and measuring tape
- Silicone sealant
Installation Steps
- 1. Select the Location: Choose the lowest point in the basement or crawlspace, ideally near an exterior wall for efficient discharge routing.
- 2. Prepare the Pit: Use a jackhammer or rotary hammer to break up the concrete floor. Excavate the sump pit large enough for the basin plus 3 inches of clearance on all sides.
- 3. Set the Basin: Pour 2–3 inches of gravel in the bottom for drainage. Insert the basin so its rim is flush with the floor; backfill gaps with gravel and concrete.
- 4. Install the Pump: Position the pump in the basin, attach the check valve to the discharge port, and connect the discharge pipe. Pipes should slope slightly downward away from the house.
- 5. Route Discharge Line: Drill a hole through the rim joist or wall for the discharge pipe. Extend piping at least 10 feet from the foundation, discharging to a downsloping area or dry well. Insulate exterior pipes to avoid winter freezing.
- 6. Seal and Test: Seal around the discharge pipe with silicone. Plug in the pump and fill the basin with water to test automatic operation and discharge flow.
- 7. Install Alarm or Backup (if applicable): Mount a water alarm or set up the backup pump system according to manufacturer instructions.
Installation Tips for Best Results
- Always use a dedicated GFCI outlet for safety.
- Do not connect discharge to sanitary sewer—use storm drains or daylight outflow where permitted.
- Label the circuit breaker for quick troubleshooting.
- Periodically check for code compliance in your municipality.
Essential Sump Pump Maintenance Best Practices
Monthly Checks
- Pour a bucket of water into the basin to ensure the pump activates and the float switch moves freely.
- Listen for unusual noises that may indicate mechanical issues.
- Inspect the discharge line for obstructions or signs of freezing.
Quarterly Routines
- Unplug the pump and remove it from the basin.
- Clean debris, mud, and sediment from the pump intake and basin bottom.
- Check the check valve for proper operation.
- Test backup systems and replace batteries as needed.
Annual Deep Maintenance
- Inspect all electrical connections for corrosion or wear.
- Flush the discharge line with a garden hose to clear any build-up.
- Lubricate moving parts if recommended by the manufacturer.
- Review alarm and notification settings on smart-enabled pumps.
- Update your maintenance log with dates and observations.
Common Sump Pump Issues and How to Fix Them
Pump Runs Continuously
- Check for stuck float switch or improper switch adjustment.
- Inspect for a jammed check valve or blocked discharge line.
- If the water table is high, consider upgrading to a more powerful pump or adding a secondary unit.
Pump Fails to Activate
- Ensure the outlet is live and the breaker is not tripped.
- Test the float switch for free movement.
- Check for clogs or debris blocking the pump intake.
- If the pump is old or corroded, replacement may be necessary.
Unusual Noises or Vibrations
- Rattling or grinding often indicates debris in the impeller—remove and clean the pump.
- Vibrations may result from loose mounting bolts or unbalanced impeller blades.
- Persistent noise could mean it’s time to upgrade to a quieter submersible model.
Advanced Upgrades: Smart Sump Pumps and Monitoring
Smart Features for Peace of Mind
- Wi-Fi-enabled pumps offer real-time notifications for water levels, power loss, or pump failure.
- Pair with home automation systems for remote monitoring and maintenance reminders.
- Some models allow for remote activation or testing via smartphone apps.
Integrating with Home Security and Insurance
Many insurance companies offer discounts or incentives for homes with flood prevention systems. Store maintenance logs and smart pump alerts as documentation for claims. Consider pairing your sump pump with water sensors elsewhere in the basement for early warning of leaks or overflows from other sources.
Cost Breakdown: Budgeting for Purchase, Installation, and Upkeep
Initial Purchase and Installation
- Basic pedestal sump pumps: $75–$200
- Submersible sump pumps: $150–$400+
- Sump basin and accessories: $50–$150
- Professional installation (labor): $500–$1,200, depending on complexity
- DIY installation: save on labor, but factor in tool rental or purchase
Backup Systems
- Battery backup pumps: $200–$600, plus battery replacement every 3–5 years
- Water-powered backups: $150–$400 (not including plumbing modifications)
Ongoing Maintenance
- Minimal annual costs for cleaning, testing, and replacing worn parts (<$50/year)
- Battery replacements: $50–$150 every few years
- Smart monitoring subscriptions (optional): $5–$15/month
Conclusion: Protecting Your Home Starts Below Ground
Ignoring your sump pump until disaster strikes is a risk no homeowner should take. As we’ve seen, the process of choosing, installing, and maintaining a sump pump isn’t just about avoiding a soggy basement—it’s about safeguarding your home’s structure, your possessions, and your peace of mind. Investing in the right pump for your property, understanding your water risks, and following a proactive maintenance schedule can save you thousands of dollars and countless hours of stress. With today’s smart technology, you can even monitor your basement’s status from anywhere, giving you real-time alerts before minor issues become major headaches.
Remember, a sump pump is only as reliable as the attention you give it. Take the time now to assess your needs, upgrade your setup if necessary, and set reminders for regular checks. Your future self—and your dry, comfortable basement—will thank you. Don’t wait for the next storm to test your luck; act today, and make your sump pump system a model of home resilience.
If my house is built on a high water table and gets heavy rain every spring, would you recommend going for a submersible sump pump over a pedestal one, and what maintenance issues should I be on the lookout for with this setup?
For homes on a high water table with heavy spring rains, a submersible sump pump is often preferred because it handles larger volumes of water quietly and can be fully submerged, protecting the motor from debris. Key maintenance includes checking for clogs in the intake screen, testing the float switch regularly, and cleaning out the sump pit at least once a year to prevent blockages and ensure reliable operation.
About sump pump maintenance, could you outline how often key routines like pit cleaning, float switch checks, and discharge line inspections should be done? I want to set a realistic schedule so I don’t accidentally void warranties or risk flooding.
For a solid maintenance schedule, clean the sump pit at least once a year to prevent debris buildup. Check the float switch every 3–4 months to ensure it moves freely and isn’t obstructed. Inspect the discharge line each spring and fall, and after heavy storms, to confirm it’s clear and draining properly. Following these routines can help keep your pump running smoothly and protect your warranty.
Could you clarify if there are any specific routine maintenance tasks homeowners should prioritize each season to make sure their sump pump stays working? I’m trying to figure out what I could realistically do myself versus what needs a professional.
Seasonal maintenance for sump pumps is definitely something homeowners can handle in most cases. Each season, you should check that the discharge pipe is clear, test the pump by pouring water into the pit, and clean the pump inlet screen. Make sure the float switches move freely. Once a year, unplug the pump and give it a deeper clean. If you spot wiring issues or suspect pump failure, that’s when you should call a professional.
If a sump pump starts making more noise than usual, as a business owner, should I be concerned about immediate failure, or are there troubleshooting steps I can try before calling a professional?
Unusual noise from a sump pump can signal an issue, but it doesn’t always mean immediate failure. First, check for debris in the pit, make sure the pump is level, and inspect the discharge pipe for blockages. Also, look for loose parts or vibrations against the basin. If the noise continues after these checks, it’s wise to call a professional before problems escalate, especially in a business setting.
You brought up battery and water-powered backup options for sump pumps. If my area has frequent power outages, how complicated is it to add a backup system after the primary sump pump is already installed?
Adding a backup system to an existing sump pump setup is generally straightforward. Battery backup units are designed to be installed alongside your main pump, usually with minimal plumbing changes. Water-powered backups are also feasible, but they require a reliable municipal water supply and some extra plumbing work. Most homeowners with basic DIY skills can handle battery backup installation, but you may want a plumber for water-powered systems or if you prefer professional help.
Are there specific maintenance routines you recommend for someone who has never owned a sump pump before? I want to avoid neglecting anything that could lead to failure when I need it most.
Absolutely, there are a few simple routines to keep your sump pump reliable. Check the pump every few months by pouring water into the pit to make sure it activates and drains properly. Clean the sump pit regularly, removing any debris that could block the pump. Inspect the discharge pipe outside to ensure it’s not clogged or frozen, especially before heavy rain. Finally, test the backup power supply if your system has one. Sticking to these habits will help your pump stay in great shape.
The guide talks about water-powered backup pumps that work without electricity. Are these usually more expensive to install than battery backup options, and are there any downsides to relying on my city’s water supply in an emergency?
Water-powered backup pumps are often more expensive to install than battery backup systems because they require a connection to your home’s water supply and sometimes additional plumbing work. A key downside is that they rely on steady municipal water pressure, so if your city’s water supply is interrupted during an emergency, the pump may not function. Battery backups are independent of your water supply but do require battery replacement and maintenance.
For homeowners on a budget, are there specific features or brands of sump pumps that offer good reliability without breaking the bank? I’d appreciate some guidance on balancing cost with quality based on what you’ve covered.
When shopping on a budget, look for sump pumps with a reliable cast iron or thermoplastic housing, a good warranty (at least 1 year), and a reputable brand like Wayne, Zoeller, or Superior Pump, which are known for offering good value. Avoid unnecessary extras—focus on horsepower suited for your basement size and a float switch for automatic operation. Regular maintenance can also extend a budget pump’s lifespan.
The article mentions water-powered backup pumps as an option during power outages. Are there any concerns about increased water bills or reduced efficiency with these systems compared to battery backup sump pumps?
Water-powered backup pumps do use your home’s municipal water supply to operate, so you may see an increase in your water bill, especially during heavy usage. They are generally less efficient than battery backup pumps since they can remove less water per minute. However, water-powered pumps provide a reliable, maintenance-free backup as long as city water is available, unlike batteries that require periodic replacement.
The article mentions water-powered backup pumps, but it doesn’t go into much detail. Are there any drawbacks or limitations to relying on a water-powered backup, especially in places where municipal water pressure isn’t always consistent?
Water-powered backup pumps do have some limitations, especially if your municipal water pressure is low or inconsistent. They rely on a steady, strong water supply to operate effectively, and if pressure drops, their pumping capacity can decrease significantly. Also, they may not be permitted everywhere due to local water use restrictions. If you experience frequent drops in water pressure, a battery backup pump might be a more reliable choice.
Could you clarify whether water-powered backup pumps really work well in areas with lower municipal water pressure, or should I just go straight for a battery backup system?
Water-powered backup sump pumps depend on strong municipal water pressure to work efficiently. In areas where water pressure is lower, their pumping capacity drops and might not keep up during heavy storms. If you know your water pressure is on the low side, it’s safer to choose a battery backup system, which maintains consistent performance regardless of your water supply.
If I wanted to upgrade my current sump pump system with a backup, does installation require a professional or is it manageable for someone who’s a confident DIYer?
Installing a backup sump pump is definitely manageable for a confident DIYer, especially if you have experience with basic plumbing and electrical work. Most backup systems come with clear instructions, but you’ll need to connect the pump, install check valves, and ensure proper power supply or battery backup. If your setup involves complex wiring or you’re unsure about local building codes, it may be worth consulting a professional.
If someone is installing a sump pump for the first time, what are the key installation steps that require a pro versus what a confident DIYer can realistically handle? Are any common mistakes worth flagging?
A confident DIYer can usually dig the sump pit, position the basin, and connect the discharge pipe. However, tasks like electrical wiring and ensuring proper drainage away from your foundation are best left to a professional. Common mistakes include placing the pit too close to walls, using the wrong size pump, or failing to install a check valve, which can cause backflow. Double-check local codes and always test the system before finishing.
If I only have occasional water intrusion in my basement during heavy rain, would a pedestal sump pump be sufficient, or should I still consider a submersible one? I’m also wondering about the noise aspect since my kids’ play area is nearby.
For occasional water intrusion, a pedestal sump pump can be sufficient and is often less expensive and easier to maintain. However, pedestal pumps are generally noisier since the motor sits above the pit. If your kids play nearby and noise is a concern, a submersible sump pump is usually quieter because it operates underwater and has a sealed motor, making it a better choice for living spaces close by.
If I’m on a tight budget but still want reliable basement protection, which type of sump pump would you recommend getting started with? Are there any important features I shouldn’t compromise on when shopping for an affordable option?
If you’re looking for a budget-friendly yet reliable sump pump, a submersible pump is generally more efficient, but a pedestal pump can be more affordable upfront. No matter which you choose, make sure it has a cast iron core for durability, an automatic float switch, and a backup power option if possible. These features are key to dependable basement protection even on a budget.
Can you explain how often a homeowner should perform maintenance routines on their sump pump system to avoid unexpected failure, especially if the system is rarely needed?
Even if your sump pump is rarely used, it’s best to check it at least once every three months. Routine maintenance includes running a test cycle with water, clearing debris from the pit, and making sure the discharge line isn’t blocked. Annually, unplug the pump and clean both the pump and the pit thoroughly. Regular checks keep the system reliable, even if it doesn’t run often.
If a sump pump activates but doesn’t seem to be moving water out efficiently, what troubleshooting steps do you recommend before considering a complete replacement? Any telltale signs that maintenance or a simple fix might solve the problem?
If your sump pump turns on but struggles to move water, start by checking the discharge pipe for clogs or obstructions and clear any debris. Make sure the pump’s inlet screen is clean and the float switch moves freely. Inspect the check valve to ensure it’s working and not stuck. Unusual noises, vibration, or frequent cycling can also point to maintenance needs rather than full replacement.
You mentioned submersible and pedestal sump pumps have different power and noise levels. Is there a significant difference in how often each type needs maintenance or replacement compared to the other?
Submersible sump pumps usually require less frequent maintenance because their sealed design keeps out debris, but they may need full replacement sooner, typically lasting 5 to 10 years. Pedestal pumps often last longer—sometimes over 15 years—with proper care, but they need more regular cleaning and oiling since their motor is exposed. So, pedestal pumps tend to need more ongoing maintenance, while submersibles may need replacing a bit sooner.
I noticed you mentioned water-powered backup pumps as an option. How effective have you found those compared to traditional battery backups, especially during longer power outages or if you’re on a private well rather than municipal water?
Water-powered backup pumps can be very reliable during power outages, as long as your home is connected to a municipal water supply. They don’t rely on electricity or batteries. However, if you’re on a private well, they won’t work since there’s no city water pressure during outages. In those cases, a battery backup would be more effective for keeping your sump pump running.
We sometimes get rapid snowmelt in early spring. Do you have any advice on whether pedestal or submersible pumps handle sudden large water influxes better, especially for older homes with limited space in the basement?
For sudden large water influxes like rapid snowmelt, submersible pumps typically handle higher volumes more efficiently and can run for longer periods if needed. They’re installed inside the sump pit, saving space—this is helpful in older homes with limited basements. Pedestal pumps are easier to maintain but may not move water as quickly and require more headroom above the pit. A submersible model is often the better choice for your situation.
After installing a new sump pump, how soon would you recommend checking to make sure everything works properly, and what are the first signs that something might be wrong with the setup?
It’s a good idea to check your new sump pump immediately after installation, ideally by pouring water into the sump pit to see if it activates and drains correctly. In the first few days, watch for signs like unusual noises, failure to turn on, slow water removal, or water remaining in the pit. Any of these could suggest something isn’t set up right or needs adjustment.
If your sump pump kicks on more often than usual during heavy rains, what troubleshooting steps should you start with to check if the pump or the pit design could be the issue?
Start by checking if the float switch is operating smoothly and not getting stuck. Ensure the pump turns on and off properly. Inspect the pit for debris that might block the pump. Confirm that the discharge pipe is clear and directed away from your foundation. If the pump runs excessively, the pit may be too small or groundwater is entering faster than the pump can handle. If these checks don’t reveal a problem, consider consulting a plumber to assess pit design or pump capacity.
I’m curious about the installation process for someone with basic DIY skills. Are there any critical steps from your guide that tend to trip up first-timers when installing a new sump pump?
When installing a sump pump as a DIY project, first-timers often run into issues during the excavation of the sump pit, making it either too shallow or not wide enough. Another common stumbling block is not properly sealing the liner or failing to check that the discharge pipe is sloped away from the house. Double-checking these steps will help ensure a smoother installation and better long-term performance.
If a sump pump starts cycling on and off more frequently than usual without heavy rain, what are the likely causes, and which troubleshooting steps would you recommend before calling in a professional?
Frequent cycling when there’s no heavy rain can be caused by a stuck float switch, a sump pit that’s too small, or a check valve failure allowing water to flow back. To troubleshoot, first check if the float switch moves freely and isn’t obstructed. Inspect the check valve to ensure it’s working properly, and make sure the discharge line isn’t clogged. If these steps don’t resolve the issue, it may be time to consult a professional.
As someone with little technical experience, what are the most common mistakes people make during sump pump installation or when setting up the discharge line that I should watch out for to avoid flooding problems down the line?
When installing a sump pump or setting up the discharge line, common mistakes include not using a check valve (which can let water flow back into the pit), placing the discharge line too close to your foundation (risking water recycling), and failing to seal or secure pipe joints properly. Also, avoid using extension cords for the pump—plug it directly into a grounded outlet. These steps can help prevent flooding issues later.
I noticed you mentioned maintenance routines—could you outline what kind of regular checks a small business owner should do to avoid emergency breakdowns, especially during storm season?
Absolutely. For small business owners, regular sump pump checks are key, especially before storm season. Test the pump by pouring water into the pit to ensure it starts automatically. Inspect and clean the inlet screen every few months to prevent clogging. Check the power cord and outlet for wear. Make sure the discharge pipe is clear and directs water away from your building. Finally, back up your system with a battery or water-powered backup in case of power failure.
The article mentions that water-powered backup pumps don’t need electricity, but do they use a lot of household water? We’re on a metered water system and I’m concerned about potential high water bills if it runs often.
Water-powered backup sump pumps do use household water to operate—typically, for every gallon of sump water they remove, they use about 1 to 2 gallons of your tap water. If your pump runs frequently, this can add up and impact your water bill, especially on a metered system. If minimizing water usage is important, you might want to consider a battery backup system instead.
If I’m on a tight college budget and renting a place with a basement prone to moisture, what’s the most affordable way to ensure some basic protection based on your recommendations? Would a DIY approach work for short-term needs?
If you’re on a budget and renting, a DIY approach can definitely help for short-term moisture issues. Try using an affordable portable utility pump or even a wet/dry vacuum for minor water accumulation. Combine this with a basic dehumidifier and sealing any visible cracks with waterproof sealant. These steps are cost-effective and don’t require major installation, making them ideal for renters.
After selecting and installing a sump pump, how often should homeowners perform key maintenance routines? Is there a seasonal checklist or schedule you suggest to keep the pump running efficiently year-round?
Homeowners should check their sump pump at least every three months, but a more thorough inspection is recommended at the start of spring and fall. Key maintenance includes cleaning the pump and pit, testing the float switch, and checking the power source. In areas with heavy rainfall or snowmelt, monthly checks during wet seasons help ensure reliable operation.
If a sump pump activates but the basement still floods a little during storms, what are the most common causes of system failure you see, and what troubleshooting steps should I take before calling in a professional?
If your sump pump runs but the basement still gets water, check for a clogged or frozen discharge pipe, a stuck float switch, or if the pump isn’t sized correctly for heavy rain. Inspect the pit for debris and make sure the pump sits upright. Also, verify the check valve is working and that the discharge line is directing water far enough from the foundation. If those all check out and problems persist, it’s wise to call a professional.
If my basement has never flooded but I’m worried about sudden storms, how quickly could I get a new sump pump system installed from start to finish, assuming professional help?
If you hire a professional, a standard sump pump system can usually be installed in one day, sometimes even within a few hours if your basement is easy to access and doesn’t need major prep work. Scheduling the appointment may take a few days depending on contractor availability, so overall the process from booking to completion typically ranges from a couple of days up to a week.
You mentioned maintenance routines for sump pumps. Can you break down what specific checks or cleaning should be done, and how often? I’d love some tips that a busy parent could fit into a regular schedule.
Absolutely, here’s a manageable routine: Every three months, test the sump pump by pouring water into the pit to ensure it turns on. Annually, unplug the pump, remove debris from the pit, clean the pump’s intake screen, and check the float switch for smooth movement. Also, make sure the discharge pipe is clear outside. These quick checks, timed with seasonal tasks or a weekend chore slot, help keep things running smoothly without taking much time.
You mentioned water-powered backup pumps as an option for power outages. Are there any limitations to these if you have low municipal water pressure, and how does their reliability compare to battery backup systems?
Water-powered backup pumps rely on sufficient municipal water pressure to operate effectively. If your water pressure is low, these pumps may not be able to remove water quickly enough during a flood situation. In terms of reliability, battery backup systems are more consistent since their performance doesn’t depend on water pressure. However, batteries need regular maintenance and replacement, while water-powered pumps can run indefinitely as long as water pressure is adequate.
For someone new to sump pump maintenance, what are the most common warning signs that a system might be about to fail? Are there easy checks homeowners can do on a monthly basis to catch issues early?
Some warning signs your sump pump might be failing include strange noises, excessive vibration, irregular cycling (turning on and off frequently), or water not being pumped out efficiently. Each month, you can check that the pump’s outlet pipe is clear, test the float switch by pouring water into the pit, and listen for any unusual sounds during operation. These simple checks can help catch problems before they become serious.
You mentioned water-powered backup pumps as an option during power outages. Is there any concern about increased water bills or compatibility with all municipal systems? How do I determine if a water-powered backup is right for my house?
Water-powered backup sump pumps do use your home’s water supply, so you might notice higher water bills, especially during heavy storms. Also, not every municipal system allows or is compatible with these pumps—some areas restrict their use. To decide if this option suits your home, check with your local water provider about regulations and ensure your water pressure meets the pump manufacturer’s requirements. A plumber can help assess compatibility.
When choosing a sump pump, what kind of maintenance should I expect to do annually to keep it working properly? Are there any parts that usually need replacing after a year or two?
Annual maintenance for a sump pump typically includes cleaning the pump and pit, testing the float switch, and checking the power source to ensure everything works smoothly. It’s also wise to inspect the discharge line for blockages. Common parts that may need replacing after a year or two are the float switch and the check valve, as these can wear out with regular use. Regular checks help catch issues early and extend your pump’s lifespan.
I noticed you discussed water-powered backup pumps. Do these require any special plumbing upgrades, and how do they compare to battery backups in terms of installation cost and long-term reliability?
Water-powered backup pumps usually need a connection to your home’s municipal water supply, which may require installing a dedicated water line and backflow preventer. This can mean additional plumbing work compared to battery backups. Installation costs are often higher for water-powered systems, but they offer long-term reliability because they don’t rely on electricity or batteries. Battery backups are typically easier to install but require ongoing battery replacement.
Once I’ve picked a sump pump type, about how long does the installation usually take for someone with basic DIY experience? I want to know if this is a weekend project or something I should plan to break up over several days.
For someone with basic DIY skills, installing a sump pump usually takes between 4 to 8 hours, depending on the complexity and whether you’re replacing an old pump or starting from scratch. It’s definitely doable in a single weekend day if you gather your tools and supplies ahead of time. If you’re breaking concrete or dealing with unexpected issues, you might need an extra day for clean-up and finishing touches.
If a sump pump runs frequently but the basement still feels damp or musty, could that indicate an issue with the discharge line or installation, or is it normal even with a properly working pump?
A sump pump that runs often but still leaves your basement damp or musty could point to issues beyond just the pump itself. It might mean the discharge line is clogged, blocked, or improperly installed, preventing water from fully leaving the area. Alternatively, the pump may not be sized properly, or you could have humidity or ventilation issues unrelated to the pump. It’s worth checking both the discharge line and your basement’s ventilation.
If my area has occasional power outages and the water table isn’t super high, are water-powered backup pumps a reliable alternative to battery backup systems? I’m interested in solutions that don’t require a lot of ongoing costs or complicated setup.
Water-powered backup sump pumps can be a reliable alternative if your home has consistent municipal water pressure and your outages are not frequent or prolonged. They require less maintenance and no batteries, so ongoing costs are minimal. However, they may not work if your water supply is interrupted during an outage. If you have reliable water service, this option could suit your needs without a complicated setup.
The guide mentions that submersible pumps are quieter and more powerful compared to pedestal models, but also suggests different use cases for each. How does someone determine which type is best for their basement, particularly if their property only has occasional water issues?
If your basement only experiences water issues occasionally, a pedestal sump pump could be a good fit because it’s generally less expensive and easier to maintain, since the motor sits above the pit. Submersible pumps are better for frequent or heavy water problems due to their power and quieter operation. Consider your budget, the frequency of water entry, and available space when deciding.
Could you share specific maintenance routines I should follow for a pedestal sump pump versus a submersible one? I want to make sure I don’t overlook anything crucial, especially as a DIY beginner.
For a pedestal sump pump, regularly clean the inlet screen, check for oil leaks, and make sure the float moves freely. Since the motor sits above the pit, keep it dust-free and avoid water splashes. For submersible pumps, unplug and remove the pump yearly to clean debris from the pit and pump housing. Inspect the discharge pipe and test the pump by pouring water into the pit. In both types, check the power cord and test operation monthly.
After picking the right sump pump type, how long should a full DIY installation usually take for a first-timer? Are there major mistakes I should look out for that could cause problems down the line?
For a first-timer, a full DIY sump pump installation can typically take around 3 to 6 hours, depending on your home’s setup and your experience with basic plumbing tools. Major mistakes to avoid include incorrect pump placement, poor sealing around the pit (which can cause leaks), and improper discharge pipe installation. Also, double-check that the pump is level and that the float switch moves freely, as these can prevent future malfunctions.
When choosing between a submersible and a pedestal sump pump, are there specific basement sizes or moisture levels that would make one type more effective or reliable than the other?
Yes, basement size and moisture level do play a role. Submersible sump pumps are generally better for larger basements or areas prone to heavy flooding because they handle higher water volumes and can run longer without overheating. Pedestal pumps, on the other hand, are well-suited for smaller basements with moderate moisture since they are easier to service and typically less expensive. For frequent or heavy water issues, submersible pumps are usually more effective and reliable.
If a sump pump seems to be running nonstop even when it hasn’t been raining much, could that signal a problem with the installation or the drainage setup? What troubleshooting steps should I try before calling a professional?
A sump pump running nonstop could definitely point to an installation or drainage issue, like a stuck float switch, a check valve failure, or improper pit placement. Start by checking if the float moves freely and isn’t blocked. Ensure the discharge pipe isn’t clogged and the check valve is working. If these steps don’t resolve it, or you spot standing water around your foundation, it’s wise to consult a professional.
The article mentions advanced backup solutions like water-powered and battery backup pumps. Could you elaborate on how these compare in terms of long-term reliability and maintenance needs?
Water-powered backup pumps generally require less frequent maintenance since they rely on your home’s water supply rather than batteries, but they can be less effective if there’s low water pressure or municipal restrictions. Battery backup pumps need periodic battery checks and replacement every few years, yet they often provide stronger pumping capacity and work even if water service is interrupted. Both options can be reliable with proper upkeep, but battery models tend to need more regular attention.
You mention both water-powered and battery backup sump pumps. How do these compare in terms of reliability during extended power outages, and is one generally more cost-effective for homeowners on a budget?
Battery backup sump pumps provide reliable protection during power outages but only for as long as the battery lasts—usually a few hours up to a day, depending on usage. Water-powered backups can run indefinitely as long as you have municipal water, making them more reliable for long outages. However, water-powered systems typically have higher upfront installation costs and may increase your water bill. For homeowners on a budget, battery backups are often less expensive to install but require occasional battery replacement.
When choosing between a submersible and a pedestal sump pump, what maintenance differences should I expect over the years? I run a small business out of my home, so minimizing disruptions is important to me.
Submersible sump pumps are mostly out of sight and quieter, but they’re harder to access for maintenance or repairs since they sit underwater in the pit. Pedestal pumps are easier to reach and service because the motor stays above the pit, but they can be noisier. Over time, submersibles may require more effort to clean or replace, while pedestal pumps generally make routine care quicker and less disruptive to your daily operations.
Can you elaborate on how to determine whether a submersible or pedestal sump pump is best for a basement that occasionally gets damp but hasn’t experienced severe flooding? I’m trying to balance performance with the need for easier maintenance.
For a basement that only gets damp occasionally and hasn’t had major flooding, a pedestal sump pump may suit your needs. Pedestal pumps are easier to maintain since the motor sits above the pit, making it accessible for repairs or checks. However, submersible pumps handle larger volumes and are quieter, which might be beneficial if noise is a concern. For light, occasional dampness and straightforward maintenance, a pedestal pump should be sufficient, but choose a submersible if you want extra peace of mind and lower noise.
I’m planning to upgrade our old sump pump soon. What kind of timeframe should I expect for installation, especially if I’m hiring a professional versus trying the DIY approach you mentioned?
If you hire a professional, sump pump installation usually takes about 2 to 4 hours, depending on the complexity and site conditions. If you choose the DIY route, plan for 4 to 8 hours, especially if you’re unfamiliar with the process. The DIY approach can take longer if you need to remove the old pump, make adjustments to the pit, or handle unexpected issues.
If my sump pump is running more often than usual even when there hasn’t been a lot of rain, what troubleshooting steps would you recommend before calling in a professional?
If your sump pump is running frequently despite little rain, start by checking if the float switch is stuck or if the pit is unusually full—sometimes debris can trigger constant running. Inspect the check valve to ensure water isn’t flowing back. Also, look for any leaks in discharge pipes or drainage problems around your foundation. Addressing these basic issues might solve the problem before you need professional help.
You mentioned that submersible sump pumps are quieter and more powerful than pedestal ones, but does that mean they’re also harder to install or maintain for someone who’s new to DIY projects?
Submersible sump pumps can be a bit more challenging for beginners to install compared to pedestal models because they need to be placed at the bottom of the sump pit and may involve more steps like sealing and wiring. Maintenance isn’t much harder, but since they’re underwater, you have to remove the pump from the pit to inspect or clean it. Pedestal pumps are easier to access, making them simpler for DIYers.
I’m trying to figure out how often routine maintenance is really needed for a sump pump. Can you explain what sort of maintenance schedule I should follow to avoid my system failing during a big storm?
To keep your sump pump reliable, inspect and test it every 3 to 4 months by pouring water into the pit to ensure it activates. Also, clean the pump inlet screen and check the power supply at that time. Once a year, do a thorough cleaning of the pump and pit, and inspect the discharge line for clogs. Regular checks help prevent failures during heavy storms.
For homeowners on a budget, what are the most critical features to focus on when selecting a basic sump pump, so we can avoid overpaying but still get reliable protection during storms?
For budget-conscious homeowners, focus on a sump pump with a reliable motor (about 1/3 to 1/2 horsepower is usually enough), a durable cast iron or thermoplastic housing, and an efficient float switch. Make sure it has enough capacity for your basement size and look for a good warranty. Avoid paying extra for smart features or high-end materials that aren’t essential for basic flood protection.
You talked about maintenance routines for sump pumps—could you give specific examples of what needs to be checked and how often busy families should schedule this to avoid forgetting?
For busy families, a simple quarterly check works well. Every three months, inspect the pump for debris in the pit, test the float by pouring water in, and make sure the power cord is plugged in securely. Once a year, clean the pump and pit thoroughly and check the discharge line for clogs. Setting phone reminders helps avoid forgetting these quick checks.
You touched on maintenance routines for sump pumps. Is there a seasonal checklist or set of specific tasks that new homeowners should follow to make sure their system works properly year-round?
Yes, a seasonal checklist is very helpful for keeping your sump pump in top shape. In spring and fall, test the pump by pouring water into the pit to ensure it activates and drains correctly. Clean out debris from the pit and check the discharge line for blockages. In winter, make sure the discharge line isn’t frozen or clogged. Also, examine the power source and consider a backup battery system before stormy seasons.
You mention water-powered backup pumps for power outages. Are there specific limitations or installation challenges with those, especially for older homes with lower municipal water pressure?
Water-powered backup pumps rely on strong municipal water pressure to operate effectively. In older homes with lower water pressure, these pumps may not work efficiently or might fail to remove enough water during a flood. Installation can also be tricky if your plumbing is outdated, as modifications may be needed to meet code and ensure proper performance. Testing your home’s water pressure beforehand is important to see if this type of pump is a good fit.
I’m new to home maintenance and a bit confused about the maintenance routines mentioned for sump pumps. Can you give some real-world examples of what regular maintenance looks like, and how often I should be performing these tasks to keep the system running well?
Regular sump pump maintenance isn’t too complicated. Every 3–4 months, you should check that the pump turns on by pouring water into the pit. Clean out any debris from the pit and make sure the discharge pipe is clear. Once a year, unplug the pump, remove it, and clean both the pump and the pit more thoroughly. Also, check the float switch for smooth movement and inspect the power cord for any issues.
If I do the installation myself, are there any crucial mistakes to avoid with the discharge line placement to make sure water doesn’t just drain back toward my foundation?
Absolutely—one of the biggest mistakes is directing the discharge line too close to your home, which can cause water to flow back toward the foundation. Make sure the line extends at least 10–20 feet away from your house and slopes downward. Also, avoid draining near patios or walkways that slope back toward the structure. Double-check for any potential obstructions or low spots where water could pool and redirect back.
The article mentions water-powered backup pumps as an alternative during power outages. Are there any limitations or risks homeowners should be aware of when relying on a water-powered system instead of a battery backup?
Water-powered backup pumps can be effective, but there are some important limitations to consider. They require strong municipal water pressure to operate, so they’re not suitable if you have well water or low water pressure. They also use a significant amount of household water, which could increase your water bill. Additionally, their pumping capacity is usually lower than battery backups, so they may not keep up during heavy flooding.
Our property is in an area that occasionally loses power during storms. Would you recommend prioritizing a battery backup system or a water-powered backup pump for reliability, and are there certain brands better suited for frequent outages?
For frequent power outages, battery backup systems are often more reliable unless your water supply pressure is always strong and consistent, which is needed for water-powered pumps. Battery systems can run for several hours and are easy to maintain. Brands like Basement Watchdog and Zoeller are popular for their durability and performance in outage-prone areas. Always make sure to check the battery status regularly and replace it as recommended by the manufacturer.
Could you explain more about how to determine whether a submersible or pedestal sump pump would be better for a basement that only tends to get wet during unusually heavy storms? Are there specific signs that indicate one option will last longer or handle infrequent use better?
For basements that only get wet during rare heavy storms, a pedestal sump pump is often a reliable choice. Pedestal pumps are generally more suited to infrequent use since their motor sits above the water, reducing wear and making maintenance easier. Submersible pumps are better for frequent or heavy-duty pumping but may be more than you need. Signs like limited water volume and rare activation point to a pedestal model lasting longer in your scenario.
I noticed you emphasized regular maintenance. Can you outline a realistic schedule for checking and servicing a sump pump, particularly during rainy months, so I can ensure I’m not caught off guard by a sudden failure?
Certainly! During rainy months, check your sump pump every 1–2 weeks by making sure it turns on and removes water properly. Clear debris from the pit and inlet screen monthly. Test the float switch and backup power monthly as well. At the start and end of the season, inspect the discharge pipe and consider a professional service check once a year to ensure reliable operation.
How quickly can a typical homeowner expect to install a new sump pump system if they’re doing it themselves, and are there common mistakes that could lead to future failures or void warranties?
A typical homeowner can expect to spend about 4 to 8 hours installing a new sump pump system, depending on experience and complexity. Common mistakes include not properly sealing the pit, using the wrong pump size, poor drainage pipe installation, and skipping check valve installation. These issues can lead to pump failures or water damage and may void warranties if manufacturer installation guidelines aren’t followed closely. Always read and adhere to the manual.
I run a small business from home and am concerned about keeping my basement workspace safe. The article mentions advanced backup solutions—could you explain how a water-powered backup pump compares to a battery backup in terms of installation complexity and ongoing maintenance?
A water-powered backup pump usually requires access to your home’s municipal water supply and professional installation, since it connects directly to your plumbing. It has low maintenance needs, as there are no batteries to replace. In contrast, a battery backup pump is easier for most homeowners to install and simply plugs in, but you’ll need to check and replace the battery every few years to ensure reliability.
You mentioned that submersible sump pumps are more powerful and run quietly compared to pedestal models, but is there a particular brand or feature I should look for if my basement occasionally takes on a lot of water after storms here in Illinois?
If your basement deals with heavy water after storms, look for a submersible sump pump with at least a 1/2 horsepower motor and a cast iron core for durability. Brands like Zoeller and Wayne are known for reliability. Also, consider a pump with a high gallons-per-hour (GPH) rating and a built-in float switch. A battery backup feature is very helpful during power outages in stormy weather.
I noticed you touched on water-powered backup pumps. Are there any drawbacks to relying on municipal water for backup, especially considering water usage or local pressure limits during a storm?
Yes, there are a few drawbacks to relying on water-powered backup pumps. During heavy storms, municipal water pressure can drop if demand is high, potentially reducing the pump’s effectiveness. These systems also use a significant amount of municipal water to remove sump water, which can increase your water bill and may not be permitted during local water restrictions. It’s a good idea to check with your local water authority and consider these factors before choosing this type of backup.
I noticed you mention water-powered backup sump pumps that run off municipal water pressure. In areas with frequent power outages, are these more reliable than battery backups, or are there limitations I should consider before choosing one for my basement?
Water-powered backup sump pumps can be very dependable during power outages, as they don’t rely on electricity or batteries. However, there are a few limitations to consider: you need strong municipal water pressure, these pumps use a significant amount of water, and they’re not suitable if your home is on well water. Also, local plumbing codes may restrict their use. Battery backups work anywhere but need regular maintenance and battery replacements. Consider your water source, local regulations, and maintenance preferences when deciding.
Could you clarify how often the crucial maintenance routines should be carried out for both submersible and pedestal systems? I want to stay ahead of any problems but don’t want to overdo it either.
For both submersible and pedestal sump pumps, it’s generally recommended to check the pump and clear debris from the pit every 3–4 months. Test the system by pouring water into the pit twice a year and clean the pump screen or inlet once a year. Annual professional servicing is also wise, but you don’t need to go beyond these intervals unless your pump runs very frequently or you notice any issues.
I saw that pedestal sump pumps are easier to service than submersible models. What kind of maintenance tasks should I expect to perform regularly, and how much time or skill do they typically require for someone who likes to DIY?
With pedestal sump pumps, routine maintenance usually involves checking and cleaning the inlet screen, making sure the float switch moves freely, and inspecting the motor for dust or debris. Most tasks take 15–30 minutes and require only basic tools like a screwdriver and a brush. If you’re comfortable with simple DIY projects, you should find these tasks straightforward.
You mentioned advanced backup solutions for sump pumps. How often do these systems typically need to be tested or maintained, and is there any tech available that can send alerts when there’s a problem?
Advanced backup sump pump systems, especially battery or water-powered backups, should be tested monthly to ensure they’re working properly. Maintenance like checking batteries or clearing debris should be done at least twice a year. Many modern systems now offer smart technology that can send alerts to your phone if there’s an issue, such as power loss, pump failure, or water detected in the sump pit.
If my basement is finished and has limited crawlspace access, do you recommend any particular sump pump type or features for tighter spaces? I want to avoid tearing up too much flooring if we need a replacement.
For finished basements with tight access, consider a compact pedestal or low-profile submersible sump pump. These pumps have a smaller footprint and make installation and future replacements easier with minimal flooring disruption. Look for models with a top discharge and quick-connect fittings, which allow for easier removal and installation in confined spaces.
How effective are water-powered backup pumps compared to battery backups in areas that sometimes lose both power and municipal water during heavy storms?
Water-powered backup pumps rely on municipal water pressure, so if you lose both power and municipal water during storms, these pumps won’t function. Battery backups, on the other hand, can operate as long as the battery holds a charge, even without water supply. In areas prone to losing both, neither backup is fully reliable—consider a combination or a generator-powered system for better protection.