

Introduction: Shedding Light on Home Upgrades
Lighting is often the unsung hero of home improvement. Whether you’re looking to enhance ambiance, improve energy efficiency, or simply update outdated fixtures, a thoughtful lighting upgrade can dramatically transform your space. Yet, many homeowners underestimate the complexity of lighting projects—overlooking budget factors, local code compliance, and the impact of smart design choices. In this comprehensive guide, we’ll walk you through the nuts and bolts of home lighting upgrades: from calculating costs and navigating permits, to selecting the right fixtures and maximizing both style and function. By the end, you’ll have actionable strategies to illuminate your home beautifully, efficiently, and safely—without falling into common pitfalls.
Understanding Your Lighting Needs
Assessing Each Room’s Function
Begin your lighting upgrade with a clear sense of how each space is used. Kitchens demand bright, task-oriented fixtures, while living rooms benefit from layered lighting for flexibility. Bedrooms often require softer, adjustable lights to create a restful atmosphere. Make a list of activities performed in each area and note any pain points—such as dark corners, glare, or outdated controls—that your upgrade should address.
Evaluating Existing Wiring and Fixtures
Before you purchase new fixtures, inspect your current system. Are there signs of aging (flickering, buzzing, or warm switches)? Is your electrical panel modern enough to handle additional loads? If your home is older, you may need to update wiring to safely support new fixtures, especially for high-powered lights or smart systems.
Budgeting for a Lighting Upgrade
Major Cost Factors
- Fixture Costs: Basic flush mounts start around $20, while designer pendants or chandeliers can exceed $500 each.
- Bulbs and Controls: LED bulbs ($5–$15 each) last years but cost more upfront. Smart dimmers or switches range from $20–$60 per unit.
- Labor: Licensed electrician rates average $75–$150 per hour. Simple fixture swaps may take 30 minutes, while full rewiring or circuit updates can stretch to several days.
- Permits and Inspections: Required for new circuits or major wiring changes. Fees vary ($50–$250), depending on local regulations.
- Unexpected Expenses: Older homes may reveal unsafe wiring or require new junction boxes, adding to costs.
Sample Budget Breakdown
- Living Room (3 fixtures, dimmer): $250–$1,000
- Kitchen (4 recessed lights, pendant): $400–$1,500
- Whole Home LED Bulb Swap (20 bulbs): $120–$300
- Smart Controls (5 switches): $100–$300
- Electrician (4 hours): $300–$600
- Permit: $100
Always budget a 10–20% contingency for surprises.
Compliance and Permits: Staying Legal and Safe
When Permits Are Required
Simple fixture replacements typically don’t require a permit. However, if your upgrade involves:
- Adding new circuits
- Running new wiring
- Upgrading your electrical panel
…you’ll likely need a permit and inspection. Check with your local building department for specifics.
Understanding Electrical Codes
National Electrical Code (NEC) standards govern safe installation. Some highlights:
- All bathroom and kitchen lights must be on GFCI-protected circuits.
- Fixtures in wet locations (showers, outdoors) require damp- or wet-rated products.
- Wiring must be correctly sized for the load—don’t overload existing circuits.
Noncompliance can void insurance or cause safety hazards. When in doubt, consult a licensed electrician.
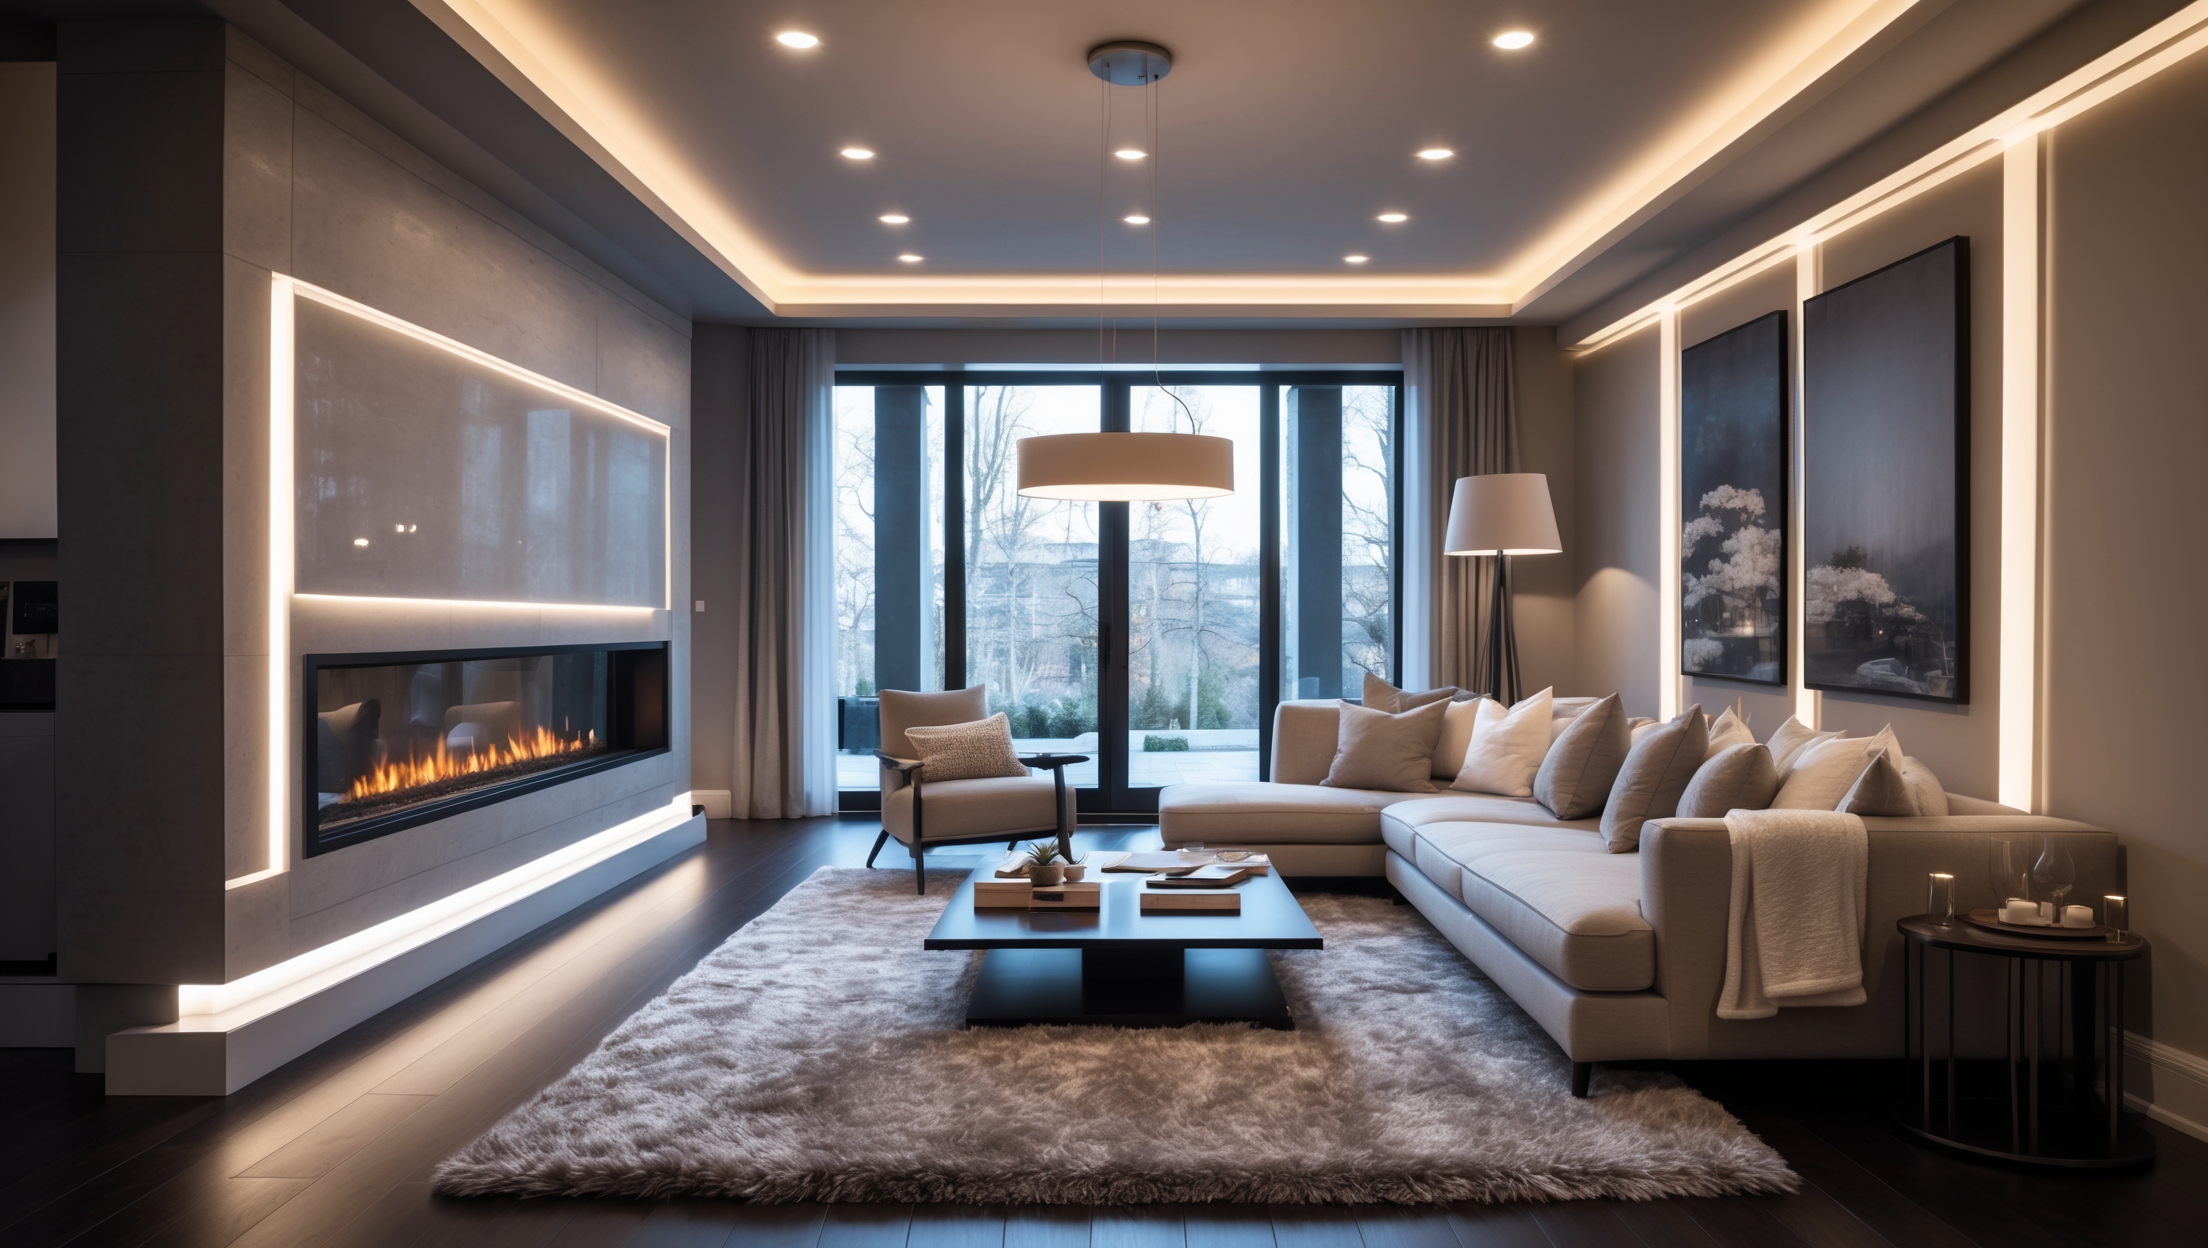
Choosing the Right Fixtures and Bulbs
Fixture Types for Every Space
- Ambient Lighting: Ceiling fixtures, chandeliers, and recessed lights provide general illumination.
- Task Lighting: Under-cabinet strips in kitchens, reading lamps in living rooms or bedrooms.
- Accent Lighting: Wall sconces, picture lights, or LED strips to highlight artwork or architectural features.
- Outdoor/Entry Lighting: Weather-rated fixtures for porches, walkways, and exterior walls.
Bulb Selection: Beyond Watts
- LED: Most efficient and long-lasting; available in a range of color temperatures (2700K for warm, 5000K for daylight).
- Color Rendering Index (CRI): A higher CRI (90+) means colors look more natural under the light.
- Dimmability: Not all LEDs are dimmable—ensure compatibility with your switches.
Smart Lighting: Modern Solutions for Efficiency and Control
Integrating Smart Bulbs and Switches
Smart lighting systems allow you to control brightness, color, and scheduling via smartphone or voice assistant. When upgrading, consider:
- Wi-Fi or hub-based systems (e.g., Philips Hue, Lutron Caseta)
- Compatibility with existing switches
- Firmware updates and app support
Energy Savings and Automation
Smart lights can be programmed for efficiency—automatically turning off when you leave, or dimming in response to daylight. Motion sensors in hallways and closets prevent wasted energy. Over time, these savings offset higher upfront costs.
Lighting Design: Maximizing Impact
Layering Light for Function and Mood
Professional designers recommend at least three layers:
- Ambient: Sets the overall brightness.
- Task: Focuses light for activities.
- Accent: Adds drama or highlights features.
Use a mix of ceiling lights, sconces, and lamps to create flexibility. Dimmer switches let you adjust for different times of day.
Common Design Mistakes to Avoid
- Over-lighting: Too much brightness is harsh and wastes energy.
- Poor placement: Avoid casting shadows on work surfaces or in reading nooks.
- Ignoring scale: Choose fixtures that fit the room’s proportions.
- Neglecting color temperature: Mismatched bulbs can make spaces feel cold or disjointed.
Step-by-Step Lighting Upgrade Process
1. Plan Your Layout
Sketch your space and mark fixture locations. Consider furniture placement and natural light sources. Use online tools or apps to visualize different lighting schemes.
2. Select Fixtures and Bulbs
Shop with your budget and design goals in mind. Double-check that all fixtures are rated for your intended locations (especially bathrooms and outdoors).
3. Check Compliance and Apply for Permits
If your plan involves new wiring or circuits, submit drawings and equipment lists to your local building department. Wait for permit approval before starting work.
4. Hire a Pro or DIY?
Simple fixture swaps are manageable for handy homeowners. For anything involving wiring changes, a licensed electrician is the safest choice. Always turn off power at the breaker before starting any electrical work.
5. Installation
- Remove old fixtures and inspect wiring.
- Install mounting hardware and connect wires according to manufacturer instructions.
- Secure fixtures, restore power, and test operation.
- Install bulbs and adjust as needed for beam angle and brightness.
6. Final Inspection
If required, schedule an inspection with your building department. The inspector will check for correct wiring, bonding, and fixture ratings.
Maintenance and Troubleshooting
Keeping Fixtures in Top Shape
- Dust and clean shades and bulbs every few months.
- Replace flickering or dim bulbs promptly.
- Check for signs of heat or discoloration—these may indicate electrical problems.
Smart Lighting Updates
Update firmware for smart bulbs and switches to maintain security and compatibility. Change Wi-Fi passwords or re-link devices as needed after router upgrades.
Safety Checklist for Lighting Upgrades
- Turn off power at the breaker before any work.
- Use a voltage tester to confirm wires are not live.
- Don’t overload circuits—calculate total wattage.
- Use fixtures rated for damp/wet locations as needed.
- Secure all connections with wire nuts and electrical tape.
- Inspect cords and sockets for wear before reuse.
- Have a fire extinguisher nearby when working on electrical systems.
Conclusion: Illuminate Your Home with Confidence
Upgrading home lighting is a high-impact improvement that pays dividends in comfort, safety, and style. By approaching your project with a clear plan—factoring in costs, compliance, and thoughtful design—you’ll avoid the missteps that frustrate so many homeowners. Remember, while DIY can be rewarding, electrical work has real risks. Never hesitate to call a licensed professional for complex installations or if you’re unsure about local codes.
Investing in energy-efficient, layered lighting not only enhances your daily living but also increases your property’s value and appeal. Embrace smart controls to further boost efficiency and convenience. With regular maintenance and attention to safety, your upgraded lighting system will provide years of reliable, beautiful illumination. Ready to flip the switch on your next home project? Let this guide be your blueprint for lighting success—one room at a time.
If my main goal is to improve energy efficiency, should I prioritize swapping old bulbs for LEDs, upgrading the fixtures themselves, or investing in smart controls? Which of these has the biggest impact on monthly electricity costs?
Swapping old bulbs for LEDs will have the biggest immediate impact on your monthly electricity costs. LED bulbs use much less power than incandescent or halogen bulbs and start saving you money right away. Upgrading fixtures and adding smart controls can also help, but LEDs offer the most noticeable efficiency gain for the least effort and cost.
When checking if my electrical panel is modern enough for new lighting, are there any specific signs or ratings I should look for? My house was built in the 1970s, and I’m not sure if it’s suited for smart switches or high-powered fixtures.
For a house from the 1970s, it’s wise to check the amperage rating of your main electrical panel—look for a label with numbers like 100A or 200A inside the panel door. Modern lighting and smart switches typically need grounded wiring and a neutral wire in your switch boxes. If your panel uses fuses instead of circuit breakers, or if you notice any corrosion or missing labeling, it’s best to have a licensed electrician assess it before upgrading.
The budgeting section breaks down fixture, bulb, and labor costs, but what should I expect as a realistic total for upgrading lighting in a medium-sized kitchen versus a living room? Are there ways to manage expenses without sacrificing quality?
For a medium-sized kitchen, you can expect a total upgrade cost between $800 and $2,000, factoring in quality fixtures, bulbs, and professional labor. A living room might range from $600 to $1,500, depending on the number and style of fixtures. To keep expenses manageable, choose energy-efficient LED bulbs, consider upgrading only the most crucial fixtures, and get multiple quotes from licensed electricians. Opting for reputable mid-range brands usually gives you good quality without the premium price tag.
If I want to swap out all my bulbs for LEDs and add a couple smart dimmers, do I need to get a permit for that or is it only necessary if I’m updating the actual wiring or electrical panel?
You don’t need a permit just to swap out bulbs for LEDs or to install smart dimmers, as long as you’re not changing any wiring or altering your electrical panel. Permits are generally only required when you’re making significant changes to the electrical system itself, like rewiring or upgrading the panel. Always make sure to follow the instructions that come with your smart dimmers for safe installation.
Could you elaborate more on the types of permits or code compliance issues that might come up during a lighting upgrade? I want to avoid any missteps, especially if I am planning to DIY some of the installation.
When upgrading home lighting, you might need an electrical permit, especially if wiring changes are involved. Common code issues include using fixtures rated for the intended location (like damp-rated lights for bathrooms), grounding all metal boxes, and ensuring circuits aren’t overloaded. Also, check your local codes for requirements on energy-efficient bulbs or smart lighting. If you’re DIY-ing, it’s smart to consult your local building authority about permits before starting.
I’m curious about budgeting—how much should I expect to pay for labor if I’m just doing a few rooms, not the whole house? Does the age of my home generally increase installation costs?
For a few rooms, labor costs can range from $50 to $100 per hour, with total installation usually between $200 and $800 depending on the complexity. Older homes often cost more to upgrade because wiring may need updating or access can be trickier. If your electrical system is outdated, factor in additional costs for code compliance or unexpected repairs.
I see you talk about permitting and local code compliance. Can you clarify which types of lighting upgrades typically require permits, and how a business owner can make sure they’re not missing any necessary steps?
Permits are usually needed for lighting upgrades that involve new wiring, circuit changes, or major fixture installations, especially if they affect building safety. Simply swapping out bulbs or fixtures often doesn’t require a permit. To be sure you’re compliant, check with your local building department before starting any project, and consider consulting a licensed electrician familiar with local codes.
Could you explain more about the process of checking if an older home’s electrical panel is modern enough for new lighting fixtures? What specific signs should I look for before deciding to upgrade the panel along with the lighting?
To check if your older home’s electrical panel can handle new lighting fixtures, look for signs like frequent tripped breakers, flickering lights, or a lack of available breaker slots. Panels rated below 100 amps may be outdated. Also, if there’s visible rust, old fuse-based panels, or buzzing sounds, it’s time to consult an electrician. Before upgrading lighting, make sure your panel is safe and has enough capacity for additional electrical load.
With fixture prices ranging so widely from $20 to over $500, how do you recommend budgeting for a whole-house lighting upgrade if I want to mix basic and designer pieces? Are there rooms where it makes sense to splurge and others to save?
When planning your lighting budget, consider prioritizing rooms where you’ll spend the most time or entertain guests, like the living room, dining room, or entryway—these are great spots for designer fixtures. In areas like laundry rooms, closets, or hallways, more basic, cost-effective options usually work well. Set an overall budget, then allocate more to your key spaces while using affordable fixtures elsewhere to balance style and cost.
What are the key local code requirements I should be aware of before replacing or adding new light fixtures in a renovated kitchen? I want to make sure I don’t run into permit issues mid-project.
Before upgrading or adding light fixtures in your renovated kitchen, check your local building codes for requirements like proper fixture ratings (especially over sinks), minimum spacing from combustible materials, and adherence to GFCI/AFCI protection for outlets. Kitchens often require dedicated circuits and compliance with energy efficiency standards. Also, permits are usually needed for new wiring or relocating fixtures. Contact your local building department for specifics to ensure your project stays compliant and on schedule.
If I’m planning to add smart lighting controls to a kitchen remodel, does the existing wiring need a full update or are there specific upgrades just for smart systems? The article mentions checking the electrical panel, but I’d like more detail on what to watch for.
When adding smart lighting controls, a full wiring update usually isn’t required unless your existing system is outdated or unsafe. Most smart switches and dimmers can be installed using standard wiring, but they often need a neutral wire—older homes sometimes lack this. Check if your switches have a neutral wire available, and confirm your electrical panel can handle any new load. Also, make sure there’s enough space in switch boxes for smart devices, as they can be bulkier than standard switches.
I noticed you suggested making a list of activities in each room before planning the lighting upgrade. Could you share an example of what that list might look like for a kitchen versus a living room?
Of course! For a kitchen, your list might include activities like meal prep, cooking, reading recipes, eating, and cleaning. For a living room, it could be watching TV, reading, playing games, socializing, or relaxing. Listing these helps you choose lighting that supports each activity, like bright task lighting for cooking and softer lights for relaxing.
You mentioned local code compliance and permits—how do I find out if I need a permit just to swap out old light fixtures for new ones, especially if I’m not changing the wiring?
If you’re just replacing old fixtures with new ones and not altering the wiring, most areas don’t require a permit for that task. However, requirements can vary by city or county. The best way to be sure is to contact your local building department or check their website for electrical permit information related to lighting upgrades.
The article mentions the importance of checking if your electrical panel can handle new lighting loads, especially in older homes. How can a homeowner determine if their current panel is sufficient or if an upgrade is necessary before starting a lighting project?
To determine if your electrical panel can handle new lighting loads, start by checking the panel’s amperage, which is usually labeled inside the panel door. Add up the wattage of your planned new lights and compare this with the panel’s capacity, factoring in your current household usage. If the panel is older, often 60 or 100 amps, or if your breakers frequently trip, it’s wise to consult a licensed electrician. They can assess your panel’s load capacity and advise if an upgrade is needed before adding more lighting.
For homes with an older electrical panel, are there certain warning signs homeowners should watch for before starting a lighting project, or is an inspection by a licensed electrician always recommended?
If your home has an older electrical panel, keep an eye out for warning signs like frequently tripped breakers, flickering lights, buzzing sounds, or warm spots around the panel. These can signal potential issues. Even if you don’t notice these signs, having a licensed electrician inspect your system before a lighting upgrade is a smart move to ensure everything is safe and up to code.
The article mentions smart dimmers and switches, which sound useful. Is it difficult to swap out old controls for these smart options, or is that something a beginner can tackle without messing up the wiring?
Switching to smart dimmers and switches can be pretty straightforward if you’re comfortable turning off power at the breaker and following wiring diagrams. Most smart controls are designed to fit into standard wall boxes using the existing wiring. However, some models require a neutral wire, which older homes may not have. If you’re unsure, it’s wise to consult an electrician to ensure safety and proper installation.
You mention that older homes might require wiring updates before adding new fixtures or smart systems. How can a homeowner determine if their current wiring is up to code, and what sort of costs should we expect if rewiring is needed during a lighting upgrade?
To determine if your home’s wiring is up to code, consider having a licensed electrician inspect your electrical system, especially if your home is over 30 years old or shows signs like flickering lights or outdated fuse boxes. Costs for rewiring vary based on your home’s size and complexity, but for a standard single-family home, expect estimates ranging from $3,000 to $10,000. The electrician can provide a detailed assessment and quote tailored to your needs.
I saw that basic flush mounts start at $20 but designer options are much higher. Is there any noticeable difference in quality or safety between budget and high-end fixtures, or is the price mostly about design?
Budget flush mount fixtures often use simpler materials and finishes, and may have shorter lifespans or less refined craftsmanship compared to high-end designs. However, both budget and designer fixtures must meet the same safety standards. Most of the price difference comes from design, materials, and brand reputation rather than safety or basic functionality.
If I’m mainly upgrading to LEDs for energy savings, is it worth spending extra on smart controls right away, or can I add those later without redoing all the wiring?
You can definitely start with just upgrading to LED bulbs and add smart controls later. Most modern smart lighting systems, like Wi-Fi or Zigbee bulbs and switches, are designed to work with existing wiring, so you typically won’t need to redo anything. Just make sure your fixtures are compatible if you plan to go smart in the future.
You mention that fixture costs can range significantly, from basic flush mounts to designer pieces over $500. Do you have any advice on balancing style with budget, especially in rooms where both function and aesthetics matter?
To balance style with budget, focus your spending on statement fixtures in key areas like the dining room or entryway, where aesthetics matter most. In functional spaces such as kitchens or hallways, look for quality budget-friendly fixtures with clean lines. Mix and match by pairing basic lights with one or two designer pieces, and consider using dimmers or updated bulbs to enhance the ambiance without overspending.
When layering lighting in a living room as recommended, do you have tips for preventing glare or uneven brightness, especially if I want to keep my current recessed lighting and just add new fixtures?
To prevent glare or uneven brightness while layering lighting, try using dimmers on your recessed lights so you can balance them with new fixtures. Choose lampshades or diffusers for added fixtures to soften direct light. Position floor or table lamps to fill dark corners, but avoid placing them where the bulbs are in your direct line of sight. Mixing light sources at different heights also helps create a comfortable, even glow.
For budgeting purposes, could you clarify if labor costs typically scale based on the number of fixtures, or is it more about the complexity of installation and upgrades to wiring?
Labor costs for home lighting upgrades usually depend on both the number of fixtures and the complexity of the work. Simple fixture swaps may be charged per unit, but if new wiring, switches, or compliance upgrades are needed, complexity plays a bigger role in pricing. Electricians often provide estimates that take both factors into account, so be sure to get a detailed quote.
If my older home has some flickering switches but they only happen occasionally, do I need to prioritize rewiring before adding new lighting or upgrading to smart controls, or are there safer interim solutions?
Occasional flickering can signal loose connections or aging wiring, which could become a safety issue if left unchecked. Before making upgrades or adding smart controls, it’s wise to have a licensed electrician inspect the affected switches and circuits. Sometimes, tightening connections or replacing faulty switches solves the problem, but if wiring is outdated, rewiring may be the safest long-term option.
When evaluating existing wiring for a lighting upgrade, how can homeowners know if their electrical panel is modern enough to handle added loads, especially for smart systems? Are there specific warning signs or is it best to always consult a licensed electrician before purchasing new fixtures?
Homeowners can start by checking the age and amperage rating of their electrical panel—modern panels are typically at least 100 amps and have clear breaker labels. Warning signs your panel might not be sufficient include frequent breaker trips, buzzing noises, or visible rust. For smart lighting systems, which may add to the load, it’s safest to consult a licensed electrician before making purchases, especially in older homes.
If I want to install smart switches or dimmers in my business, are there usually extra permit or code requirements, or is it generally straightforward if my wiring is up to date?
Installing smart switches or dimmers in a business setting is often straightforward if your wiring is modern and meets current standards. However, commercial properties sometimes have stricter electrical codes than homes. You may need a permit or inspection, especially if you’re changing wiring or working in public areas. It’s a good idea to check with your local building department or a licensed electrician before starting the upgrade.
You mention that smart dimmers and switches can run $20 to $60 each. In your experience, is it worth splurging on these upfront for the energy savings and convenience, or would basic controls suffice for most homes?
Smart dimmers and switches do add convenience, like remote control and automation, which many people find worthwhile, especially in living rooms, bedrooms, or for whole-home systems. However, the actual energy savings are usually modest, mostly coming from dimming lights rather than the smart features themselves. For most homes, basic dimmers or switches are perfectly adequate unless you want those added smart functions or plan to expand your system over time.
I see labor costs for licensed electricians are a big part of the budget. Any tips on which lighting upgrades a confident DIYer can tackle safely versus what definitely requires hiring a pro, especially in older homes?
In older homes, any work that involves modifying or extending existing wiring—such as adding new circuits or fixtures—should be left to a licensed electrician, especially if you’re unsure about the condition of the wiring or grounding. However, confident DIYers can usually handle tasks like swapping out light fixtures with similar ones, replacing bulbs, or installing smart switches (as long as the wiring matches and the power is off). Always turn off the circuit at the breaker and verify there’s no power before starting.
If I want to start with just one room to upgrade lighting for both function and style without overhauling the whole house, is the kitchen or living room a better place to begin?
Choosing between the kitchen and living room depends on your priorities. If functionality is key, the kitchen is often the best starting point since good lighting improves both safety and task efficiency. For a noticeable style upgrade and ambiance, the living room is ideal, as it’s a central gathering space. Start with the room where improved lighting will make the most positive impact on your daily life.
For older homes with flickering or buzzing lights, is rewiring usually a major project that takes days, or can it be a quick fix? What signs should I look for to decide if a full wiring upgrade is actually needed?
Flickering or buzzing lights in older homes can sometimes be fixed quickly—like tightening a loose bulb or replacing a faulty switch. However, if these problems happen throughout the house, it could signal outdated or unsafe wiring. Signs that a full wiring upgrade might be necessary include frequent blown fuses, discolored outlets, burning smells, or electrical shocks. In such cases, rewiring can be a major project and usually takes several days, depending on the home’s size and accessibility.
If my house has older wiring and I want to add smart switches as you mentioned, is this a job a beginner DIYer can handle safely, or should I definitely hire a pro electrician?
If your home has older wiring, installing smart switches can be tricky because older systems may lack a neutral wire, which many smart switches need. Safety is a major concern, especially if you’re unfamiliar with electrical work. For older homes, it’s best to hire a licensed electrician to assess your wiring and handle the installation to ensure everything is up to code and safe.
If my living room has a lot of dark corners even after changing bulbs, does that usually mean I need more fixtures or should I look into layered lighting options like the article suggests?
If you still have dark corners after upgrading your bulbs, it’s likely that adding more fixtures or using layered lighting is the best solution. The article highlights that combining ambient, task, and accent lighting can help brighten up those shadowy areas and give your living room a more balanced feel. Consider adding floor lamps, wall sconces, or table lamps in the darker spots for a more inviting space.
The article mentioned that permit requirements can be a factor when upgrading home lighting. In your experience, how often do lighting upgrades in older homes actually require pulling a permit, and are there ways to streamline the process to avoid delays?
In many older homes, you typically need a permit if the lighting upgrade involves new wiring, moving electrical boxes, or adding circuits. Simple fixture swaps often don’t require one. To streamline the process, check with your local building department first and prepare all necessary documents up front. Hiring a licensed electrician can also help, as they’re familiar with permitting requirements and can handle submissions efficiently.
If I want to upgrade the lighting in only the bedrooms and living room, should I expect to need any permits or wiring updates, or is that mostly for kitchen projects? My home was built in the 1980s so I’m a little nervous about any hidden electrical issues.
For bedroom and living room lighting upgrades, permits usually aren’t needed if you’re just swapping out fixtures. However, if you plan to add new wiring or move switches, you might need a permit, especially in older homes like yours from the 1980s. Since older wiring can sometimes be outdated or show wear, it’s a good idea to have a licensed electrician check things before starting—this helps avoid surprises and keeps everything up to code.
If my main goal is to boost energy efficiency throughout my house, which provides the better return: investing in all new LED bulbs and smart switches, or upgrading to high-end, energy-efficient fixtures?
Switching all your bulbs to LEDs and adding smart switches usually offers a faster, higher return on investment for energy efficiency. LEDs use much less power and last longer, while smart switches help avoid wasted electricity. Upgrading to high-end fixtures can be beneficial, but it’s generally more expensive and the efficiency gains over quality LED bulbs are typically smaller.
When assessing the function of each room as you suggest, how do you balance the need for bright task lighting in a kitchen with the desire for a softer ambiance in the same space?
Balancing bright task lighting with a softer ambiance in a kitchen is often achieved by layering different light sources. Consider installing bright, focused lights like under-cabinet LEDs for tasks such as chopping, while using dimmable ceiling fixtures or pendant lights to create a gentle overall glow. This way, you can adjust the lighting depending on whether you’re cooking or entertaining.
I’m curious about the process of updating the electrical panel if it turns out our current one isn’t modern enough for new lighting. Is this usually a major project, and should I expect it to add significantly to the overall cost and timeline for a typical lighting upgrade?
Upgrading an electrical panel can be a significant part of a lighting project, especially if your current panel lacks the capacity or safety features needed. It usually involves shutting off power, removing the old panel, installing the new one, and updating circuits. This often requires a licensed electrician and can add both time and cost—sometimes several thousand dollars and a few extra days, depending on complexity and permits. Factoring this into your budget and timeline is wise if you suspect your panel is outdated.
I have an older home and some of my light switches are warm to the touch, as mentioned in your wiring section. How big of a safety concern is this, and should I have an electrician look at it before upgrading any fixtures?
Warm light switches can be a sign of overloaded circuits, faulty wiring, or defective switches, which could be a fire hazard. It’s important not to ignore this, especially in an older home. Before upgrading any fixtures or making other changes, you should have a licensed electrician inspect the switches and wiring to ensure everything is safe and up to code.
The article says to assess each room’s function before planning lighting, but I’m not sure how to choose the right fixture style for a multi-use living room that doubles as a workspace. Any tips on balancing flexibility and ambiance?
For a multi-use living room, aim for a layered lighting approach. Use overhead fixtures like dimmable ceiling lights for general illumination, then add floor or table lamps for task lighting at your workspace. Wall sconces or accent lights can create a cozy ambiance when you’re relaxing. Choose fixtures with adjustable brightness and consider styles that blend well with both work and leisure settings for a flexible, cohesive look.
When updating lighting in an older house, what are the main signs that my electrical panel might not be modern enough to support new smart systems or high-powered fixtures?
Some signs your electrical panel may not be up to date for smart systems or high-powered fixtures include having a panel with fuses instead of circuit breakers, visible signs of wear or corrosion, limited available circuit spaces, or a lower amperage rating (like 60 or 100 amps instead of 200). If your lights flicker when other devices run, or breakers trip often, it’s a clue your panel might need an upgrade before adding more advanced lighting.
The article mentions local code compliance. What are some common electrical code issues homeowners encounter during lighting upgrades, and how can I research what permits I might need in my area?
Common electrical code issues include using incorrect wire types, overloading circuits, installing non-rated fixtures in damp locations, and not properly grounding fixtures. To find out about permits, contact your local building department or visit their website. They often provide detailed guidelines about electrical work rules and permit requirements based on your location.
The article talks about navigating permits and code compliance. If it’s just a few fixture replacements and not a full rewiring, do I still need to worry about permits or inspections, or is that only for bigger electrical projects?
For simple fixture replacements—like swapping out light fixtures without altering wiring—permits and inspections typically aren’t required. These rules can vary by location, so it’s a good idea to check your local building department’s guidelines just to be sure. Full rewiring, new circuits, or moving electrical boxes usually trigger the need for permits and inspections.