

Introduction: Why Subfloor Repairs Matter in Home Improvement
If you’ve ever felt a soft spot under your feet, heard a suspicious creak, or noticed uneven flooring, your home’s subfloor might be trying to get your attention. The subfloor is the unsung hero of a solid, comfortable home—supporting everything above it, from hardwood planks to plush carpet. Yet, it’s often overlooked until trouble strikes. Neglecting subfloor issues can lead to persistent squeaks, warped or sloping floors, and even costly structural damage. Tackling subfloor repairs isn’t just about comfort; it’s about protecting your home’s integrity and your investment.
This comprehensive guide is designed to demystify the process of repairing a damaged subfloor. Whether you’re a seasoned DIYer or a first-timer, you’ll find practical advice on identifying subfloor problems, understanding the tools required, budgeting for materials, and following a safe, step-by-step repair process. We’ll also cover essential safety considerations and tips to avoid common pitfalls. By the end, you’ll have the confidence and know-how to restore a sturdy foundation beneath your feet—and peace of mind above it.
Understanding Subfloor Problems: Causes and Warning Signs
What Is a Subfloor?
A subfloor is the structural layer between your home’s joists and the finished flooring surface. Typically made from plywood or oriented strand board (OSB), it provides the necessary support for flooring materials like hardwood, laminate, tile, or carpet.
Common Causes of Subfloor Damage
- Water Intrusion: Leaks from plumbing, roof, or windows can cause the subfloor to rot or delaminate.
- Poor Installation: Inadequately spaced fasteners, insufficient adhesive, or improper materials can lead to movement and squeaking.
- Termite or Pest Infestation: Insects can eat away at wooden subfloor panels, weakening their structure.
- Heavy Loads: Large appliances or oversize furniture can compress or crack subflooring over time, especially if the joist spacing is inadequate.
Warning Signs You Need Subfloor Repairs
- Persistent squeaks or creaks in certain floor areas
- Soft spots or uneven sections underfoot
- Visible sagging, warping, or separation in finished flooring
- Moldy, musty odors coming from beneath the floor
- Water stains or discoloration on the ceiling below (in multi-level homes)
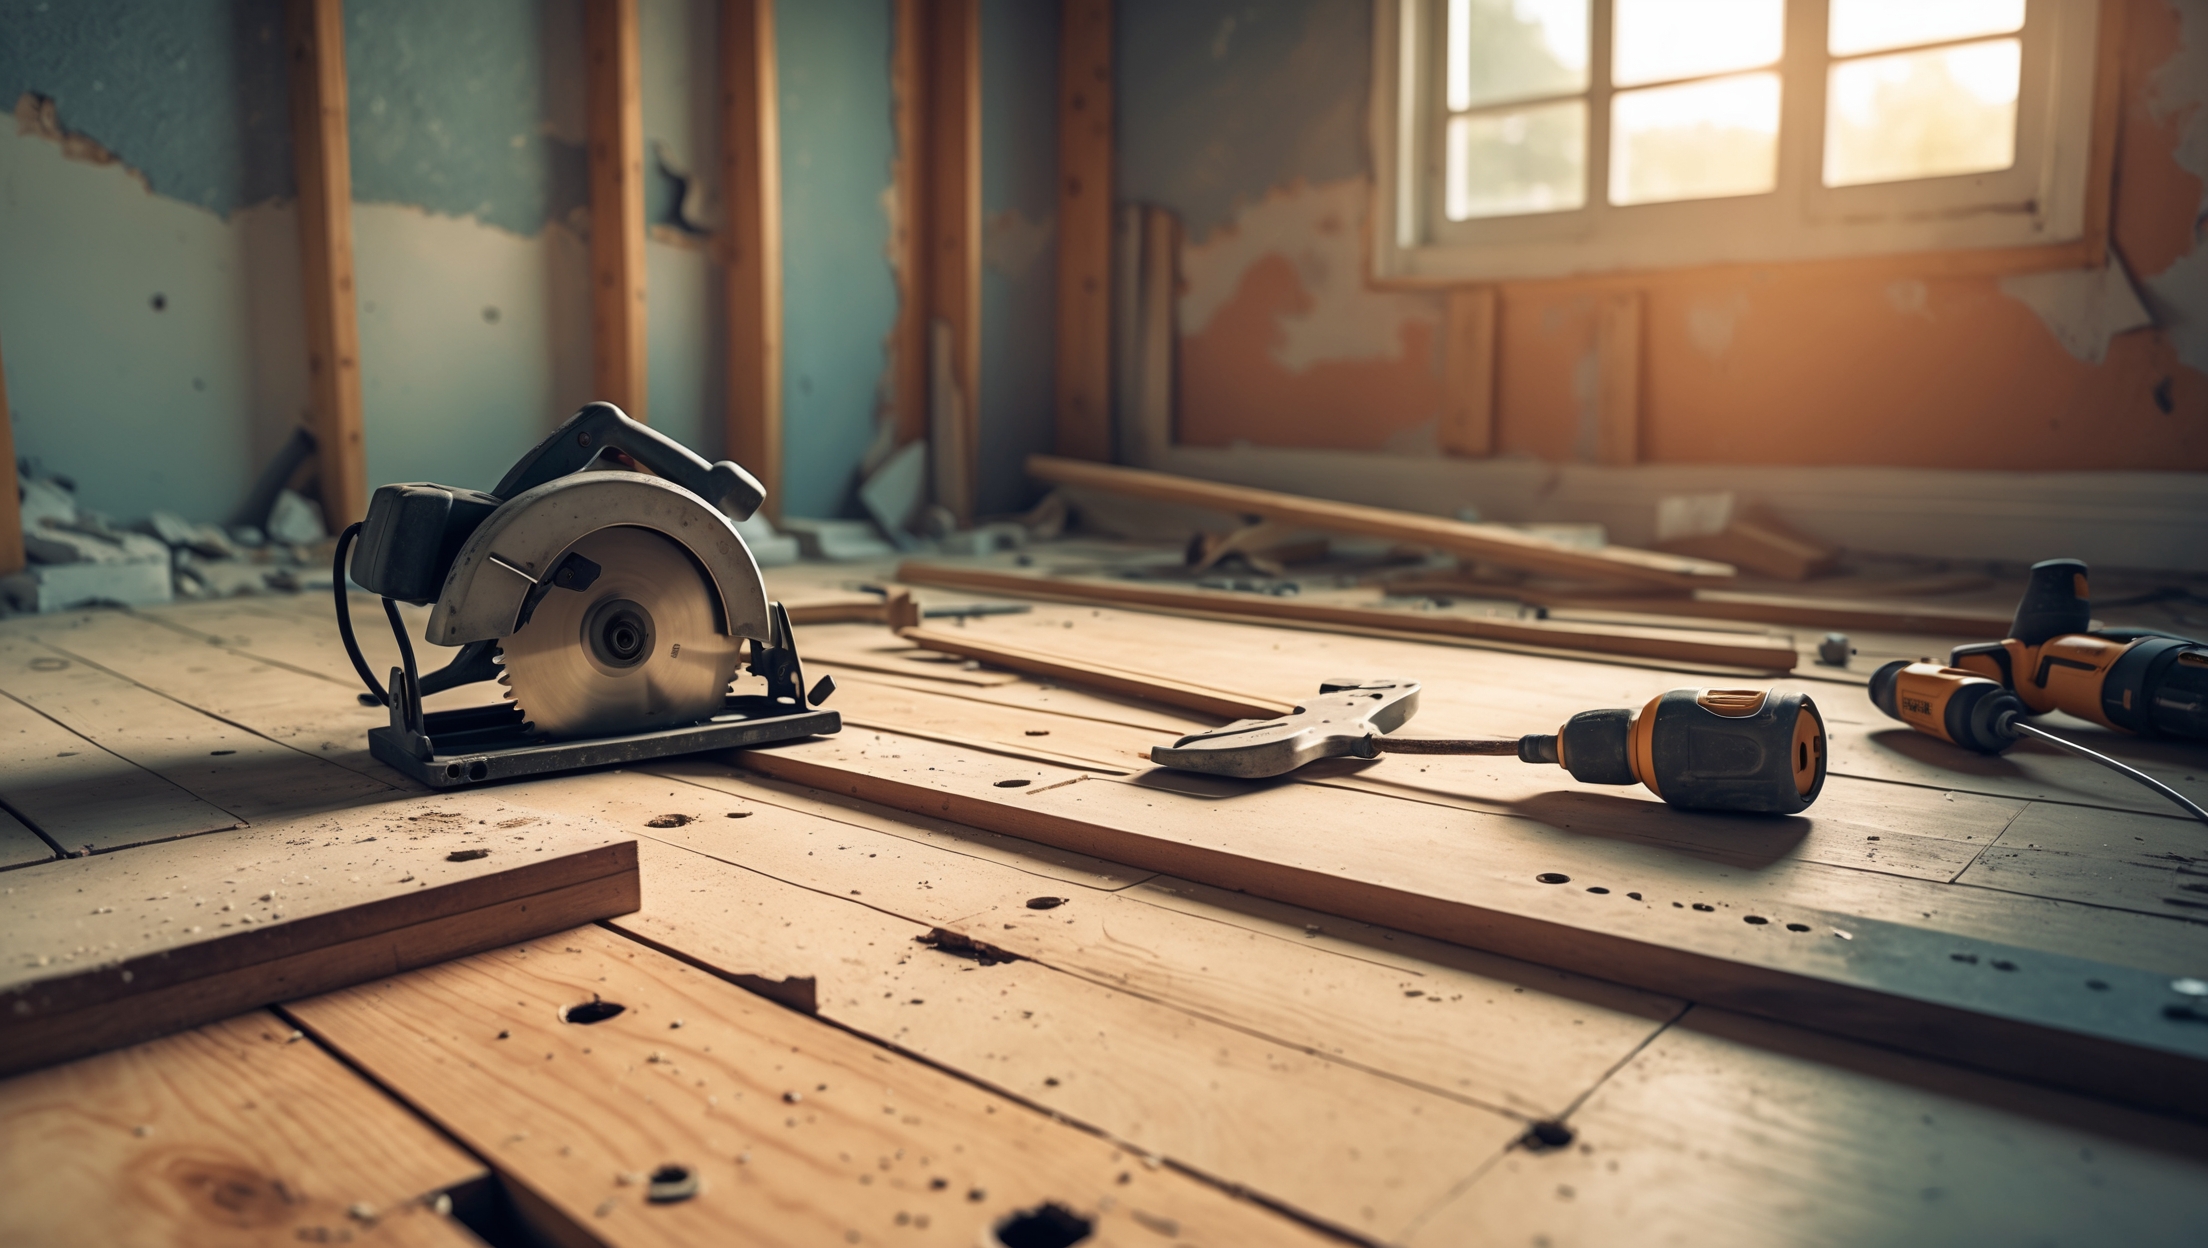
Essential Tools and Materials for Subfloor Repairs
Hand Tools
- Pry bar (for removing floor coverings and nails)
- Claw hammer
- Chisel (for stubborn nails or adhesive)
- Measuring tape and carpenter’s square
- Utility knife (for cutting carpet or vinyl)
Power Tools
- Circular saw (for cutting damaged subfloor panels)
- Drill/driver (for securing new panels and joist reinforcement)
- Oscillating multi-tool (for flush cuts in tight spaces)
- Shop vacuum (for dust and debris removal)
Materials
- Replacement subfloor panels (plywood or OSB, thickness must match existing)
- Construction adhesive (for panel-to-joist bonding)
- Deck or subfloor screws (2–2.5” length, corrosion-resistant)
- Wood blocking or sistered joists if structural reinforcement is needed
- Safety gear: gloves, safety glasses, dust mask, knee pads
Cost Breakdown: Budgeting for Subfloor Repairs
Material Costs
- Plywood/OSB panels: $35–$75 each (4×8 foot, 3/4” thick)
- Construction adhesive: $5–$10 per tube (expect 1–2 tubes per panel)
- Screws: $8–$15 per box (covers multiple panels)
- Wood blocking/joist material: $5–$15 per 8-foot length
Tool Costs (if you need to purchase)
- Circular saw: $60–$150
- Oscillating multi-tool: $80–$120
- Drill/driver: $60–$200
- Pry bar, hammer, measuring tools: $30–$50
Labor Costs (if hiring a professional)
- Hourly rate: $50–$100 per hour (varies by region and complexity)
- Typical project total: $500–$2,500 for moderate repairs in a single room
Hidden Costs to Consider
- Disposal fees for old subfloor and flooring materials
- Replacement of damaged insulation or vapor barriers
- Potential need for pest or mold remediation
- Temporary relocation of furniture or appliances
Step-by-Step Subfloor Repair Process
1. Preparation and Safety First
- Clear the room of furniture, rugs, and valuables.
- Shut off power to outlets in the work area if electrical lines run beneath the floor.
- Wear gloves, safety glasses, and a dust mask to protect against debris and dust.
2. Remove the Finished Flooring
- Carpet: Use a utility knife to cut into manageable sections, then pull up with pliers.
- Hardwood or Laminate: Pry loose with a pry bar, starting at a seam or edge.
- Tile: Chisel and hammer to break up tiles, then scrape away adhesive.
- Set aside reusable materials; dispose of damaged sections responsibly.
3. Inspect and Mark the Damaged Subfloor Sections
- Check for soft, sagging, or discolored areas.
- Probe with a screwdriver to test for rot or delamination.
- Mark the perimeter of damaged sections with chalk or a marker. Ensure cuts fall in the center of joists for solid support.
4. Cut Out the Damaged Subfloor
- Set circular saw blade depth to just exceed subfloor thickness (usually 3/4”).
- Carefully cut along the marked lines, avoiding pipes, wires, and framing.
- Use an oscillating multi-tool for corners and areas near walls.
- Pry up the cut panel; remove all fasteners from joists.
5. Inspect and Reinforce Joists
- Look for water, mold, or pest damage to underlying joists.
- If joists are compromised, sister a new joist alongside using carriage bolts or lag screws.
- Add wood blocking between joists if needed for extra support at panel seams.
6. Install the Replacement Subfloor Panel
- Cut a new panel to size for a snug fit.
- Apply a generous bead of construction adhesive to joist tops and blocking.
- Set the panel in place, ensuring all edges are well-supported.
- Secure with subfloor screws every 6–8 inches along joists and every 12 inches in the field.
- Countersink screw heads slightly below the surface.
7. Seal and Prepare for New Flooring
- Fill any gaps with wood filler or construction adhesive.
- Sand flush if necessary for a smooth surface.
- Inspect carefully for squeaks—add screws if any movement is detected.
- Install new underlayment or vapor barrier as needed before re-laying finished flooring.
Safety Checklist for Subfloor Repair Projects
- Always locate and avoid electrical wiring and plumbing before cutting.
- Use appropriate personal protective equipment: gloves, eye and respiratory protection, knee pads.
- Keep work area well-ventilated, especially if mold or adhesives are present.
- Lift with your legs, not your back, when moving heavy panels.
- Dispose of debris and old materials in compliance with local regulations.
Maintenance Best Practices: Extending Your Subfloor’s Life
Preventing Future Damage
- Address leaks and spills immediately; use waterproofing in wet areas (kitchens, bathrooms).
- Insulate crawlspaces and basements to control moisture.
- Use area rugs or pads in high-traffic zones to reduce wear.
- Inspect annually for squeaks, soft spots, or signs of pests.
When to Call a Professional
- Extensive water or pest damage spanning multiple rooms
- Structural joist repairs beyond basic blocking or sistering
- Mold remediation requiring containment or specialized treatment
- Electrical or plumbing rerouting during repairs
Conclusion: Building Confidence from the Ground Up
Repairing your home’s subfloor may seem daunting, but with careful planning, the right tools, and a step-by-step approach, it’s a manageable project for many committed DIYers. Addressing subfloor issues promptly prevents minor annoyances from becoming major structural headaches, saving you money and stress in the long run. By understanding the warning signs of damage, budgeting for both expected and hidden costs, and following proven repair techniques, you’ll restore both the comfort and value of your home.
Remember, safety is paramount—take the time to prepare your workspace and protect yourself throughout the process. Don’t hesitate to consult a professional if you encounter extensive damage or structural issues beyond your comfort level. Regular inspections and preventative maintenance will help you catch small problems before they escalate, ensuring your floors stay solid and secure for years to come.
Whether you’re repairing a single squeaky board or replacing an entire room’s subfloor, this guide equips you with the knowledge and confidence to tackle the job right. Every sturdy step you take is a testament to your commitment to a safe, comfortable, and resilient home.
If I start noticing squeaks and a slight slope in my living room floor, should I be concerned about immediate structural danger, or is this typically something that can wait until I have more time to tackle the repair?
Squeaks and a slight slope are usually signs of normal wear or minor issues like loose boards or settling, not immediate structural danger. However, if the slope gets worse, you notice cracks, or doors and windows stop working properly, it could indicate a bigger problem that needs prompt attention. Otherwise, you can typically schedule repairs when it’s convenient.
I noticed you mentioned both plywood and OSB as common materials for subfloors. Is there a significant difference between repairing plywood versus OSB subfloors, or do the steps and tools stay pretty much the same?
The repair process and tools are quite similar for both plywood and OSB subfloors. You’ll still need to cut out damaged areas, secure replacement panels, and ensure everything is level. However, OSB can be more prone to swelling if it’s gotten wet, so make sure it’s fully dry before repair. Otherwise, basic steps and materials remain the same for both types.
When dealing with squeaky floors, how can you tell if the issue is with the subfloor versus the finished flooring above it? Are there any telltale signs mentioned in your guide that can help pinpoint the exact source before starting repairs?
To differentiate between squeaks from the subfloor and those from the finished flooring, listen for the location and type of noise. If the squeak is sharp and only happens when stepping directly on certain boards, it’s often the finished floor. If the noise is more muffled and seems to come from deeper below, the subfloor may be the culprit. The guide also notes that movement or sagging underfoot usually points to subfloor issues.
When you mention that heavy appliances or large furniture can eventually compress or crack subflooring, how do you determine if a spot is structurally compromised or just squeaky? Are there tests or signs beyond just feeling it move underfoot?
Besides movement or squeaking, check the area for visible sagging, dips, or cracks in the floor covering. Push down firmly to see if the floor feels spongy or gives way more than nearby spots. Tapping with a rubber mallet can also reveal hollow or weak-sounding areas, which might indicate damage beneath the surface. If in doubt, lifting a small section of flooring to inspect the subfloor directly is the most reliable way to assess structural compromise.
In the step-by-step process, how long does it usually take for a first-time DIYer to complete a basic subfloor repair in a single room? I want to plan ahead so I can arrange furniture and family schedules.
For a first-time DIYer, repairing a basic subfloor in a single room typically takes between one and two days. This includes removing furniture, pulling up flooring, making the repair, and allowing any adhesives or leveling compounds to set. It’s best to plan for the room to be out of use for a full weekend to account for unexpected delays or drying times.
Can you give some advice on how to tell the difference between squeaks caused by the subfloor versus ones from the finished flooring above? We have laminate in some areas and carpet in others and I’m not sure where to start troubleshooting.
To tell if squeaks are from the subfloor or the finished flooring, try walking slowly over the noisy area while someone else listens below, if possible. With laminate, squeaks are often from movement between boards or at joints—press down and see if only the top layer shifts. For carpeted areas, press down firmly; if you feel give or movement, it may be the subfloor. Also, subfloor squeaks tend to sound deeper and persist regardless of flooring, while finished flooring noises are lighter and may change when you step in different directions.
If I discover water damage in the subfloor around my kitchen, how can I tell if it’s just the subfloor or if the joists underneath are also affected? Are there warning signs I should look for before removing any flooring?
To check if joists are affected, look for signs like sagging floors, uneven surfaces, or a springy feel when you step in the area. You might also notice visible mold or a musty odor. If possible, peek through existing gaps or vents to inspect for discoloration or rot in the joists. Before removing flooring, these clues can help you judge whether the problem extends below the subfloor. For certainty, a closer inspection after lifting a small floor section is often necessary.
Could you clarify what specific safety equipment I should have on hand before starting subfloor repairs? I want to make sure I’m fully prepared, especially if there’s potential for pest issues or mold.
Before starting subfloor repairs, you should have sturdy gloves, safety goggles, and a dust mask or respirator to protect against dust, mold spores, and pest droppings. Wear long sleeves and pants, and consider knee pads for comfort. If you suspect mold, use an N95 respirator and disposable coveralls. Always keep a first aid kit nearby and ensure the area is well-ventilated during your work.
You mentioned using different tools for subfloor repairs—are there any specific brands or types of saws and fasteners that you find especially reliable for DIY projects, or is it fine to use basic equipment for most jobs?
For most DIY subfloor repairs, you can get solid results with basic tools, but some brands do stand out for reliability. For saws, a circular saw from DeWalt or Makita is both durable and user-friendly. For fasteners, look for construction screws or ring-shank nails from brands like GRK or Simpson Strong-Tie, which are well-suited for subfloor work. If you’re tackling a small area, basic equipment works, but investing in quality tools can make the job easier and last longer.
For someone tackling their first subfloor repair, about how much time should I set aside for the full project, from identifying the problem spot to finishing the flooring again, assuming just minor repairs?
For a first-time DIYer handling minor subfloor repairs, you should plan for a full weekend. Typically, expect to spend 1–2 hours identifying and prepping the area, about 3–5 hours for the actual repair (cutting, replacing, and securing new subfloor), and another 2–3 hours for reinstalling and finishing the flooring. Take your time with each step and allow for drying or setting time if adhesives or leveling compounds are needed.
I noticed you mentioned water intrusion as a common cause of subfloor issues. If the water damage is limited to a small area, is it possible to just repair that section, or is a full subfloor replacement usually necessary?
If the water damage is limited to a small section of your subfloor, you can usually repair just that affected area rather than replacing the entire subfloor. The key is to ensure the damaged wood is fully removed and the source of the water intrusion has been addressed before patching or replacing the section. Always check surrounding areas for hidden moisture to prevent future issues.
I have a persistent squeak in my living room, but I can’t see any visible signs of damage from above. How can I tell if the squeak is a minor issue or a sign that I need a full subfloor repair?
A persistent squeak without visible damage above often points to loose floorboards or nails rather than serious structural issues. Try walking around to pinpoint the exact spot and note if the floor feels spongy or uneven—these could suggest subfloor damage. If the squeak worsens, covers a large area, or the floor moves noticeably, a deeper inspection from below or by a professional is wise to rule out more serious subfloor problems.
You talk about water intrusion being a major cause of subfloor damage. How can I make sure I’ve really fixed the source of moisture before I start on repairs?
To ensure you’ve truly fixed the moisture source, start by identifying any nearby plumbing leaks, roof leaks, or exterior drainage problems. After making repairs, use a moisture meter to check the subfloor and surrounding areas for dampness. It’s also wise to monitor for new water stains or musty smells over a few days. Only move forward with repairs once everything stays dry and stable.
I’m worried about costs getting out of hand. For someone on a tight budget, are there any tips for saving money on materials or tools when repairing subfloors yourself?
To keep costs down, consider borrowing or renting tools instead of buying them new. Check local hardware stores, tool libraries, or ask friends and neighbors. For materials, look for sales, discounted items, or reclaimed lumber where possible—sometimes home improvement stores offer offcuts at reduced prices. Also, accurately measure your space to avoid buying excess material, and only purchase what you truly need for the job.
When budgeting for materials as mentioned in your guide, could you provide more detail on the cost differences between using plywood versus oriented strand board (OSB) for subfloor replacement?
Plywood is generally more expensive than OSB, often costing about 20 to 40 percent more per sheet depending on thickness and grade. For example, a standard 3/4-inch plywood sheet might range from $35 to $55, while OSB of the same thickness usually costs $25 to $35 per sheet. Plywood is more moisture-resistant and stronger, but OSB can be a budget-friendly choice if those factors are less critical for your project.
After fixing a damaged subfloor, how long should I wait before installing new flooring on top? Are there any signs I should look for to make sure the repairs have set properly?
After repairing your subfloor, it’s best to wait at least 24 to 48 hours before installing new flooring, especially if you’ve used adhesives or leveling compounds, to ensure everything has fully cured and set. Check that the area feels solid with no movement, there are no soft spots, and the surface is dry and level. If you notice any squeaks, moisture, or unevenness, address these issues before proceeding with your new flooring.
Regarding tools for subfloor repairs, do you have any recommendations for the most essential ones a total beginner should buy or rent? I have basic tools at home, but I’m not sure what might be considered specialized or really necessary for this project.
For a beginner tackling subfloor repairs, you’ll want to have a circular saw or a reciprocating saw to cut out damaged sections, a pry bar for removing old subfloor and nails, and a drill or impact driver for securing the new material. A chalk line helps mark straight cuts, and a tape measure ensures accuracy. These are the main specialized tools needed; most can be rented if you don’t already own them.
When it comes to identifying subfloor problems like soft spots or squeaks, are there specific tools or methods you recommend for pinpointing the exact location of the damage, especially if the finished flooring isn’t easily removable?
To pinpoint subfloor issues when you can’t remove the flooring, try walking slowly across the area and marking spots where you feel softness or hear squeaks. A stud finder with deep scanning can sometimes detect voids or unevenness. For squeaks, have someone walk overhead while you listen from below, if possible. Small inspection holes in inconspicuous spots can also help verify problems without major removal.
If I notice a soft spot in the floor near my kitchen sink, how do I figure out whether it’s a simple surface issue or actual subfloor damage that needs repair? The guide mentions water intrusion, but I’m not sure how deep the problem might go.
To determine if the soft spot is just a surface issue or if the subfloor is damaged, start by pressing around the area to see if it feels spongy or gives way. If the floor flexes significantly, that often suggests subfloor damage. You can also remove a small piece of flooring, if possible, to inspect underneath. Pay attention to any signs of moisture, mold, or wood that easily crumbles, which all indicate deeper water damage requiring subfloor repair.
When deciding between plywood and OSB for subfloor repairs, are there situations where one is better than the other in terms of durability or dealing with moisture?
Plywood usually handles moisture better than OSB, making it a stronger choice for bathrooms, kitchens, or laundry areas where spills or humidity are common. OSB can work well in drier rooms and is often less expensive, but it may swell or weaken more if exposed to moisture over time. For long-term durability in damp areas, plywood is generally preferred.
I noticed you talked about budgeting for subfloor repairs. Could you give a rough estimate on the average cost for materials and tools if I’m just fixing a few small soft spots in one room?
If you’re repairing a few small soft spots in one room, the average cost for materials like plywood, adhesive, and screws is usually between $50 and $150. For tools, if you already have basics like a circular saw, pry bar, and drill, you might only need to spend $20–$40 on anything extra like a pry bar or safety gear. Overall, expect a total of roughly $70 to $200, depending on what you already own.
What’s your advice for dealing with minor water damage that hasn’t caused visible rot yet? Is there a preventative treatment I should apply to the subfloor before reinstalling the flooring, or is that overkill?
If the subfloor is dry and there’s no visible rot or mold, you’re in a good position to prevent future issues. It’s a good idea to treat the area with a mold inhibitor or a mildew-resistant primer before reinstalling the flooring. This step isn’t overkill; it adds a layer of protection, especially if the area is prone to moisture. Just be sure the subfloor is completely dry before applying any treatments.
When dealing with a soft spot in the subfloor, how do you determine if replacing the whole sheet is necessary versus just patching the affected area? Are there specific signs that point to a full replacement being the better option?
To decide between patching or replacing the whole subfloor sheet, check the extent of the damage. If the soft spot is small, localized, and the rest of the sheet feels solid, patching should suffice. However, if you notice widespread softness, moisture damage, mold, or rot across much of the sheet, a full replacement is safer. Also, if the subfloor flexes or crumbles beyond just the spot, replacing the entire sheet is usually best.
In your step-by-step process, do you give tips on handling squeaky spots that persist even after subfloor repairs, or is there a different approach to fix squeaks that keep coming back?
In the step-by-step process, we do address common causes of squeaky subfloors and suggest ways to fix them, like securing loose boards and using construction adhesive. If squeaks keep returning after repairs, it may be helpful to check for missed fasteners or try specialized squeak repair kits. Sometimes, accessing the squeak from below and adding screws or shims can provide a more lasting solution.
I’m curious about the safety precautions you mentioned. Are there any specific steps you would recommend to prevent injuries while pulling up old subfloor boards, especially if there’s a chance of mold or pest damage?
When pulling up old subfloor boards, it’s important to wear heavy-duty gloves to protect your hands from nails and splinters, and safety goggles to shield your eyes from debris. If you suspect mold, use an N95 mask or respirator to avoid inhaling spores. For areas with potential pest damage, wear long sleeves and check for signs of active infestations before working. Always use tools properly and keep your work area well-ventilated and clear of tripping hazards.
If my subfloor is starting to creak in certain spots but doesn’t feel soft or uneven, does that always mean there’s underlying damage, or could it just be an installation issue? Would tightening fasteners be enough, or should I investigate further?
Creaking in subfloors without any softness or uneven spots often points to loose fasteners or minor movement between boards, rather than serious damage. In many cases, tightening or adding screws can solve the problem. However, if the creaking persists despite this, or if you notice new signs like sagging or moisture, it’s wise to investigate further just to rule out hidden issues.
My floors have started squeaking more lately, but I’m not sure if it’s an issue with the subfloor or just the finished flooring. Is there a way to tell where the noise is coming from before starting any repairs?
To figure out if the squeak is coming from your subfloor or just the finished flooring, try walking slowly over the area and listening closely. If the noise happens when you step between floor joists, the subfloor is likely the cause. If the squeak is near seams or edges, it might be the finished flooring. You can also gently press down to see if movement underfoot matches the sound.
I’m not sure how to tell if uneven flooring is due to a subfloor issue or just the finished floor itself. Are there specific warning signs or tests you recommend to figure this out before starting repairs?
Distinguishing between subfloor and finished floor issues involves a few checks. Walk across the area and notice if there’s sponginess, creaking, or movement—these usually point to a subfloor problem. If the unevenness is slight and only on the surface, it might just be the finished floor. You can also lift a small section of the finished floor in an inconspicuous spot to inspect the subfloor underneath for damage or warping.
The guide mentions heavy loads as a source of subfloor problems. If I plan to move a large aquarium into my living room, are there preventative steps I can take during installation to avoid future subfloor damage?
Placing a large aquarium is a smart time to think ahead. First, make sure your subfloor and joists are in good condition and can handle the weight—consider consulting a structural professional if unsure. Use a sturdy, level stand that distributes weight evenly, and add waterproofing measures like a moisture barrier beneath the tank to protect against leaks. Reinforcing the area underneath with additional joists or supports can also help prevent sagging or damage over time.
You talked about essential safety considerations during repairs. What are the specific hazards I should watch out for if I’m cutting out and replacing a subfloor panel by myself for the first time?
When cutting out and replacing a subfloor panel, be careful of hidden electrical wires or plumbing beneath the floor—always check before you cut. Wear safety goggles and a dust mask to protect yourself from debris and dust. Use sharp blades and keep your hands clear of the saw’s path. Also, be mindful of structural stability; don’t remove too much at once or step onto unsupported areas.