

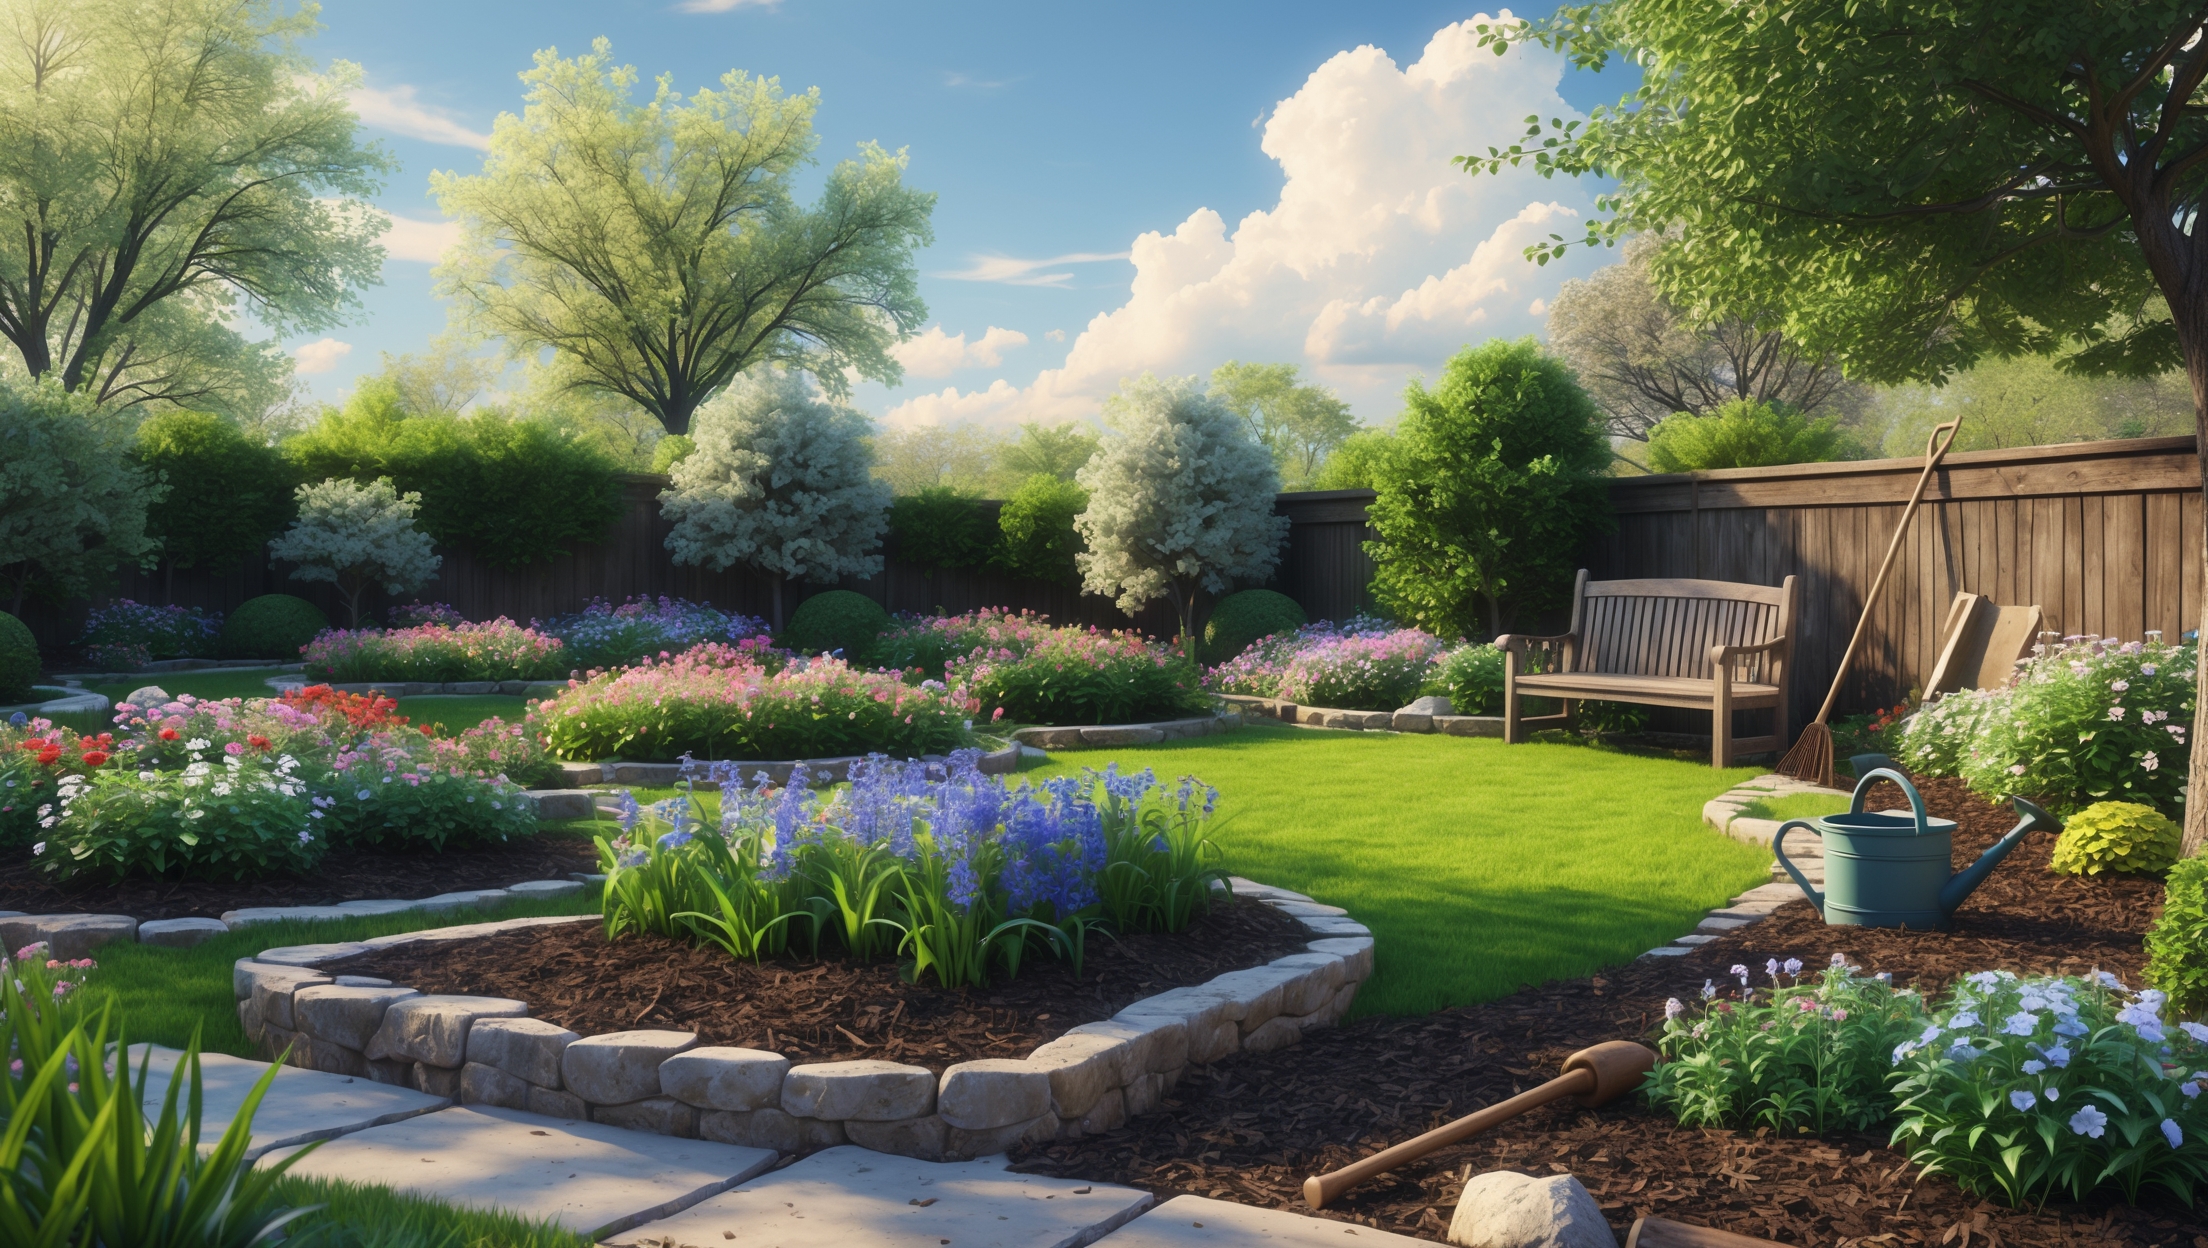
Introduction: Why Smart Landscaping Matters
There’s nothing quite like stepping outside to enjoy a beautiful, well-designed yard. Whether you dream of vibrant flower beds, a lush green lawn, or a tranquil seating area, DIY landscaping promises big rewards. However, many homeowners dive in with enthusiasm only to encounter frustration, wasted money, and disappointing results. Why? Because landscaping is more than just planting a few shrubs or rolling out sod—it’s a blend of science, art, and smart planning. Even the most motivated DIYers can make costly mistakes that set back their projects by months or even years. From poor plant choices to improper drainage, these missteps can lead to dead plants, overgrown chaos, and ongoing maintenance headaches. This guide will shine a spotlight on the most common DIY landscaping mistakes, explain why they happen, and—most importantly—show you how to avoid or fix them. Armed with practical advice and real-world solutions, you’ll be ready to transform your yard into an outdoor oasis that thrives season after season.
1. Skipping the Planning Stage
1.1. Why Planning Is Critical
Many homeowners are eager to get their hands dirty and start planting, but jumping in without a plan is the fastest route to disappointment. Landscaping is a long-term investment—plants grow, seasons change, and your needs may evolve over time. Without a master plan, you risk overcrowding, mismatched styles, and costly rework.
1.2. How to Plan Effectively
- Analyze your yard: Map out sun and shade patterns, slope, and existing features.
- Define your goals: Do you want a play area, vegetable garden, or a low-maintenance retreat?
- Sketch a rough design: Use graph paper or free online tools to visualize plant beds, paths, and focal points.
- Budget wisely: Include costs for soil, plants, mulch, edging, and tools.
Resist the urge to buy on impulse—a thoughtful plan prevents future headaches and ensures your yard matures beautifully.
2. Choosing the Wrong Plants
2.1. Ignoring Climate and Soil
One of the most frequent DIY missteps is selecting plants based solely on looks. If a plant isn’t suited to your climate zone or soil type, it will struggle or die—no matter how much you water or fertilize.
2.2. How to Make Smart Plant Choices
- Know your USDA hardiness zone: Only choose plants proven to thrive in your region.
- Test your soil: Check for clay, sand, or silt, and amend as needed for plant requirements.
- Research plant needs: Group together plants with similar sun, water, and soil requirements.
- Plan for mature size: Avoid overcrowding by spacing plants according to their full-grown dimensions—not how they look in the nursery pot.
For the best results, consult with local garden centers or extension services for recommendations specific to your area.
3. Poor Soil Preparation
3.1. The Risks of Skipping Soil Work
Soil is the foundation of your landscape, but it’s often overlooked in the rush to plant. Planting directly into compacted or nutrient-poor soil leads to stunted growth and sickly plants. Even the best plants can’t overcome poor soil conditions.
3.2. Steps to Improve Your Soil
- Remove debris and weeds: Clear rocks, roots, and invasive plants from planting areas.
- Loosen the soil: Use a shovel or tiller to break up compacted areas at least 6–12 inches deep.
- Add organic matter: Mix in compost, aged manure, or peat moss to improve texture and fertility.
- Amend as needed: Add sand for heavy clay or clay for sandy soils; adjust pH if necessary.
Healthy soil pays dividends for years to come—don’t cut corners here!
4. Ignoring Drainage and Erosion
4.1. Signs of a Drainage Problem
Improper drainage can turn a beautiful yard into a muddy mess, kill plants, and damage your home’s foundation. Signs include standing water, soggy soil, or visible erosion after rain.
4.2. Solutions for Drainage Issues
- Grade slopes away from structures: Ensure soil slopes at least 2% away from your house.
- Install French drains or dry creek beds: Direct excess water away from problem areas.
- Use ground covers and mulch: Slow runoff and prevent soil erosion on slopes.
- Choose water-tolerant plants: In persistently wet spots, use species that thrive in damp conditions.
Address drainage up front—it’s far easier than fixing water damage later.
5. Overplanting or Underplanting
5.1. Why Plant Spacing Matters
It’s tempting to pack plants close together for an instant full look, but this leads to overcrowding, competition for resources, and increased disease risk. On the flip side, underplanting looks sparse and gives weeds room to invade.
5.2. Best Practices for Plant Spacing
- Read plant tags: Follow spacing recommendations for mature width and height.
- Visualize growth: Use temporary markers to map out mature plant sizes before digging.
- Fill gaps with annuals: If new beds look bare, use fast-growing annuals or decorative mulch until perennials fill in.
Patience pays off! Proper spacing ensures healthier, longer-lasting plantings.
6. Forgetting About Maintenance
6.1. Underestimating Upkeep
Some DIYers design complex landscapes without considering the ongoing maintenance required. High-maintenance features like formal hedges, water features, or large lawns require regular attention. Neglect leads to overgrowth, pests, and expensive fixes.
6.2. How to Plan for Easy Maintenance
- Choose low-maintenance plants: Native species often require less water and care.
- Group plants by water needs: This makes watering more efficient and reduces waste.
- Mulch generously: Mulching suppresses weeds, retains moisture, and adds organic matter as it breaks down.
- Install edging: Physical barriers keep grass and weeds out of beds for easier upkeep.
Design with maintenance in mind to keep your yard looking its best with less effort.
7. Not Mulching Properly
7.1. Mulch Mistakes to Avoid
Mulch is a landscaping hero—but only when used correctly. Piling mulch against plant stems (the dreaded “mulch volcano”) causes rot and pest problems. Using the wrong material can attract bugs or blow away in the wind.
7.2. Mulching Tips for Success
- Apply 2–3 inches deep: Too much mulch suffocates roots; too little doesn’t control weeds.
- Keep away from trunks: Maintain a 2-inch gap around woody stems and tree trunks.
- Choose appropriate material: Use shredded bark, pine needles, or compost for beds; avoid dyed or rubber mulches in edible gardens.
- Top up annually: Replenish mulch as it decomposes to maintain effectiveness.
Proper mulching conserves water, improves soil, and enhances curb appeal.
8. Neglecting Edging and Bed Definition
8.1. Why Edging Matters
Defined edges give your landscape a polished, professional look and keep grass from invading flower beds. Skipping this step leads to messy borders and more work pulling weeds.
8.2. Edging Options
- Natural trench: Use a flat spade to create a shallow V-shaped trench between beds and lawn.
- Plastic or metal edging: Durable and flexible for curves and straight lines.
- Stone or brick: Attractive and long-lasting, though more expensive and labor-intensive.
Install edging before mulching for lasting results and easier maintenance.
9. Overlooking Irrigation Needs
9.1. Watering Hassles
Dragging hoses around the yard is tedious and often leads to uneven watering. New plants, especially, need consistent moisture to establish roots.
9.2. Efficient Watering Solutions
- Install drip irrigation: Delivers water directly to plant roots, saving water and time.
- Use soaker hoses: Easy to install for beds and borders.
- Group plants by water needs: Avoid over- or under-watering by grouping thirsty plants together.
- Water early in the day: Reduces evaporation and prevents fungal diseases.
Invest in a simple irrigation system to protect your landscaping investment.
10. Failing to Consider All Four Seasons
10.1. Avoiding Seasonal “Dead Zones”
Many DIYers focus on spring and summer blooms, forgetting that landscapes should offer interest year-round. The result? Beds that look bare and dull for half the year.
10.2. Achieving Year-Round Appeal
- Mix evergreens with deciduous plants: Evergreens provide structure through winter.
- Include winter-blooming or berry-producing plants: Add color and attract wildlife in colder months.
- Use ornamental grasses: Their texture and movement add winter interest even when dormant.
- Plan for fall color: Choose trees and shrubs with vibrant autumn foliage.
A little planning ensures your yard looks inviting in every season.
11. Ignoring Local Regulations and Utility Lines
11.1. The Risks of Overlooking Codes
Local ordinances may regulate tree placement, fence height, and even what you can plant near sidewalks or property lines. Failing to check before digging can result in fines or having to remove features.
11.2. Staying Safe and Compliant
- Call before you dig: Contact your local utility marking service to avoid hitting electrical, gas, or irrigation lines.
- Check HOA rules: If you live in a neighborhood with a homeowners association, review landscaping guidelines.
- Read local codes: Understand setback requirements and restrictions on certain plant species.
Taking these steps avoids legal headaches and keeps your yard safe.
12. Disregarding Wildlife and Pollinator Needs
12.1. The Importance of Biodiversity
Landscapes that ignore local wildlife can become pest-prone and sterile. Pollinators like bees and butterflies are crucial for healthy gardens, and birds help control insects.
12.2. How to Attract Beneficial Wildlife
- Plant native flowers: These support local pollinators and require less care.
- Add water sources: A birdbath or shallow dish can attract birds and beneficial insects.
- Provide shelter: Shrubs, brush piles, and even decorative rocks offer homes for wildlife.
- Avoid pesticides: Use natural pest control methods when possible.
Embracing biodiversity results in a more resilient, vibrant landscape.
Conclusion: Your Path to a Successful DIY Landscape
Transforming your yard with your own hands is a deeply rewarding experience, but success hinges on avoiding the common pitfalls that trip up so many DIY landscapers. From the very first step—taking time to plan, analyze, and budget—through to the ongoing care of your plantings, every stage matters. Skipping soil preparation, choosing the wrong plants, or neglecting drainage can lead to costly failures that sap your enthusiasm. Overcrowding, poor mulching, and ignoring maintenance will rob your landscape of its beauty and function. Even something as simple as forgetting to check local codes or utility lines can have serious consequences. The good news? With the practical strategies in this guide, you can sidestep these mistakes and build a landscape that thrives year after year. Take the time to research, prep your soil, plan for all seasons, and embrace sustainable, wildlife-friendly practices. Not only will you save money and frustration, but your home will become a welcoming retreat for family, friends, and the natural world. Every successful landscape starts with learning from others’ mistakes—now, you’re ready to get it right from the ground up.
When mapping out sun and shade patterns as suggested, do you have recommendations on the best way to track these over time? Should I log sunlight at different times of day throughout all four seasons, or is a single day’s observation usually sufficient for planning purposes?
It’s best to track sunlight at several times of day—morning, midday, and late afternoon—over at least a week to get an accurate sense of your yard’s sun and shade patterns. If possible, repeat this during different seasons, since tree foliage and the sun’s angle change. While a single day’s observation can help for general planning, multiple observations will give you much more reliable results for plant placement.
For someone eager to start planting, is it better to do a small test area first or should I wait until my whole yard plan is complete before starting any work? What are the risks of doing one versus the other?
Starting with a small test area is usually a wise idea, especially if you’re new to landscaping. This lets you experiment with soil, plants, and layout before committing to your entire yard. The risk of starting small is that your initial choices might not fit seamlessly with your eventual whole-yard plan, so try to choose an area that can be integrated easily. Jumping in without a full plan can lead to mismatched styles or wasted effort, so sketch a basic plan first, even if you start small.
If I already started planting without much of a plan and I’m now dealing with overcrowded flower beds, what are the first steps I should take to fix this without harming my plants?
Start by identifying which plants are suffering most from overcrowding, such as those looking weak or not flowering well. On a cool, cloudy day or in the evening, gently dig up some of the overcrowded plants, keeping as much soil on their roots as possible. Replant them in other parts of your yard or in pots, water them thoroughly, and monitor them closely for signs of stress. This way, you can give all your plants more space and a better chance to thrive.
When sketching a rough design, do you have tips for balancing aesthetic appeal with long-term functionality, especially if I might want to add new features like a vegetable garden down the road?
When sketching your design, try to keep main pathways and open spaces flexible, so you can adjust them as your needs change. Group permanent elements like trees or patios where they won’t block future projects. Also, mark potential zones for additions like a vegetable garden, making sure they’ll get enough sunlight and won’t interfere with existing features. This way, your yard can evolve while staying both attractive and practical.
You mention that landscaping is a long-term investment and plants grow over time. How can I estimate how much space to leave between new plantings so they don’t end up overcrowded in a few years?
To estimate proper spacing, check the mature width of each plant variety, which should be listed on the plant tag or described in gardening resources. Space each plant apart by at least the full width they’ll reach when grown. For example, if a shrub grows to 4 feet wide, leave at least 4 feet between the centers of each plant. This helps avoid overcrowding as they mature.
When analyzing sun and shade patterns during the planning stage, how do you account for changes throughout the year, especially if taller trees or structures could alter light exposure over time?
To account for changing sun and shade patterns year-round, observe your yard at different times of day and in different seasons if possible. Note where shadows fall in summer versus winter, since the sun’s angle changes. Consider how future growth of trees or new structures might block light, and plan beds or seating areas accordingly. Using a sun calculator tool or sun path diagrams can also help predict long-term light exposure.
If I’ve already planted some shrubs without much of a plan, is there a way to fix overcrowding without having to rip everything out and start over?
You don’t have to start from scratch if you’ve got overcrowded shrubs. Try selectively transplanting a few to other areas of your yard, ideally in early spring or fall when plants are less stressed. You can also prune existing shrubs to control their size and improve air flow. Planning new groupings as you rearrange will help everything thrive without overcrowding.
You mention that skipping the planning stage can lead to overcrowding and costly rework. If my yard is already partially landscaped and feels a bit chaotic, is there a way to retroactively create a plan that fixes the mess without having to start from scratch?
Absolutely, you can create a plan for your existing yard without tearing everything out. Start by mapping your current layout and identifying which plants and features you want to keep. Then, sketch a new plan around these elements, considering spacing, sunlight, and plant sizes. Gradually adjust or move overcrowded areas, adding or removing plants as needed. This approach lets you refresh your yard step by step, prioritizing improvements without discarding all your hard work.
The article mentions that skipping the planning stage is one of the biggest mistakes in DIY landscaping. If I already started planting without a plan, is there a way to backtrack and create a master plan now, or do I have to start all over?
You don’t have to start over! You can still create a master plan for your yard as it is now. Begin by mapping out your existing plants and features, then decide what changes you’d like to make. Adjust, move, or remove any elements that don’t fit your updated plan. This way, you can gradually transform your yard without wasting the work you’ve already done.
How long should I spend planning my yard before I start buying materials? The article emphasizes careful preparation, but I’m not sure if a week or a month is enough to cover all the steps, especially if I want to avoid costly mistakes.
The planning stage can vary, but for most DIY landscaping projects, spending at least two to three weeks is recommended. This gives you time to assess your yard, sketch out ideas, research plants and materials, and double-check measurements. Rushing through planning often leads to expensive errors, so taking a few extra weeks—even up to a month—can really pay off in the long run.
I’m new to landscaping and the article mentions mapping out sun and shade patterns before planting. What’s the easiest way for a beginner to figure out how sun and shade shift in their yard throughout the day or across seasons? Any simple tips to track this before making a plan?
A simple way to track sun and shade is to observe your yard at several points during the day—morning, midday, and late afternoon—and take notes or mark a sketch of your yard with sunny and shady areas. Do this on a few typical days to spot patterns. If possible, repeat this in both spring and summer, since the sun’s angle changes. Taking photos at set times can also help you remember each area’s light exposure.
If I accidentally skip the planning stage and run into overcrowding or style mismatches later, what are some realistic steps to fix those issues without having to start over completely?
If you notice overcrowding, consider thinning out plants by removing or transplanting some to open areas in your yard. For style mismatches, you can introduce unifying elements like consistent edging, mulch, or repeating a few key plant types or colors throughout the space. These changes help tie the look together and improve flow, all without having to redo the entire yard.
Could you elaborate more on how to effectively analyze sun and shade patterns in a yard for someone new to landscaping? Are there simple methods or tools you recommend for beginners figuring this out before they start planning?
To analyze sun and shade patterns, spend a day observing your yard at different times—morning, midday, and late afternoon—to see where sunlight falls. Take notes or photos to track changes. Some beginners use a simple sketch of their yard and mark sunny and shaded spots during each observation. There are also free sun-tracking apps that can help map sunlight exposure. Doing this for a few days will give you a reliable overview before you start your landscaping plans.
I tend to buy plants impulsively when I see sales or get inspired at the garden center. How do you recommend resisting those urges or building flexibility into my plan so I don’t end up with random mismatched plants?
Try making a list of plants that suit your yard’s conditions—sun, soil, and space—before you shop, and bring it with you. If you see something tempting, give yourself a day to think it over and check if it fits your plan. You can also leave a few spots in your layout open for future finds to keep things flexible but still coordinated.
When you mention sketching a rough design for the yard, do you find it’s better to start on paper or go straight to one of the online tools? For someone new to this, what would make the process easiest?
For beginners, starting with paper can often feel less intimidating and allows for quick, easy changes as you brainstorm ideas. You can sketch out basic shapes and layout concepts without worrying about technology. Once you’re comfortable with your plan, online tools can help you visualize details and proportions more accurately. So, starting on paper and then moving to digital tools is usually the easiest approach.
You mention mapping out sun and shade patterns as part of the yard analysis. For a beginner, what is the best way to track these patterns throughout the day, and how precise does this mapping need to be when planning flower beds?
To track sun and shade patterns, pick a sunny day and check your yard every 2-3 hours, noting which areas are in full sun, part sun, or full shade. A simple sketch or a few photos at different times can help. This mapping doesn’t need to be exact, but having a general idea of which spots get morning, midday, or afternoon sun will help you choose the right plants and avoid future issues.
You mention the importance of mapping out sun and shade patterns when planning a yard. Could you provide some practical tips or tools for accurately tracking these patterns throughout the day or season, especially for those new to landscaping?
To accurately track sun and shade in your yard, spend a day noting which areas get sunlight each hour, then repeat this at different times of year if possible, as the sun’s angle changes. You can also use your phone’s compass and a simple sketch to map shaded zones. Some apps, like Sun Seeker or Sun Surveyor, show sun paths and help visualize seasonal changes. These steps will help you plan plant placement and avoid shade-related issues.
I’m a little overwhelmed by the idea of sketching a master plan. Are there any user-friendly online tools you recommend for homeowners who are new to design?
Absolutely, there are several online tools designed for beginners that can make creating a landscape plan much easier. Options like SmartDraw, HomeByMe, and Gardena’s My Garden offer drag-and-drop features and pre-made templates, so you don’t need any design experience. These tools let you experiment with different layouts, plants, and hardscapes before committing to your project.
When budgeting for a DIY landscaping project, how much should I realistically set aside for unexpected costs like soil amendments or drainage fixes?
It’s wise to set aside an extra 10-20% of your total landscaping budget for unexpected costs such as soil amendments, drainage fixes, or replacing plants. For example, if your planned budget is $1,000, keeping an additional $100 to $200 as a cushion can help cover surprises without stress. This approach gives you flexibility to handle issues as they arise.
Could you elaborate a bit more on budgeting wisely for a DIY landscaping project? I always seem to underestimate the costs for soil and mulch. Any advice on how to estimate these expenses in advance would be really helpful.
To better estimate costs for soil and mulch, first measure your yard areas to calculate the volume needed (length x width x depth for each section). Most suppliers sell by the cubic yard or bag, so convert your measurements accordingly. Check local prices ahead of time and factor in delivery fees. Also, add a buffer (about 10–15%) for unexpected needs. This approach helps you avoid underestimating and ensures your budget stays on track.
About budgeting for landscaping projects—what’s a reasonable percentage to allocate for upfront costs like soil and mulch versus saving for future maintenance expenses mentioned in your article?
For most landscaping projects, it’s common to allocate around 70-80% of your budget to upfront costs like soil, mulch, and plants. The remaining 20-30% should be set aside for ongoing maintenance, such as fertilizing, pruning, and replacing plants as needed. This balance helps ensure you don’t run out of funds for essential upkeep after the initial installation.
I’m curious about the budgeting advice you gave—are there any areas in DIY landscaping where it’s really worth spending more versus places you can safely cut costs?
It’s wise to invest in quality tools and foundational materials like soil, mulch, or irrigation systems, since these impact your results long-term. Professional-grade tools last longer and make jobs easier. On the other hand, you can often save by choosing simpler plants or doing your own planting and mulching instead of hiring help. Decorative items and some hardscape features can also be added gradually as your budget allows.
When you mention using free online tools to sketch a rough design, could you name a couple that are beginner-friendly? I get overwhelmed by software sometimes, so something simple would be great.
Two beginner-friendly online tools you might find helpful are Gardena’s My Garden planner and SmartDraw’s garden planner. Both are designed to be simple, with drag-and-drop features and intuitive interfaces—no design experience needed. They let you experiment with layouts and plants without feeling overwhelmed by too many options or complicated menus.
You mention budgeting for things like soil and mulch during the planning stage. Do you have any advice for prioritizing which items to spend more on if my landscaping budget is pretty tight?
When working with a tight landscaping budget, prioritize spending on quality soil and mulch first, since they directly impact plant health and long-term success. Consider holding off on pricier plants or decorative features until later. You can also start with smaller plants—they cost less and will fill out over time. Focus your resources on essentials that support the foundation of your yard.
When budgeting for my first landscaping project, what are some common costs that new DIYers like me tend to overlook? I want to avoid surprise expenses if possible.
Some often-overlooked costs for first-time DIY landscapers include soil amendments like compost or fertilizer, renting or buying tools, delivery fees for bulk materials, and disposal of yard waste. You might also need extra mulch, edging, or weed barriers. It’s smart to budget a little extra for unexpected repairs or last-minute plant replacements. Listing out all your needed materials and possible rentals before starting can help avoid surprises.
If someone does end up skipping the planning stage and sees overcrowding or mismatched styles, what are some first steps you’d recommend for undoing or correcting these mistakes without overhauling the entire yard?
If you’re dealing with overcrowding, start by thinning out plants—either transplant some to other areas or give them away. For mismatched styles, identify a key theme or color scheme and gradually swap out or relocate plants and features that clash. Focus on small changes, like using matching mulch or unifying borders, to create a more cohesive look without major rework.
For homeowners on a tighter landscaping budget, which parts of the initial planning—like soil or edging—are the smartest places to invest versus areas where it’s okay to save or DIY?
Investing in good soil quality and preparation pays off most because healthy plants rely on strong foundations. Edging can be a DIY project using basic materials, so it’s a good place to save. Also, planting smaller or fewer plants and letting them grow in over time can help stretch your budget without sacrificing quality.
Once you’ve sketched a design and set a budget, how far in advance of planting season should you start preparing your yard and gathering materials to make sure everything goes smoothly?
It’s best to start preparing your yard and gathering materials about 4 to 6 weeks before planting season. This gives you enough time to clear debris, improve soil, and source plants and tools without feeling rushed. Early preparation also helps you spot and fix any issues that might delay your project.
You mention using free online tools to sketch designs—do you have any specific recommendations for sites or apps that are especially user-friendly for beginners? I’m not very tech-savvy but want to visualize my ideas before I start.
For beginners who want simple and easy-to-use design tools, I recommend trying out platforms like SmartDraw and Gardena’s My Garden planner. Both offer drag-and-drop features with clear instructions, making it easy to sketch out your yard ideas without needing advanced tech skills. These tools let you experiment with different layouts and plant placements before starting your project.
If I’ve already made some purchases on impulse before having a real plan, what steps would you recommend to avoid further mistakes and salvage what I’ve done so far?
It’s understandable to buy things on impulse when you’re excited about your yard. Start by making a simple plan: map out what you already have and what you want to achieve. Assess if your purchases suit your yard’s conditions—sun, soil, and space. If some plants or materials don’t fit, try to repurpose or exchange them. Focus on one area at a time to prevent more spontaneous buys. Planning now will help make the most of what you’ve already invested.
How much time should I expect to spend on the initial planning and mapping before I actually start planting, especially if my yard has tricky slopes or odd sun patterns?
For a yard with slopes or unusual sun patterns, set aside at least a week for planning and mapping. This allows time to observe sunlight at different times of day, sketch the layout, and research suitable plants. Rushing this step can lead to mistakes later, so it’s worth investing extra time up front to ensure your final design works well with your yard’s unique conditions.
Can you elaborate on how changing family needs might impact a landscaping plan over the years? Are there design strategies that make it easier to adapt a yard as needs evolve?
Changing family needs can definitely influence your landscaping plan. For example, you might need a play area for young kids now, but want more entertaining space or a garden later. Choosing flexible layouts, like open lawn areas or modular patios, makes updates easier. Planting trees and shrubs with growth in mind and using movable containers can help your yard adapt as your family’s needs change.
I always struggle with planning out my yard, especially figuring out sun and shade patterns. Do you have any tips or specific tools that make it easier to map sunlight throughout the day in different seasons?
Tracking sun and shade is a smart first step for planning your yard. One helpful method is to take photos of your yard at different times throughout the day and in each season to record changing light. There are also smartphone apps that use your camera and location to map sun movement, such as Sun Seeker or Sun Surveyor. These tools can help you visualize how sunlight shifts, making it easier to place plants in their ideal spots.
Could you elaborate on how to accurately map out sun and shade patterns in my yard before I start planning? I want to make sure I’m not misjudging which areas get enough light for different types of plants.
To map sun and shade patterns accurately, observe your yard throughout a typical day—ideally every two hours from morning to evening. Mark which areas receive full sun, partial sun, or are mostly shaded at each interval. Keep notes or create a simple sketch. Repeat this process over a few different days, as light shifts with the seasons. This record will help you match plants to the right spots based on their sunlight needs.
Your point about evolving needs is interesting—what should I keep in mind when sketching my first rough design if I think I might want to add a vegetable garden later but I’m not sure yet?
When sketching your initial yard plan, leave flexible open spaces where a vegetable garden could fit in the future. Avoid placing permanent features like patios or trees in those areas for now. Also, consider sun exposure and water access in your layout, since vegetable gardens need plenty of sunlight and convenient watering. This way, you keep your options open and can easily adapt your design later.
If I already planted some shrubs without really planning first and now realize they might be poorly placed, what steps can I take to fix or at least minimize this mistake before it becomes a costly problem?
If you suspect your shrubs are poorly placed, the sooner you act, the better. You can carefully transplant them to more suitable spots, ideally during their dormant season to reduce stress. Water them well before and after moving, and try to retain as much of the root ball as possible. If transplanting isn’t an option right now, consider pruning or temporary barriers to guide growth until you can relocate them. Regular monitoring will help you act before any long-term issues develop.
You mention that landscaping is a long-term investment and that needs can change over time. How detailed does my initial plan need to be to avoid redoing things later? Should I plan everything at once or leave space for future adjustments?
It’s best to create a flexible initial plan that covers your main goals and priorities, such as layout, pathways, and major plantings. You don’t need every detail finalized at the start. Leave space for future projects or changes as your needs evolve or your budget allows. This approach helps you avoid costly redos and accommodates any new ideas you might have down the road.
How do I figure out what my main goals for the yard should be if I want both a relaxing area and a small vegetable garden, but don’t have much space? Is it better to combine uses or separate them?
Thinking about how you want to use your yard is a great starting point. With limited space, combining uses can work well—consider raised beds or vertical planters for your vegetables along the edge of a patio or seating area. You can also use attractive garden borders to visually separate a small relaxation spot from your veggie patch. Prioritize what matters most—relaxation or gardening—and let that guide how much space each gets.
If someone already started planting without a master plan and now has overcrowding, what’s the best way to fix that without ripping everything out? Is it possible to rescue the design with some rearranging?
You can definitely rescue your yard design without starting from scratch. Begin by identifying which plants are overcrowded and could benefit from more space. Transplant some to new spots in your yard, making sure to match their sunlight and soil needs. Pruning and thinning out excess growth also helps improve air flow and appearance. By rearranging and adjusting placement, you can create a more balanced, attractive landscape without removing all your hard work.
If I’ve already put in some plants and realize I may have overcrowded or mismatched areas, what are some practical steps to fix this without ripping everything out and starting from scratch?
You don’t need to start over. Try selectively thinning out crowded areas by moving a few plants to spots where there’s more space or grouping plants with similar needs together. Prune back fast growers to give others room. You can also add mulch or groundcover between plants to reduce visual clutter. These small adjustments can improve both plant health and the overall look of your yard.
If I’ve already started planting without a master plan and realize things might get overcrowded down the line, is it better to transplant things now or wait until next season to avoid stressing my plants?
If you notice that your plants may become overcrowded, it’s usually best to transplant them before they grow too large and their roots become more established. Doing it now, especially if the weather is mild and not too hot, can minimize stress. However, if you’re currently in the middle of a very hot or cold season, waiting until early fall or spring might be gentler on your plants. Just be sure to water well after transplanting.
Could you elaborate on how to properly analyze sun and shade patterns in my yard? I’m worried about getting it wrong and ending up with plants in the wrong locations—are there tools or methods you recommend for beginners?
To analyze sun and shade patterns, observe your yard at different times throughout the day—morning, midday, and late afternoon—for at least one week. Note which areas get full sun, partial sun, or full shade. You can sketch a simple map to track these zones. For beginners, using a sunlight calculator or smartphone apps that track sun exposure can make this process easier. Careful observation and mapping will help you choose the best spots for each type of plant.
I’m curious about budgeting for landscaping projects. When you suggest including costs for soil, mulch, and edging, do you have any ballpark figures or tips for keeping expenses down without sacrificing quality?
For basic landscaping, expect to spend about $30–$50 per cubic yard for mulch and $20–$40 per cubic yard for topsoil. Edging materials vary: plastic is cheaper, while stone or metal costs more. To save money, buy materials in bulk, do prep work yourself, and compare prices at local suppliers. Focus on quality where it matters most—like good soil—and consider less expensive options for non-essential items.
When budgeting for a landscaping project, how do I figure out what to prioritize if I can’t afford to do everything at once? Should I start with soil improvements, plant beds, or paths?
When you’re working with a limited budget, it’s usually best to start with soil improvements. Healthy soil sets the foundation for successful plant beds later on and helps your plants thrive. Once your soil is in good shape, you can move on to creating plant beds and then add paths as your budget allows. This approach prevents costly mistakes and gives your yard a strong start.
You mention mapping out sun and shade patterns before starting any landscaping project. What’s the best way for a DIY homeowner to track how sunlight shifts throughout the day, especially if they don’t have much experience with this?
One simple approach is to observe your yard several times a day—morning, midday, and late afternoon—over a few days. Take notes or snap photos of which areas get direct sun or shade at each time. You can also sketch a rough map and mark the sunny and shady spots. This will help you understand how sunlight moves across your yard and guide your planting decisions.
How long should I expect the planning phase to take for an average suburban yard? I want to make sure I don’t rush it, but I also don’t want to put things off for months.
For an average suburban yard, the planning phase typically takes anywhere from one to three weeks. This gives you enough time to assess your space, research plants and materials, sketch a layout, and anticipate any challenges. Dedicating a few focused sessions over this period should help you avoid rushing while still keeping the project moving forward.
The article talks about defining your goals for the yard, like a play area or veggie garden. What if I want more than one? Any tips on dividing up the space so it still looks cohesive and not overcrowded?
Having multiple purposes for your yard is very doable. Try using paths, low hedges, or different ground materials to subtly define each area without harsh separations. Keep a consistent color palette and repeat certain plants or materials throughout so everything feels unified. Also, avoid crowding by leaving open space between sections, and use multi-functional features like benches or raised beds to maximize both space and style.
The article mentions mapping out sun and shade patterns when planning a yard. How do you recommend tracking those patterns accurately over different seasons if I’m new to landscaping?
To accurately track sun and shade patterns, observe your yard at different times of day—morning, midday, and afternoon—over several days. Make simple notes or sketches of where sunlight falls. For a seasonal perspective, repeat this process in spring, summer, and fall if possible, or use a sun-tracking app that estimates angles throughout the year. This helps you choose the right plants and placement for long-term success.
You talk a lot about starting with a master plan, but what if my budget is really tight? Are there any low-cost tools or tricks for mapping out sun and shade patterns without investing in software or fancy equipment?
You absolutely don’t need expensive tools to map sun and shade patterns in your yard. One simple trick is to draw a rough sketch of your yard on paper. Then, visit your yard at different times of the day and note which areas get sun or shade by marking them on your sketch. You can also use your phone to take photos every few hours and compare where the light falls. This hands-on approach works very well with a tight budget.
You talked about budgeting for soil, plants, mulch, edging, and tools. Are there any areas where it’s actually better to splurge versus where I can save money and still get good results?
It’s usually worth splurging on quality soil and mulch, since they directly impact plant health and long-term success. Investing in sturdy tools also pays off because they last longer. For plants, you can often save by choosing smaller sizes or native varieties, which adapt well and grow quickly. When it comes to edging, basic materials often work just fine, so there’s no need to overspend there.
How long should I expect the planning process to take before I actually start working on my yard? I don’t want to lose momentum but I also see now how skipping steps could mess things up later.
The planning process for a DIY landscaping project usually takes about one to two weeks, depending on the size and complexity of your yard. This allows you time to research, measure, sketch a layout, and gather materials. Taking this time up front helps you avoid costly mistakes and makes the actual work go more smoothly. If you keep your planning organized and set small goals, you can stay motivated while preparing properly.
The article mentions avoiding impulse plant purchases. Are there any specific tips for sticking to your plan when faced with seasonal plant sales or limited local nursery options?
When seasonal sales or limited nursery choices tempt you, try making a detailed plant list before shopping and bring it with you. Focus on your yard’s needs—sun, soil, and space—so you only buy what fits your landscape plan. If a sale plant isn’t on your list, pause and consider if it truly matches your design and conditions before buying.
When budgeting for a new DIY landscaping project, what unexpected costs have you run into that weren’t obvious at first? For example, are there hidden expenses between the planning and actual planting stages?
Unexpected costs can definitely pop up during a DIY landscaping project. Some common ones include delivery fees for soil, mulch, or plants, rental costs for equipment like tillers, and extra materials such as edging or weed barriers. You might also find that you need more soil or plants than estimated, or tools you hadn’t considered, like gloves or wheelbarrows. Permits or soil testing can also be overlooked expenses in the planning stage.
I noticed the article talks about having a master plan to prevent costly rework. If I already started planting in some areas, is it too late to create an overall design, or can I still fix things without ripping everything out?
It’s definitely not too late to create a master plan even if you’ve already started planting. You can assess what’s already in place and incorporate those elements into your overall design. Adjustments can be made by moving plants if needed, or working around existing features. A thoughtful plan now can help guide your next steps and minimize any future rework or disruption.
I really like the suggestion of sketching out a rough design, but I’m not very artistic. Can you recommend any user-friendly online tools that make visualizing paths and plant beds easier for beginners?
You don’t need to be artistic to plan your yard design. There are several beginner-friendly tools like SmartDraw, Gardena My Garden, and Plan-a-Garden by Better Homes & Gardens. These let you drag and drop elements such as paths, beds, and plants onto a virtual yard. They’re designed for ease of use and can help you visualize your ideas with minimal drawing skills.
If I already jumped in and started planting without much planning, what’s a good first step to get back on track according to the guidance in your article? Should I move things around now, or wait until another season?
If you’ve already started planting without much planning, the article suggests assessing your current layout first. Take note of what’s thriving and what isn’t, and consider your yard’s sun, shade, and soil conditions. If you see obvious placement issues now, you can move plants early in the season or wait until fall or spring when transplanting causes less stress. Planning before your next step will help your landscape thrive.
You bring up the problem of overcrowding from poor planning. If my plants are already too close together, what’s the best way to fix that without damaging them or my yard’s overall design?
To fix overcrowding, carefully dig up and transplant some of the plants to give each one enough space to thrive. Do this during the cooler parts of the day and water them well afterward. Try to match each plant’s sun and soil needs in their new spots to keep your yard’s design balanced. You can also consider thinning out less healthy or duplicate plants if space is limited.
I’m curious about online tools for rough design sketches you mentioned. Are there any free ones you recommend that are particularly user-friendly for beginners?
Some free, beginner-friendly online tools for rough landscaping sketches include SketchUp Free, which is intuitive for 3D layouts, and Gardena’s My Garden planner for simpler, drag-and-drop designs. Both are web-based and don’t require design experience. If you prefer something even simpler, Google Drawings can also work for basic layouts. Each tool lets you experiment with shapes, pathways, and plant placements before you start digging.
If I already planted some shrubs without a master plan and now realize they’re overcrowded, is there a way to fix this mistake without starting completely over?
You don’t have to start over if your shrubs are overcrowded. The best solution is to carefully dig up and relocate some of the shrubs to give each plant enough space to grow. Try to do this during their dormant season to minimize stress. After transplanting, water them well and keep an eye on their recovery. This way, you can adjust your layout without losing your plants.
When you mention sketching a rough design for the yard, are there any specific online tools you recommend that are easy for beginners to use? I’ve never done landscaping before, so I’m not sure where to start with digital planning.
For beginners, there are a few user-friendly online tools to help you sketch your landscaping ideas. Try platforms like SmartDraw, Gardena’s My Garden, or Plan-a-Garden by Better Homes & Gardens. These tools offer drag-and-drop features and simple interfaces, making it easy to map out basic yard layouts without prior experience. Start with a rough outline of your space, then add elements like trees, plants, and paths to visualize your plan.
You talk about budgeting for things like soil, mulch, and tools. Are there certain areas where it’s better not to cut corners, or items you consider okay to buy more cheaply for a DIY landscaping project?
It’s wise not to cut corners on soil, mulch, and quality tools—these impact your plants’ health and the longevity of your landscaping. Good soil and mulch are investments in healthy growth, and sturdy tools last longer. However, items like decorative edging, plant markers, or less-critical garden décor can be purchased more cheaply if needed, as they don’t affect the core success of your project.
If I already made some impulse plant purchases before sketching out a design, what’s the best way to integrate them so I don’t end up with an overcrowded or mismatched look?
To make your impulse plant purchases work, start by grouping them according to their light, water, and growth needs. Lay them out on the ground before planting to visualize spacing and how they’ll look together. Place taller plants at the back or center and shorter ones in front. If some don’t fit, consider pots or another garden area so everything has enough space and creates a balanced look.
If I’ve already planted a few shrubs without a master plan, is it possible to integrate them into a cohesive design, or would you recommend starting from scratch to avoid future headaches?
You don’t need to start from scratch. It’s definitely possible to integrate your existing shrubs into a cohesive design. Begin by assessing their placement—consider their mature size, sunlight needs, and colors. Then, create a simple plan that adds complementary plants, pathways, or features around what you already have. Rearranging a few shrubs is an option if some are poorly placed, but often you can work with what’s there and build a harmonious landscape.
For sketching out a rough design, do you have any suggestions for specific free online tools that are easy for a beginner to use, or is graph paper usually better for hands-on planning?
For beginners, online tools like SketchUp Free and Gardena My Garden are user-friendly options for sketching rough yard designs. They offer drag-and-drop elements which make visualizing your space easier. However, if you prefer a more hands-on approach or want something quick and flexible, classic graph paper still works well for simple layouts. It really comes down to your comfort with digital tools versus traditional drawing—both methods are effective for planning.
How much time should I realistically set aside for the planning phase compared to the actual planting and building? I tend to underestimate how long it takes to map out goals and draw up a design.
It’s easy to underestimate planning time, but it’s a critical phase. Aim to spend at least as much time on planning as you do on the planting and building itself. For a medium-sized yard, this could mean several weekends mapping out your goals, measuring, and drawing a design. Good planning helps prevent costly mistakes and delays down the road.
If someone already planted shrubs and realized their yard is now overcrowded because they skipped the planning step, what’s the best way to fix this without wasting all the plants they bought?
You can carefully dig up and relocate some of the shrubs to other areas of your yard or even into containers if space is tight. Try to move them during cool weather, keep as much root ball as possible, and water them well after transplanting. If you still have extras, consider sharing with neighbors or friends so your plants don’t go to waste.
The article talks about analyzing your yard’s sun and shade patterns before planting. How do I accurately map out these patterns across the seasons, especially since the sunlight changes so much from spring to fall?
To accurately map your yard’s sun and shade patterns across the seasons, try observing and making notes or sketches at different times of day—morning, midday, and late afternoon—during spring, summer, and fall. Take photos during each time slot if possible. Remember that trees, buildings, and the sun’s angle will change the patterns, so a few observations per season will give you a clearer year-round picture.
You mentioned budgeting for soil, mulch, and edging—are there any areas where it actually makes sense to spend more upfront, or is it okay to go with cheaper options for now and upgrade later?
Spending more upfront on soil quality and proper edging can pay off in the long run, as these form the foundation of your landscape and are harder to fix later. Mulch is more flexible—it’s fine to use a budget option at first and upgrade later. Prioritize investing in elements that are difficult to replace or upgrade once your plants are established.
When mapping out sun and shade patterns as suggested in the planning section, how detailed should I get? Should I track light at different times of day for each season, or is a general observation enough before deciding on plant placement?
For most home landscapes, making general observations of sun and shade during morning, midday, and late afternoon is usually sufficient. Track this over a few typical days to get a sense of your yard’s patterns. However, if you’re planning for plants with very specific light needs or have lots of trees and structures creating variable shade, more detailed tracking—especially during different seasons—can help you make the best choices.
What’s the best way to adjust your landscaping plan if you realize halfway through planting that your initial spacing estimates were off and things are getting crowded? Should you replant immediately or wait until the next season?
If you notice plants are too crowded while you’re still planting, it’s best to adjust right away. Carefully dig up and reposition any plants that are too close, making sure to minimize root disturbance. If you’ve already finished planting and the plants are established, it may be better to wait until the next favorable planting season to move them. This reduces stress and gives them a better chance to thrive.
You mention budgeting for soil, plants, mulch, and tools in the planning phase. Are there any budget-friendly strategies or common money-saving mistakes that homeowners should be aware of when tackling a DIY landscaping project?
To save money on DIY landscaping, consider buying plants during end-of-season sales or swapping plants with neighbors. Renting tools instead of buying can also reduce costs if you only need them temporarily. A common mistake is buying too many materials without measuring your space first, so always calculate what you need before purchasing. Planning your project in phases can also help spread out expenses over time.
If I want to include both a small play area and a vegetable garden, is it better to design everything at once or tackle one element at a time to avoid the overcrowding and style mismatches you mentioned?
It’s usually best to create an overall design plan first, even if you build each area in stages. Planning everything together lets you visualize spacing, flow, and style, which helps avoid overcrowding and mismatched looks later. You don’t have to finish both areas right away, but a unified plan keeps your yard cohesive as you work.
You talk about needs evolving over time. How do you account for future changes, like adding a vegetable garden or a play area, when you’re making your initial landscape plan?
When planning your landscape, it’s helpful to sketch out possible future additions, like a vegetable garden or play area, and leave enough open space for them. Consider running irrigation or power lines to those zones in advance. Select flexible plantings and movable features so you can easily adapt the layout as your needs change over time.
I noticed you mentioned budgeting for materials like soil, plants, and tools. Do you have any advice on how to prioritize spending if my budget is limited, or tips on where it’s okay to save versus splurge in the planning stage?
When working with a limited budget, focus on improving soil quality first, since healthy soil benefits everything you plant. Invest in good-quality plants for focal points or high-traffic areas, but you can save by choosing smaller plants, which grow over time, or by propagating your own. Basic tools are usually fine for most jobs—no need to buy professional-grade unless you’ll use them often. Prioritize essentials and add extras as your budget allows.
When budgeting for landscaping, how much should I realistically expect to spend on materials like mulch and edging for an average-sized suburban yard? Are there areas where it makes sense to splurge versus save?
For mulch and edging in an average suburban yard, you might spend between $150 to $400 depending on material quality and yard size. Mulch typically costs $2–$5 per bag, while edging can range from $1–$4 per linear foot. It’s smart to invest a bit more in durable edging since it lasts longer, while you can save on mulch by buying in bulk or choosing natural options.
How long should I expect the planning phase to take if I want to avoid the common mistakes you describe? I don’t want to rush, but I also don’t want to be stuck sketching and mapping for months.
For most DIY landscaping projects, a thorough planning phase usually takes anywhere from one to three weeks. This gives you enough time to assess your yard, research plants, consider sun and shade, set a budget, and sketch out your ideas. Giving yourself at least a week or two helps you avoid rushed decisions but shouldn’t leave you stuck in planning for too long.
How much time should I expect to spend on the planning phase before actually doing any planting? Are there common signs that my plan is detailed enough so I don’t rush ahead and make mistakes?
For most DIY landscaping projects, spending at least one to two weeks on the planning phase is wise, especially if you’re new to it. Your plan is detailed enough if you have a clear sketch of your yard, a list of plants suited to your climate and sun exposure, a basic timeline, and a budget. If you can visualize each step and troubleshoot possible issues, you’re less likely to miss important details or rush into mistakes.
If my initial DIY efforts already resulted in overcrowded beds from impulse plant buys, what’s the best way to fix this without tearing everything up and starting over?
You don’t need to start from scratch. Begin by carefully thinning out your beds—gently dig up and relocate or gift excess plants to friends or another part of your yard. Focus on spacing them according to their mature size. Mulch any bare spots to prevent weeds, and keep monitoring for crowding as plants grow. This way, you preserve your current plants and gradually create a healthier, more attractive layout.
Time is pretty limited with work and kids, so how much planning is really enough before I can start planting? Is there a faster way to get organized without dragging out the project for months?
You don’t need an elaborate plan to get started—just a simple sketch of your yard, a rough list of plants you like, and knowing your sunlight and soil conditions can be enough. Set aside a weekend to prep and lay things out, then tackle one small section at a time. This way, you stay organized without letting the project stretch on too long.
When you talk about sketching a rough design, do you recommend any particular online tools for beginners that are easy to use? Graph paper seems a little old-school to me and I’m hoping for a digital option.
If you’d prefer a digital approach, there are several beginner-friendly tools to sketch your landscape ideas. Options like Gardena’s My Garden, SmartDraw, or even Canva let you create simple yard layouts without much learning curve. These tools typically offer drag-and-drop features and templates, making it easy to visualize your space without needing professional design skills.