

Introduction: Why DIY Tile Flooring is a Smart Home Upgrade
Tile flooring has long been celebrated for its durability, visual appeal, and versatility in home design. Whether you’re aiming for a classic ceramic look in your kitchen, a modern porcelain finish in your bathroom, or a rustic natural stone in your entryway, tile can elevate almost any space. Yet many homeowners assume that installing tile flooring is a project best left to the pros. In reality, with the right preparation, tools, and knowledge, DIY tile installation is not only achievable but can be a highly rewarding, cost-effective upgrade for your home.
This comprehensive guide will walk you through every essential phase of a DIY tile flooring project: from realistic cost breakdowns and budget planning, to a detailed list of must-have tools and supplies, and finally a step-by-step tutorial for flawless installation. You’ll learn to avoid common pitfalls, understand which materials best suit your needs, and gain expert tips for long-lasting, beautiful results. Whether you’re a first-time DIYer or a seasoned home improver, this resource will empower you to tackle tile flooring with confidence.
Cost Breakdown: Budgeting for Your Tile Flooring Project
Material Costs: Tile Types and Price Ranges
- Ceramic Tile: $1–$5 per sq. ft. Affordable and widely available, ideal for most rooms.
- Porcelain Tile: $3–$10 per sq. ft. Denser and less porous, suitable for high-moisture areas.
- Natural Stone (Marble, Slate, Travertine): $5–$20+ per sq. ft. Premium look but higher cost and maintenance.
- Glass Tile: $7–$30 per sq. ft. Best for accent areas; more challenging to install.
Underlayment and Subfloor Preparation
- Cement Backer Board: $0.75–$1.25 per sq. ft.
- Waterproof Membrane (Optional): $1–$3 per sq. ft.
- Leveling Compound: $30–$50 per bag (covers approx. 40 sq. ft. at 1/8″ thickness)
Adhesives, Grout, and Sealants
- Thinset Mortar: $15–$35 per 50 lb. bag (covers 60–90 sq. ft.)
- Grout: $10–$25 per 10 lb. box (covers 100–200 sq. ft., depending on tile size)
- Sealer (for grout or natural stone): $20–$50 per quart
Tool Rental or Purchase
- Wet Saw Rental: $40–$60 per day
- Manual Tile Cutter: $30–$100 to buy
- Other Tools: $50–$150 (trowels, spacers, buckets, mixing paddle, etc.)
Disposal and Miscellaneous
- Old Flooring Removal: $0.50–$2 per sq. ft. (DIY labor only; add for dumpster rental if needed)
- Unexpected Expenses: 10–15% of total budget recommended as a contingency
Sample Budget: 200 sq. ft. Project
- Mid-range porcelain tile: $1,200
- Backer board: $200
- Mortar and grout: $100
- Tools (rental + purchase): $150
- Disposal: $50
- Contingency: $170
- Total Estimated Cost: $1,870
While DIY tile flooring can cut labor costs dramatically, remember to factor in tool purchases, underlayment, and prep work. Always buy 10% more tile than you think you’ll need to cover cuts, mistakes, and future repairs.
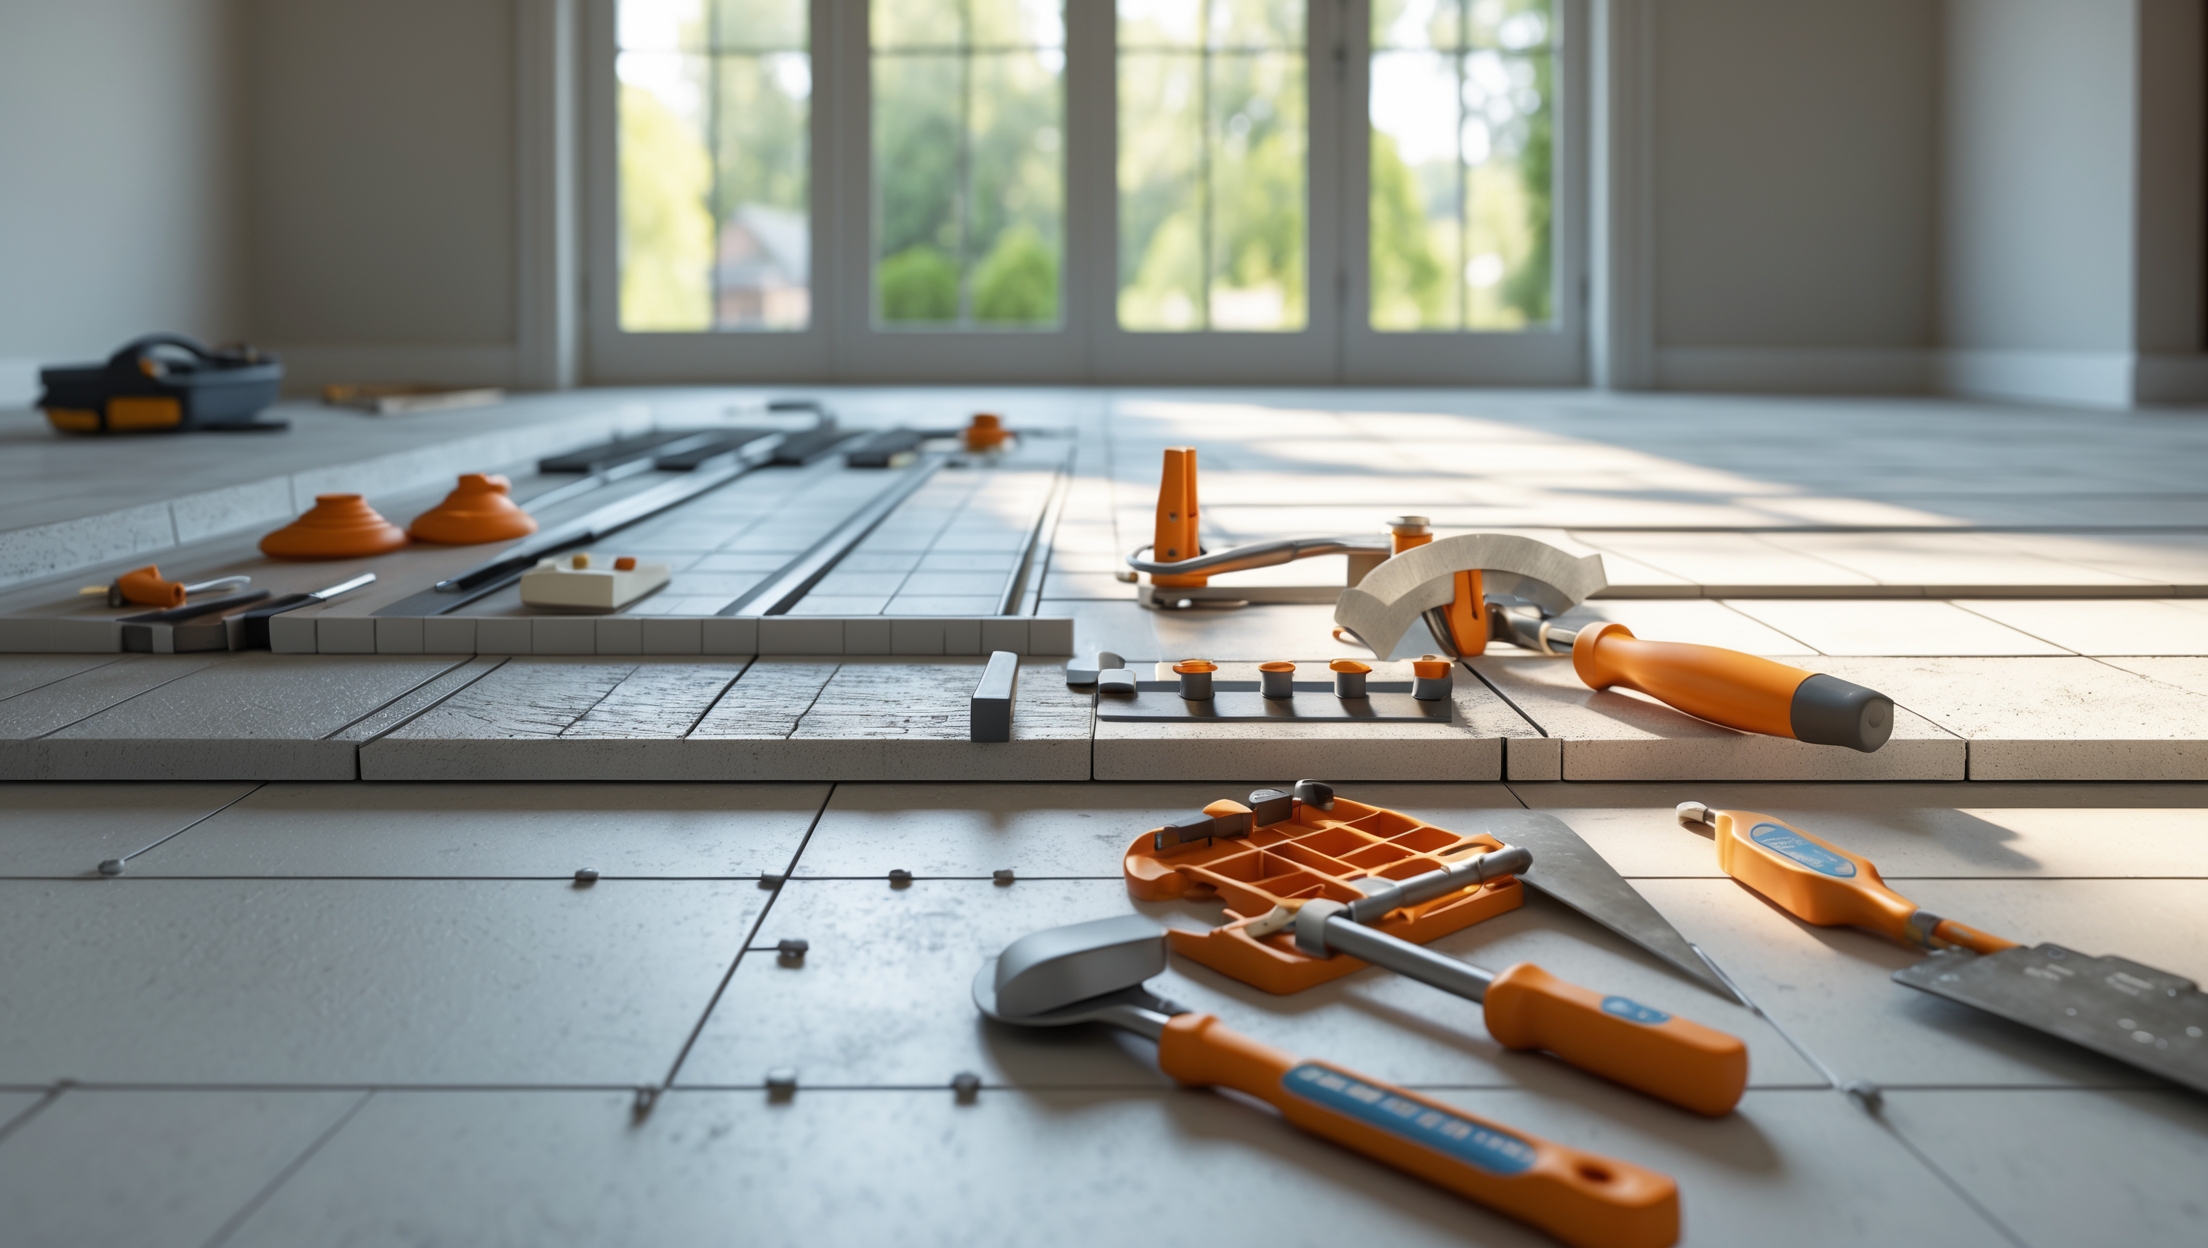
Essential Tools & Equipment for DIY Tile Flooring
Cutting and Measuring
- Wet Tile Saw: For precision cuts and thick or hard materials.
- Manual Tile Cutter: Quick, straight cuts on most ceramic and porcelain tiles.
- Tile Nippers: For small, detailed cuts and around irregular shapes.
- Tape Measure & Chalk Line: Accurate layout and planning.
- Square & Level: Ensures straight lines and even installation.
Installation Tools
- Notched Trowel: For spreading thinset mortar evenly.
- Rubber Mallet: Tapping tiles gently into place.
- Tile Spacers: Keep grout lines consistent.
- Mixing Paddle & Bucket: For mortar and grout mixing.
Finishing Tools
- Grout Float: Spreads grout into joints smoothly.
- Sponge & Clean Water: Wipes excess grout off tile surfaces.
- Knee Pads: Comfort for extended time on hard surfaces.
- Safety Gear: Gloves, eye protection, and dust mask.
Step-by-Step DIY Tile Flooring Installation
Step 1: Remove Old Flooring and Prepare Subfloor
Begin by removing any existing flooring and thoroughly cleaning the subfloor. Check for nails, staples, and debris. The subfloor must be level, stable, and clean. Use a long level or straightedge to identify high spots (sand them down) and low spots (fill with leveling compound). Allow the compound to fully cure before proceeding.
Step 2: Install Underlayment
For wood subfloors, install cement backer board using manufacturer-recommended screws and thinset mortar underneath. Tape and mud the seams with alkali-resistant mesh tape and thinset. For concrete subfloors, ensure the surface is clean and free of cracks. Apply a waterproof membrane if moisture is a concern.
Step 3: Dry Layout and Planning
Lay out your tile pattern without adhesive to plan the placement and minimize awkward cuts at edges. Use a chalk line to mark the center of the room and lay tiles along these reference lines. Adjust layout as needed for symmetry and aesthetics.
Step 4: Mixing and Spreading Thinset Mortar
Mix thinset mortar to a peanut butter-like consistency, following package instructions. Using a notched trowel, spread mortar over a small area (3’x3’ max). Comb the mortar with the notched edge to create ridges for better adhesion. Only spread as much as you can tile in 10–15 minutes to prevent drying.
Step 5: Setting the Tiles
Press tiles firmly into the mortar, twisting slightly for good contact. Insert spacers at each corner to maintain even grout lines. Periodically lift a tile to check for full coverage on the back. Use a level to check for flatness and adjust as needed. Continue working in small sections.
Step 6: Cutting Tiles
Measure carefully for edge and corner tiles. Use a manual cutter for straight cuts, and a wet saw for intricate or thick tiles. For small notches or curves, use tile nippers. Always wear eye protection when cutting tiles.
Step 7: Allow Mortar to Cure
Let the tiles set undisturbed for at least 24 hours, or as recommended by the thinset manufacturer. Avoid walking on the tiles during this period to ensure a strong bond.
Step 8: Grouting the Tiles
Remove tile spacers. Mix grout according to instructions. Use a grout float to press grout into the joints at a 45-degree angle. Work in small sections and remove excess grout from the tile surface with the float. After 15–30 minutes, wipe tiles with a damp sponge, rinsing frequently. Avoid pulling grout from the joints.
Step 9: Final Cleaning and Sealing
Once grout has cured (typically 24 hours), buff away any remaining haze with a dry cloth. Apply grout sealer as recommended, especially in kitchens, bathrooms, or natural stone installations. Allow sealer to cure fully before heavy use of the floor.
Pro Tips for a Flawless Tile Flooring Project
- Check for Lippage: As you lay tiles, continually check that adjacent tiles are flush to prevent tripping hazards and unsightly unevenness.
- Mind Expansion Joints: Leave a 1/4-inch gap around the room’s perimeter (covered by baseboard or molding) to allow for expansion and contraction.
- Mix Boxes of Tile: Tiles can vary slightly between boxes. Mix from several boxes as you install for a consistent look.
- Practice Cuts: Use scrap tile to practice using your cutter or saw before making final cuts.
- Grout Color: Test grout color on a few tiles before doing the whole floor. The color can look different when dry.
- Work Safely: Wear gloves, eye protection, and a dust mask, especially when cutting tiles.
DIY Tile Flooring Maintenance Best Practices
Routine Cleaning
- Sweep or vacuum regularly to remove grit that can scratch the surface.
- Mop with a mild detergent and warm water. Avoid harsh chemicals that can damage grout or sealer.
- Dry the floor after mopping to prevent water spots, especially on natural stone.
Grout and Sealant Care
- Inspect grout lines every few months. Reapply sealer annually if recommended for your grout or tile type.
- Promptly repair or re-grout areas where cracks or gaps appear to prevent moisture intrusion.
Preventing Damage
- Use felt pads under furniture legs to prevent scratching or chipping tiles.
- Clean spills quickly, especially on unglazed or natural stone tiles, to avoid staining.
- Avoid dropping heavy objects on the floor to minimize risk of cracks or chips.
Frequently Asked Questions About DIY Tile Flooring
Can I tile over existing tiles?
In some cases, yes, but the existing tile must be tightly bonded, clean, and level. You’ll also need to check that the added thickness won’t interfere with doors or transitions. It’s usually best to remove old tiles for a lasting result.
How long does a DIY tile floor take to install?
A 200 sq. ft. floor typically takes a weekend for experienced DIYers, not including drying times. Beginners should allow extra time for careful layout, cuts, and troubleshooting.
What’s the best tile for high-traffic areas?
Porcelain tile is highly recommended for entryways, kitchens, and bathrooms due to its density, durability, and water resistance.
Do I need to seal all tile floors?
Glazed ceramic and porcelain tiles typically do not require sealing, but grout lines and natural stone tiles almost always do. Follow manufacturer recommendations for your specific materials.
How can I prevent cracked tiles?
Proper subfloor preparation is key. Ensure the subfloor is level, rigid, and free of movement before tiling. Avoid walking on newly installed tiles until the mortar is fully cured.
Conclusion: Transform Your Space with DIY Tile Flooring
Embarking on a DIY tile flooring project can seem daunting, but with careful planning, the right tools, and attention to detail, it’s a home improvement task well within reach for most homeowners. The upfront investment in quality materials and solid preparation pays dividends in a beautiful, long-lasting floor that adds value and character to your home. By understanding the full scope of costs, assembling the essential tools, and following a proven, step-by-step approach, you’ll avoid common mistakes and ensure a professional-grade finish.
Remember, the key to success lies in preparation: double-check your measurements, invest in good tools, and don’t rush the process. Take pride in each stage, from subfloor prep to that final polish. Not only will you enjoy the satisfaction of a job well done, but you’ll also gain skills and confidence for future home improvement projects. Whether this is your first adventure with tile or you’re honing your DIY expertise, your efforts will be reflected in every step across your new, stunning floor.
Ready to get started? Gather your materials, review these steps, and transform your living space with a tile floor that’s as durable as it is beautiful. Happy tiling!
If my subfloor isn’t perfectly level, how much can leveling compound actually fix before it becomes a bigger problem? At what point is it better to call in a professional rather than try to DIY tile installation?
Leveling compound can typically handle dips or uneven spots up to about 1/2 inch deep. If you notice wider or deeper areas, or if the floor has significant sloping, it’s best to consult a professional to avoid future issues like cracked tiles. DIY works well for minor inconsistencies, but large or structural problems really need expert assessment for a long-lasting result.
The material cost range for natural stone tiles seems pretty wide—from $5 to over $20 per square foot. What factors drive that big price difference, and are there quality/maintenance trade-offs to consider for more affordable natural stone options?
The price of natural stone tiles varies due to the type of stone (like marble, slate, or travertine), where it’s sourced, and how it’s processed or finished. More affordable options may have more natural imperfections, less intricate finishes, or be thinner, which can affect durability and maintenance. High-end stones usually offer more consistent color, greater durability, and sometimes easier maintenance, but they cost more. Sealing and regular upkeep are important for all natural stone, but especially for the more porous, budget-friendly types.
I noticed you mention both cement backer board and optional waterproof membranes for subfloor prep. For a typical kitchen renovation, is it usually necessary to use both, or will cement board on its own suffice if spills are the main concern?
For most kitchen renovations, installing cement backer board alone provides a solid and moisture-resistant base, which is usually enough if you’re mainly concerned about occasional spills. Waterproof membranes are more important in areas with frequent water exposure, like bathrooms. Unless your kitchen is prone to lots of standing water or leaks, cement board should suffice for everyday protection.
Under adhesive costs, you mention thinset mortar and grout, but I’m curious if certain tile types—like glass tiles—require specialty versions of these products, or if the standard ones listed will work for all materials.
For some tile types like glass, you’ll need specialty products. Glass tiles usually require a white, non-sanded thinset mortar designed for glass, as standard thinset can show through and affect the look. Also, non-sanded grout is typically recommended for glass to avoid scratching. Always check the manufacturer’s recommendations for both the tile and adhesives to ensure the best results.
Can you give a rough estimate of how long a full tile flooring installation typically takes for a first-timer, from prep through grouting? I’m trying to figure out if I need to set aside a whole weekend or even longer.
For a first-timer, installing tile flooring in an average-sized room (about 100–150 square feet) usually takes two to three days. That includes prep work, laying tiles, waiting for adhesive to set, and grouting. If your area is larger or has tricky cuts, it might take longer. Setting aside a full weekend is realistic, but be prepared to finish up on the following day if needed.
When budgeting for a tile project, how much should I set aside for unexpected costs or overruns? Based on your experience, is there a typical percentage above the initial estimate that DIYers should anticipate?
It’s smart to plan for unexpected expenses when budgeting for a tile project. Many DIYers set aside an extra 10–20% above their initial estimate to cover things like damaged tiles, extra materials, or unforeseen tools. The specific percentage can vary, but 15% is a safe middle ground for most projects. This cushion helps ensure you’re prepared for surprises without stalling your progress.
I see the cost breakdown for materials, but do you have any tips on how to estimate the total project time for installing tile in a 200 sq. ft. space? I’m trying to figure out if I can realistically finish this in a weekend.
For a 200 sq. ft. tile installation, a weekend is doable if you’re prepared and have some DIY experience. Plan for about 4-6 hours for prep and layout, 6-8 hours for setting tiles, and 2-3 hours for grouting the next day after tile adhesive sets. Allow extra time for cleanup and any unexpected issues. With consistent effort, most people can finish over two days, but being flexible with your schedule helps.
Could you clarify whether the installation guide covers any specific tips for working with larger format tiles versus standard sizes? I’m curious if there are extra tools or techniques needed to prevent lippage or cracking during DIY installation with those larger tiles.
The installation guide does provide additional tips for working with larger format tiles. It highlights the importance of using a leveling system to prevent lippage and suggests a large notched trowel to ensure proper adhesive coverage. The guide also recommends back-buttering the tiles and working with a partner to handle the increased weight and size, which helps prevent cracking and improves alignment.
I noticed the article mentions a waterproof membrane as optional underlayment. For a busy family with pets and kids, would you recommend always using a waterproof membrane in kitchens and bathrooms, or are there cases where it’s not really necessary?
For families with pets and kids, especially in kitchens and bathrooms, using a waterproof membrane under tile flooring is highly recommended. It adds extra protection against spills, accidents, and moisture, which can prevent long-term damage to your subfloor. While not always mandatory, in busy households where water exposure is likely, it’s a smart step for durability and peace of mind.
When preparing the subfloor, you note that waterproof membranes are optional. In what situations would you say they’re necessary, and are there significant consequences if I skip this step in a kitchen installation?
Waterproof membranes are especially important if your subfloor is prone to moisture, like in kitchens where spills and leaks can occur, or if you’re installing over plywood or concrete that might absorb water. Skipping this step could lead to trapped moisture, which can cause tiles to lift, grout to crack, or even mold growth beneath your floor. For kitchens, it’s a smart precaution to include a membrane for long-term durability and peace of mind.
Could you explain a bit more about the difference between using cement backer board and leveling compound? Would both be used together for a really uneven subfloor, or does one replace the other?
Cement backer board and leveling compound serve different purposes. Cement backer board provides a stable, moisture-resistant surface for tile, while leveling compound is used to create a flat, even base. If your subfloor is very uneven, you would first use leveling compound to smooth it out. Once it’s level and dry, you can lay cement backer board on top to create the ideal surface for tiling. They are often used together in challenging situations.
For budgeting purposes, could you provide some guidance on how much extra tile and materials I should buy to account for waste and potential mistakes during a DIY install?
For most DIY tile flooring projects, it’s smart to buy about 10% extra tile to cover waste from cuts and any mistakes. For more complex patterns or rooms with lots of corners, you might want to increase that to 15%. The same percentage applies to grout and other consumables. This cushion helps ensure you won’t run short before finishing the job.
The cost breakdown lists several underlayment options. For a high-moisture basement, would you recommend both a waterproof membrane and cement backer board, or is one usually sufficient for most DIY jobs?
In a high-moisture basement, using both a waterproof membrane and cement backer board gives you the best protection against water damage, though many DIYers find a quality waterproof membrane alone is usually sufficient when paired with a proper tile underlayment. If you want maximum peace of mind, especially in areas prone to moisture, using both layers is a solid approach.
The article breaks down the price per square foot for different tile types, but what about the overall cost for tools and supplies if this is my first DIY tile project? How much should I budget extra if I don’t have any of the tools yet?
If this is your first DIY tile project and you need to buy all the tools and supplies, you should budget an additional $200 to $400 on top of the tile cost. Key tools include a tile cutter, notched trowel, spacers, level, rubber mallet, mixing bucket, grout float, and safety gear. Supplies like thin-set mortar, grout, and sealant are also needed. The exact amount depends on the brands and quality you choose, but this range covers most beginner setups.
You listed leveling compound as part of subfloor prep—how do I know if my existing floor really needs it before starting the project? Are there signs or tests I can do myself to avoid unnecessary steps or materials?
You can check if your floor needs leveling compound by looking for visible dips, humps, or uneven spots. Try placing a long level or a straight board on different areas of the floor. If you see gaps beneath the level or it rocks back and forth, your floor isn’t flat. Generally, if variations are more than 1/8 inch over 4 feet, leveling compound will help create a smooth surface for your tile. This quick check can help you avoid extra work if your floor is already even.
When budgeting for my DIY tile project, should I factor in any hidden costs besides those you listed, such as special tools I might need to rent or safety gear? I’d like to avoid surprises mid-project.
Absolutely, it’s smart to plan for possible hidden costs. Besides the standard tools and materials, you may need to rent a wet saw if you have a lot of tile cuts or are using thicker tiles. Don’t forget safety gear like knee pads, gloves, safety goggles, and a dust mask. Unexpected expenses can also include extra tiles for mistakes, grout sealant, or disposal fees for old flooring. Planning for these will help keep your project on budget.
Do you have an estimated average timeframe for completing a DIY tile flooring project in a 200 sq. ft. area, considering all phases from prep to grouting? This would help me plan around my regular business hours.
For a 200 sq. ft. area, the entire DIY tile flooring process—from prep and layout to setting tiles and grouting—typically takes about 2 to 3 days for most homeowners, allowing time for drying between steps. If working only after business hours, spreading the work across several evenings and a weekend is realistic. Drying and curing times, especially for adhesive and grout, are essential to factor in for best results.
For someone on a tight budget, is there a particular tile type or combination of underlayment materials you’d recommend to save money without sacrificing too much on quality? I’m planning a mid-sized kitchen and trying to keep costs under control.
For a budget-friendly kitchen floor, consider using ceramic tiles, as they are generally less expensive than porcelain but still durable and attractive. For underlayment, cement backer board is reliable and cost-effective, but if the subfloor is in good shape, a high-quality tile membrane or even a well-prepped plywood underlayment can save additional money. Always check that your chosen materials are compatible to ensure a lasting installation.
If I want to use glass tile for a kitchen backsplash, but the article mentions it’s more challenging to install, are there specific tools or tricks I should be aware of to avoid cracking or uneven lines during installation?
Glass tile does require special care during installation. Use a high-quality glass tile cutter or a wet saw with a diamond blade designed for glass to prevent cracking. Apply a white thinset mortar to avoid visible adhesive marks behind the glass. Also, use non-sanded grout to avoid scratching the surface. Carefully space each tile with spacers and avoid pressing too hard to keep your lines even and tiles intact.
You listed several essential tools for installation, but for a first-timer, which tools would you suggest renting instead of buying outright to keep the project affordable?
For a first-time DIY tile project, consider renting tools like a wet tile saw, tile cutter, and possibly a power drill with mixing attachment. These are typically more expensive and may not get much future use. Hand tools like notched trowels, spacers, and grout floats are usually inexpensive, so buying them makes sense for your toolkit.
If I want to install natural stone tiles in a high-traffic entryway, do you have any tips for managing the higher maintenance needs mentioned, or ways to make the upkeep less demanding over time?
For natural stone tiles in high-traffic entryways, sealing the tiles and grout regularly is key to preventing stains and moisture damage. Use doormats to catch dirt before it reaches the tiles, and clean up spills promptly to avoid etching or staining. Choose a quality penetrating sealer designed for your stone type, and reseal as recommended—usually every 1–2 years. Frequent sweeping and using a pH-neutral cleaner will also help maintain the tiles with less effort over time.
What are the most common mistakes beginners make when installing tile floors, especially regarding adhesive and grout application, and is there an easy way to spot potential problems before everything sets?
Beginners often use too much or too little adhesive, which can cause tiles to crack or come loose. Uneven adhesive also leads to lippage, where tiles sit at different heights. With grout, it’s common to not pack it fully into joints or to leave excess on the tile surface, which can cause staining. Before the adhesive sets, check that tiles are level and spaced evenly; use a straight edge to spot unevenness. Also, gently lift a tile to ensure full adhesive coverage underneath before continuing.
I’m a little confused about underlayment options. Between cement backer board and a waterproof membrane, do I need both for most installations, or can I get away with just one? How do I decide which is necessary for my project?
Whether you need cement backer board, a waterproof membrane, or both depends on your specific installation area. For most dry areas like kitchens or hallways, cement backer board alone is usually enough. If you’re tiling in a wet area such as a shower or bathroom floor, adding a waterproof membrane is recommended for extra moisture protection. Consider your room’s moisture exposure before deciding.
For those estimating project time, how many hours should a first-time DIYer budget for removing old flooring and prepping the subfloor before actually starting tile installation?
For a first-time DIYer, removing old flooring and prepping the subfloor usually takes anywhere from 6 to 12 hours for an average-sized room, such as a kitchen or bathroom. The exact time depends on the type of old flooring (like carpet, vinyl, or old tile) and the condition of the subfloor. If the subfloor needs repairs or leveling, you might need a few extra hours.
Based on your cost breakdown, what would you estimate as a realistic total price per square foot for a mid-range DIY install including tile, underlayment, mortar, and grout but not counting labor? Just trying to figure out what I should budget for a 300 sq. ft. area.
For a mid-range DIY tile flooring project, you can expect to pay around $5 to $10 per square foot for materials like tile, underlayment, mortar, and grout. For a 300 sq. ft. area, that works out to a total budget of about $1,500 to $3,000, not including labor. This range will vary depending on your tile selection and local prices.
You pointed out that a waterproof membrane is optional for subfloor prep. How do I know if my room really needs it, especially if I’m installing tile in a laundry room where spills are possible?
In a laundry room, where water spills or leaks can happen, using a waterproof membrane is strongly recommended to protect your subfloor from moisture damage. If your subfloor is wood or if the room is on a level above finished spaces, the membrane adds valuable protection. It’s less crucial for concrete floors at ground level, but still beneficial if you want extra peace of mind against leaks.
For someone on a tight budget, how much could I realistically save by doing a tile floor installation myself versus hiring a professional, taking into account not just materials but also tool costs mentioned in the article?
By doing your own tile floor installation, you could save anywhere from 40% to 60% of the total project cost compared to hiring a professional. Most of your expenses would be for materials, plus basic tools like a tile cutter, trowel, and spacers, which the article notes can add $50–$150 up front. In contrast, labor costs from professionals often double the price. So for a medium-sized room, you might save several hundred dollars by tackling the job yourself.
I noticed that natural stone tiles have a much higher price range compared to ceramic and porcelain. Besides the look, are there major differences in durability or maintenance that could impact their suitability for a small business’s high-traffic entryway?
Natural stone tiles are generally more durable than ceramic but require more maintenance. They’re porous, so they need regular sealing to prevent staining and moisture damage—especially in high-traffic areas like a business entryway. Porcelain is less prone to scratching and easier to maintain, making it a practical option if you want durability with lower upkeep.
How much extra time should I allot in my project schedule for potential pitfalls or mistakes that a first-time DIYer might encounter during tile installation, especially during subfloor prep or tile cutting?
For a first-time DIY tile installation, it’s wise to add an extra 30–50% to your estimated timeline, especially for subfloor prep and tile cutting. For example, if you think the whole project will take 3 days, plan for 4–5 days instead. Subfloor leveling and tile cutting can be tricky, so extra time helps you manage mistakes or slowdowns without feeling rushed.
The article lists several options for underlayment and subfloor prep, like cement backer board and waterproof membranes. How do I decide if the waterproof membrane is truly necessary for a kitchen, or is it mostly recommended for bathrooms?
In kitchens, a waterproof membrane is helpful but not always essential. It’s highly recommended if your kitchen is prone to spills, has sinks or appliances where leaks are possible, or if you want extra protection for the subfloor. Cement backer board alone works for most kitchens, but adding a membrane gives peace of mind, especially in homes where moisture might be a concern.
For the cost breakdown, are there any unexpected expenses that tend to come up during a DIY tile flooring project, like needing extra leveling compound or replacement tiles? Wondering how much buffer to add to my initial budget to be safe.
Unexpected expenses are common in DIY tile projects. You might need extra leveling compound if the subfloor is uneven, additional tiles for mistakes or future repairs, and possibly new underlayment or tools you didn’t anticipate. It’s wise to add 10–20% to your tile quantity for waste and mistakes, and another 10–15% to your overall budget for unforeseen costs. This should give you a comfortable buffer.
After finishing installation, how soon can furniture be moved onto the new tile floor? Does the step-by-step section mention recommended curing or waiting times for grout and mortar to reach full strength?
You should wait at least 24 to 48 hours after laying the tile before moving furniture onto the new floor. The step-by-step section recommends allowing the mortar and grout to fully cure during this period to ensure the tiles set properly and to avoid shifting or damage. For the best results, double-check the specific product instructions, as some mortars or grouts may require a bit more time.
When calculating the total project budget, should I factor in extra tile for potential breakage and trimming? If so, how much extra do you recommend purchasing compared to the actual square footage of the space?
Yes, it’s important to include extra tile in your budget to account for breakage, mistakes, and cuts around edges. A common rule of thumb is to purchase an additional 10% over your measured square footage. For rooms with unusual shapes or lots of cuts, consider increasing that to 15%. This helps ensure you have enough matching tiles to finish the project smoothly.
The article mentions using leveling compound for subfloor preparation. If my existing floor already feels pretty smooth and even, can I skip this step, or are there hidden issues I might face down the line?
If your floor feels smooth and even, you might be able to skip the leveling compound. However, even slight dips or high spots can cause tiles to crack or become uneven over time. It’s a good idea to use a long level or straightedge to check for subtle irregularities. If you find any uneven areas larger than 1/8 inch over six feet, applying a leveling compound is recommended to prevent future problems.
You mention using a waterproof membrane as an optional part of subfloor prep. Is this step strongly recommended for kitchens, or is it mainly needed for bathrooms and other high-moisture areas?
For kitchens, a waterproof membrane isn’t always mandatory like it is in bathrooms, but it can still be a smart precaution. Kitchens do face occasional spills and leaks, so adding a membrane helps protect the subfloor from unexpected water damage. If your kitchen tends to see a lot of moisture or has plumbing nearby, it’s a good idea to include this step.
This guide makes tile installation sound doable for someone like me, but how long should I realistically expect the whole process to take if I have zero experience? Is it something I can finish in a weekend, or should I plan for more time?
If you have no prior experience with tile flooring, it’s wise to set aside more than just a weekend. For an average-sized room, the project could take 3 to 4 days, factoring in time for prep work, careful tile placement, drying periods, and grouting. Rushing the process can lead to mistakes, so plan for extra time to ensure quality results.
If my existing subfloor has a few uneven spots, do I always need to use a leveling compound, or are there situations where it can be skipped for tile installs?
Leveling compound is important for tile installations because tiles need a flat surface to avoid cracks and uneven lines. However, if the uneven spots in your subfloor are very minor—less than 1/8 inch over 10 feet—you might be able to skip the compound and use a thicker layer of thinset. For anything more significant, it’s best to use leveling compound to ensure a long-lasting, professional result.
I’m a little confused about the subfloor prep—how do I know if I actually need leveling compound or if my floor is already flat enough? What signs should I look for before moving on to the next step?
To check if your subfloor is flat enough, lay a long level or a straight board (at least 4 feet long) across various areas of the floor. If you see gaps larger than 1/8 inch under the board, or if the level shows obvious dips or humps, you’ll need leveling compound. Also watch for squeaks or flexing, which could indicate the subfloor needs repair before tiling.
If I’m trying to keep costs down for my small office remodel, which area of the tile flooring process tends to throw off budgets the most? Is it usually the materials, the prep work, or something unexpected?
In most DIY tile flooring projects, unexpected costs often come from the prep work, especially if you discover uneven subfloors or hidden water damage that needs fixing before tiling. While materials and basic prep are predictable, surprises during tear-out or leveling can quickly add up, so it’s wise to budget a little extra for unforeseen issues in the prep stage.
For a first-time DIYer, how hard is it to install glass tile compared to ceramic or porcelain? You mention glass is more challenging, but are there specific pitfalls or extra tools needed that I should plan for?
Installing glass tile is a bit trickier than working with ceramic or porcelain mainly because glass tiles are more prone to chipping and can show adhesive through the tile if not applied carefully. You’ll want to use a glass tile cutter or a wet saw with a diamond blade specifically designed for glass. Also, opt for a white, non-sanded thin-set mortar to prevent scratching and maintain the tile’s appearance. Take extra care with grout choice and application to avoid scratching the surface.
When budgeting for a DIY tile floor, how much extra material should I really buy to account for mistakes or tricky cuts? The cost breakdown mentions price per square foot, but I want to avoid running short mid-project.
It’s smart to plan ahead! For most DIY tile projects, buying about 10% extra tile over your calculated square footage is recommended. If your space has lots of corners, angles, or tricky cuts, consider bumping that up to 15%. This extra material helps cover breakage, miscuts, and future repairs, so you won’t risk running short.
If my budget is tight, are there any tools listed as ‘must-have’ that could reasonably be rented or borrowed without sacrificing quality or results? I’m trying to avoid big purchases for a one-time project.
Absolutely, for a one-time tile flooring project, many of the ‘must-have’ tools like a wet tile saw, tile cutter, and even a power drill can be rented from hardware stores or borrowed from friends or neighbors. Renting or borrowing these larger or specialized tools won’t compromise your results, while letting you avoid hefty purchases for items you may not need again.
Do you have any tips on cutting glass tile cleanly for accent areas? The price per square foot is higher, so I’m worried about wasting material with bad cuts or chipping. Are there specific tools or blades that make a big difference?
Cutting glass tile cleanly does require the right tools and technique. Use a wet saw with a diamond blade specifically labeled for glass tiles to minimize chipping. For small cuts or shaping, a glass tile nipper can help. Always apply painter’s tape along the cut line to reduce splintering. Work slowly, keep the blade wet, and avoid forcing the tile through the saw—this helps preserve those pricier tiles and reduces waste.
When budgeting for ceramic versus porcelain tile, besides the price differences listed, are there any other hidden costs during installation or prep work that I should be aware of?
Yes, there can be a few extra costs to consider. Porcelain tiles are denser and harder, so they often require more specialized cutting tools or stronger blades, which can add to tool rental or purchase expenses. Also, porcelain is heavier, so delivery or handling costs might be higher. Both types may need specific adhesives and underlayment depending on your subfloor. Factoring in possible waste from cuts and breakage is also smart when budgeting.
For a bathroom renovation, would it be better to spend extra on a waterproof membrane under porcelain tile, or is it usually safe to rely on the backer board alone to protect against moisture over time?
Using a waterproof membrane under porcelain tile in a bathroom adds significant moisture protection, especially in areas like showers or where water is likely to seep through grout lines. While cement backer board is water-resistant, it’s not entirely waterproof. Investing in a membrane helps prevent long-term issues like mold or water damage beneath your tiles. For best results and peace of mind, especially in bathrooms, it’s wise to include a waterproof membrane in your renovation.
You mention leveling compound as part of subfloor preparation, but what happens if I skip that step? Are uneven floors just a cosmetic issue, or could it cause bigger problems down the line with the tiles?
Skipping the leveling compound can lead to more than just cosmetic issues. Uneven floors can cause tiles to crack, shift, or become loose over time, especially in high-traffic areas. Grout lines may also become uneven and prone to crumbling. Properly leveling your subfloor helps ensure the tiles sit flat and remain securely in place, preventing these problems down the line.
If I run into issues with uneven subfloor despite using leveling compound, what troubleshooting steps do you recommend? Do most DIYers need to repeat the leveling process, or is it usually a matter of technique during installation?
If your subfloor remains uneven after using leveling compound, it’s often necessary to repeat the process—sometimes unevenness is due to not applying enough compound or missing low spots. Carefully inspect and mark problem areas, then reapply where needed. Technique matters too: using a long straightedge during application and allowing proper drying time helps. Most DIYers need at least two rounds for perfect results.
I’m budgeting for my first DIY tile project, and I’m not sure how to factor in potential unexpected expenses. What are some common surprises or pitfalls that might come up during subfloor preparation or installation that could affect my total costs?
Unexpected expenses often crop up if your subfloor isn’t level, has water damage, or needs reinforcement—repairs here can add extra material and labor costs. You might also discover you need additional backer board, underlayment, or specialized tools if the existing floor isn’t suitable. During installation, broken tiles, extra grout, or mistakes that require redoing sections can increase your total spending. It’s wise to budget an extra 10-20% beyond your initial estimates to cover these possible issues.
For someone with no prior tiling experience, roughly how many days might it take to tile a 200 square foot room following the steps in your tutorial? I need to plan for downtime in my business.
For someone new to tiling, expect the project to take about 3 to 4 full days for a 200 square foot room. This includes a day for surface prep, a day or two for laying and cutting tiles (allowing for learning time), and another day for grouting and cleanup. Add extra time if the room has complex angles or obstacles.
For the cost breakdown you provided, does your estimate for underlayment and subfloor prep cover older homes where the subfloor often needs extra leveling or repair work? I’m working with a 1950s house and wondering what kind of hidden costs I should budget for.
The cost breakdown in the article covers standard underlayment and basic subfloor prep, but for a 1950s house, you may need to budget extra for leveling, patching, or replacing damaged subfloor sections. Unexpected issues like rot or uneven floors can add both time and cost, so it’s wise to set aside an additional 10–20% of your budget for these possible repairs.
When budgeting for a DIY tile flooring project, does your cost breakdown factor in potential waste from tile cuts or breakage? If so, how much extra material do you recommend purchasing to account for mistakes or pattern alignment?
The cost breakdown in the article does take potential waste from tile cuts and breakage into account. Generally, it’s wise to buy about 10% extra tile for standard layouts, and up to 15% more if you’re working with intricate patterns or diagonal designs. This ensures you have enough material to cover mistakes, cuts, and to match patterns properly without running short.
For a first-timer, how do I know if my subfloor really needs the leveling compound you mentioned, or can I just use the cement backer board? Is there an easy way to check if my floor is level enough before I start tiling?
To check if your subfloor needs leveling compound, use a long level or straightedge and lay it across different areas of the floor. Look for gaps under the tool or places where it rocks back and forth—if you find dips or high spots over 1/8 inch in a six-foot span, leveling compound is a good idea. Cement backer board helps, but it doesn’t correct major unevenness. Take time to check before starting to ensure your tiles lay flat and last longer.
Could you clarify how to estimate the right amount of mortar and grout needed for a project? The coverage per bag seems to vary, so I want to avoid buying too little or too much.
To estimate mortar and grout amounts, start by measuring your floor’s square footage. Mortar bags usually list coverage per square foot, but coverage varies by tile size and trowel notch—check the bag for specifics. For grout, coverage depends on tile size and grout joint width; most grout bags include a coverage chart. Always add about 10% extra to your calculations to account for waste and cutting mistakes.
In the budget planning section, do the cost estimates for adhesives and grout account for potential overages or waste, or should we plan to buy extra beyond those amounts?
The cost estimates for adhesives and grout in the budget planning section are based on typical usage, but they don’t specifically account for overages or waste. It’s wise to plan for a bit extra—generally about 10% more—to cover mistakes, cuts, and unexpected needs during installation. This helps ensure you don’t run short mid-project.
When budgeting out the project with the ranges you’ve listed, does the tile type (like porcelain vs. ceramic) impact the installation process or just the upfront cost? Are there any extra steps or tools needed for premium options like natural stone?
The tile type affects both cost and installation. Porcelain and ceramic are similar to install, but porcelain is harder, so it may require a stronger tile cutter. Natural stone tiles, like marble or slate, often need sealing before and after installation and may require a wet saw for cutting. These extras can add time and cost, so be sure to factor them into your budget and tool list.
For a first-time DIYer, how critical is it to use a waterproof membrane over just cement backer board when tiling a bathroom floor, especially if the bathroom doesn’t see heavy water exposure?
Using a waterproof membrane over cement backer board is an extra precaution, especially in bathrooms. While backer board is moisture-resistant, it’s not fully waterproof. If your bathroom doesn’t get a lot of water on the floor, you can often skip the membrane, but it still adds long-term protection against leaks or spills. For peace of mind and best durability, many pros recommend adding the membrane, but it’s not strictly necessary for low-exposure areas.
The article mentions natural stone tile being higher maintenance compared to ceramic or porcelain. What kind of extra maintenance should I expect if I choose marble or slate for a foyer?
If you choose marble or slate for your foyer, you’ll need to regularly seal the tiles to protect them from stains and moisture, since natural stone is porous. Cleaning should be done with pH-neutral cleaners, not harsh chemicals. You’ll also want to quickly wipe up spills to avoid etching or staining, and be cautious with abrasive dirt or grit that can scratch the surface.
When budgeting for a DIY tile floor, is there a rule of thumb for estimating waste or breakage? For someone new to tiling, how much extra tile should I buy to account for mistakes or cuts?
When planning your tile purchase, it’s wise to buy extra to cover waste, breakage, or mistakes. Most experts suggest adding 10% more tile than your measured area for standard layouts. If your room has lots of angles or you’re using intricate patterns, consider increasing that to 15%. This cushion helps ensure you don’t run short during installation or future repairs.
When budgeting for a tile floor, how do labor costs compare if I decide to hire out just the subfloor prep but do the actual tiling myself? The guide lists material prices but I’m trying to estimate partial DIY savings.
Hiring out just the subfloor prep can save you a significant portion of labor costs, since subfloor prep usually accounts for about 25–35% of the total labor fee, with the rest going to tile installation. By handling the tiling yourself, you’ll pay only for the prep, so you can expect to save more than half of what a full-service installer would charge for labor. Exact prices depend on your region and the complexity of the job.
I’m curious about the total installation time for DIY tile flooring. The article breaks down material costs and tools, but about how many hours or days should a first-timer plan for, especially if they’re tiling an average-sized kitchen?
For a first-timer tiling an average-sized kitchen, you should plan for about 2 to 3 full days. This includes a day for prepping the subfloor and laying out tiles, another day for setting the tiles and letting the adhesive cure, and a final day for grouting and cleanup. Allow extra time if you need to move appliances or if your layout has tricky cuts.
The article breaks down costs for different tile types, but what about tile waste and overage? How much extra tile do you recommend buying to account for cuts and future repairs, and should this be included in the initial budget?
It’s smart to plan for extra tile when budgeting your project. Most professionals suggest buying 10% to 15% more tile than your measured area to cover waste from cuts, pattern matching, and future repairs. Yes, you should include this overage in your initial budget to avoid shortages or mismatched batches later.
I’m trying to estimate my total project cost. Does your budget breakdown include waste from cutting tiles and mistakes, or should I plan for extra material beyond the square footage of my rooms?
The budget breakdown in the article is based on the square footage of your rooms and typical material costs, but it’s wise to buy extra tiles to account for cuts, waste, and possible mistakes. Most professionals recommend adding about 10% extra to your total square footage to ensure you have enough material for your project.
If the subfloor in my commercial space is already uneven, would you recommend using leveling compound only, or should I also factor in both cement backer board and a waterproof membrane for the most stability?
For an uneven subfloor in a commercial space, it’s usually best to use a self-leveling compound first to create a flat surface. After leveling, adding cement backer board will provide extra strength and durability, especially for high-traffic areas. Including a waterproof membrane is also wise if moisture is a concern, such as in bathrooms or kitchens. Combining all three methods will give you the most stable and long-lasting tile installation.
You break down the costs nicely, but what would you estimate the average total spent per square foot is for a small 100 sq. ft. kitchen, including all the adhesives and underlayment? Trying to see how this stacks up against pre-finished flooring.
For a small 100 sq. ft. kitchen, the total average cost for tile flooring—factoring in tiles, adhesives, underlayment, grout, and basic tools—typically ranges from $5 to $15 per square foot, depending on the tile quality and local prices. This puts your project at about $500–$1500 overall, which is often comparable to or a bit less than many pre-finished flooring options.
For a busy family home with pets and kids, would you recommend porcelain or ceramic tile given the differences in price and durability described in the article? I’m worried about scratches and spills, so any advice on the best long-term choice would help.
Given your concerns about scratches and spills in a busy household with pets and kids, porcelain tile is usually the better long-term choice. While it can cost a bit more than ceramic, porcelain is denser and more durable, making it more resistant to scratches, chips, and moisture. This makes maintenance easier and helps the flooring hold up better over time in high-traffic areas.
Once all the tools and materials are gathered, how long should a DIY tile flooring project typically take from start to finish for an average-sized room? Are there particular steps that usually cause delays for first-timers?
For an average-sized room, most DIYers can expect the tile flooring project to take two to four days, depending on experience and complexity. Prepping the subfloor and allowing the adhesive and grout to dry are the most common causes of delays, especially for first-timers. Taking extra care with layout and cutting tiles also tends to slow things down, but patience here leads to better results.
If I’m trying to stick to a really tight budget but want the floor to last, which combination of tile type and subfloor prep would you recommend from your breakdown?
For a durable floor on a tight budget, porcelain or ceramic tiles are your best bet—they’re affordable and tough. Make sure your subfloor is clean, dry, and level. If you have wood subfloors, adding a cement backer board is a cost-effective way to prevent cracking and ensure longevity. Skimping on subfloor prep can lead to problems later, so invest some time there for lasting results.
For a DIYer tackling tile flooring for the first time, can you clarify how to determine if cement backer board or a waterproof membrane is necessary for the subfloor, especially in areas like kitchens versus bathrooms?
When deciding between cement backer board and a waterproof membrane, consider the room’s moisture exposure. In bathrooms or any area regularly exposed to water, a waterproof membrane is important for protecting the subfloor. For kitchens, cement backer board usually provides enough stability and moisture resistance unless the area is especially wet, in which case adding a membrane is wise. Always check your local building code for specific requirements.
Based on the material and tool costs listed, what would be a reasonable total budget estimate for tiling a 150 square foot kitchen with basic ceramic tile, including all the prep supplies?
For a 150 square foot kitchen using basic ceramic tile, a reasonable budget estimate—including tiles, adhesive, grout, underlayment, spacers, sealer, and essential tools—would typically fall between $750 and $1,200. This range covers both materials and prep supplies, assuming you’re purchasing mid-range products and renting any specialty tools you don’t already own.
When planning the cost for a DIY tile floor, what hidden expenses should I watch out for beyond the materials and tools you listed? Are there common surprises that tend to pop up during installation?
Beyond the main materials and tools, hidden expenses can include underlayment or subfloor repairs, waste from cut tiles, extra adhesive or grout, and rental fees for specialty tools if you don’t own them. You might also encounter costs for disposal of old flooring and unexpected fixes for water damage or uneven surfaces once you lift the old floor. It’s smart to budget at least 10-15% extra for these surprises.
Could you clarify how critical the waterproof membrane is for areas that aren’t typically exposed to much moisture, like a boutique’s main floor? I’m trying to figure out if I can skip that step and save on both time and budget.
For a boutique’s main floor, which usually isn’t exposed to much moisture, a waterproof membrane isn’t strictly necessary. You can often skip this step to save time and money, as long as the area is indoors, away from water sources, and the subfloor is in good condition. Just be sure to address any cracks or moisture concerns before tiling.