

Introduction: Why Seasonal HVAC Maintenance Matters
Heating, ventilation, and air conditioning (HVAC) systems are among the hardest working components in any home, quietly maintaining comfort through blazing summers and icy winters. Yet, many homeowners overlook regular maintenance, leading to unexpected breakdowns, higher energy bills, and even premature system failure. A well-maintained HVAC system is more than a luxury—it’s a necessity for air quality, energy savings, and home safety.
This comprehensive seasonal HVAC maintenance checklist will guide you through specific, actionable steps for each part of the year. Whether you’re a seasoned DIYer or new to home upkeep, following these guidelines will ensure your system runs efficiently, keeps utility costs in check, and extends the lifespan of your investment. We’ll cover everything from filter changes and coil cleaning to thermostat calibration and outdoor unit care. No fluff—just practical advice you can implement right away. Let’s dive in and make sure your home’s comfort never skips a beat, regardless of the season.
Understanding Your HVAC System: The Essentials
Key Components of Typical Residential Systems
- Furnace or Heat Pump: Provides heating during cold months.
- Air Conditioner or Heat Pump: Cools your home in summer.
- Air Handler and Ductwork: Circulates conditioned air.
- Thermostat: Controls temperature and system scheduling.
- Filters: Trap dust and allergens, protecting system components.
- Condensate Drain: Removes moisture from air conditioning process.
Understanding these components will help you perform targeted maintenance and spot issues before they become costly repairs.
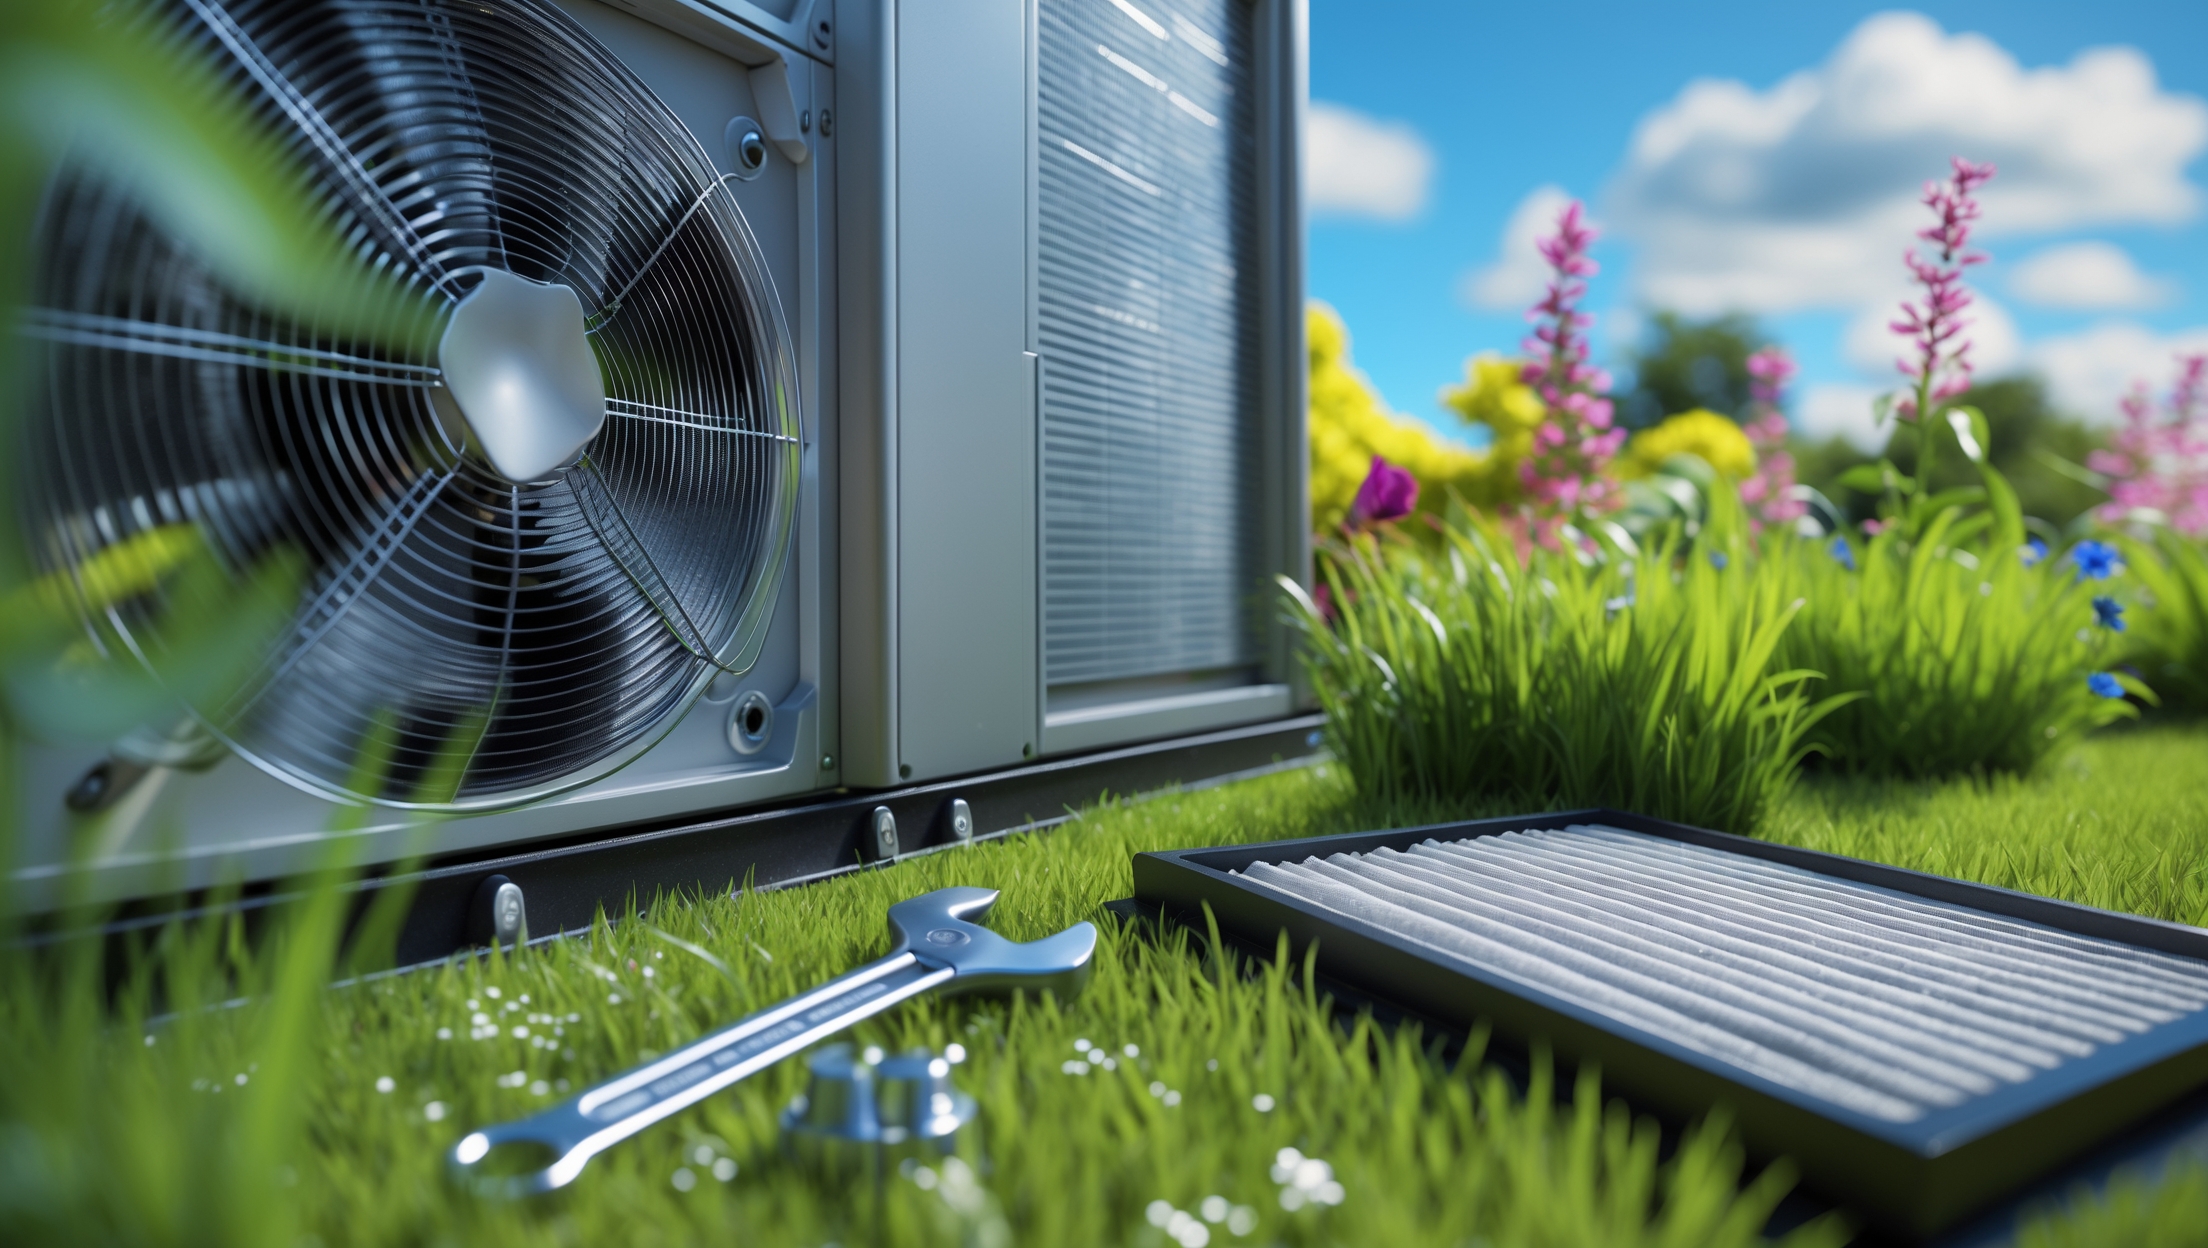
Spring HVAC Maintenance: Preparing for Cooling Season
1. Replace or Clean Air Filters
Dirty filters restrict airflow, reduce system efficiency, and can lead to breakdowns. Replace disposable filters or clean reusable ones every 1–3 months, but always check at the start of spring.
2. Inspect and Clean the Outdoor Condenser Unit
- Turn off power to the unit.
- Remove leaves, dirt, and debris from around the condenser.
- Use a soft brush or vacuum to clean the fins. Straighten bent fins with a fin comb.
- Spray the coils gently with a hose (never use a pressure washer).
3. Check Refrigerant Lines and Insulation
Inspect refrigerant lines for visible insulation damage. Replace foam insulation if it’s brittle, missing, or cracked. This preserves cooling efficiency and prevents energy loss.
4. Test System Operation
- Set the thermostat to cooling mode and let the system run for 15–20 minutes.
- Listen for unusual noises, check for proper cooling, and ensure air is flowing evenly from vents.
5. Clean or Clear the Condensate Drain Line
Pour a cup of distilled vinegar or a manufacturer-recommended cleaner down the condensate drain to prevent clogs and mold buildup. Check for leaks and ensure the drain is clear of blockages.
6. Schedule Professional Inspection
Consider an annual spring tune-up with a licensed HVAC technician. They’ll check refrigerant levels, test electrical connections, and inspect for hidden issues.
Summer HVAC Maintenance: Keeping Cool Under Pressure
1. Monitor Air Filter Condition
During heavy summer use, check filters monthly. Replace or clean as soon as they appear dirty to maintain airflow and system efficiency.
2. Maintain Clearance Around Outdoor Unit
- Keep at least 2 feet of clearance around the condenser unit.
- Trim grass, bushes, and remove debris weekly.
3. Inspect Ductwork for Leaks
Check accessible ducts in basements, attics, or crawlspaces for visible gaps, loose connections, or damaged insulation. Seal minor leaks with HVAC foil tape—not duct tape—or mastic sealant.
4. Check Thermostat Settings and Batteries
Ensure your thermostat is set for efficient cooling. Replace batteries in programmable thermostats every summer to avoid unexpected malfunctions.
5. Monitor System Performance
- Pay attention to higher energy bills, reduced cooling, or excess humidity—these may signal developing problems.
- Call a professional if you hear new noises, notice ice on the coils, or experience frequent cycling.
Fall HVAC Maintenance: Getting Ready for Heating
1. Replace or Clean Air Filters
Start the heating season with a fresh filter to ensure healthy air quality and efficient operation.
2. Inspect the Furnace Burner and Blower
- Turn off power and gas supply before inspection.
- Vacuum dust from around burners and blower components.
- Check for rust or corrosion.
If you smell gas or see signs of wear, call a professional immediately.
3. Test Smoke and Carbon Monoxide Detectors
- Test alarms and replace batteries.
- Install detectors near bedrooms and the furnace for maximum safety.
4. Inspect Exhaust Vents and Chimneys
Check that vent pipes are securely connected and free of obstructions or nests. Blocked exhaust can lead to dangerous carbon monoxide buildup.
5. Set Thermostat for Heating
Check that your thermostat switches smoothly between cooling and heating. Program energy-saving schedules for milder fall temperatures.
6. Schedule a Professional Furnace Tune-Up
Have a qualified technician inspect burners, heat exchanger, safety controls, and ignition system. Early detection of problems can prevent mid-winter breakdowns.
Winter HVAC Maintenance: Ensuring Reliable Heating
1. Monitor and Replace Air Filters Frequently
Heating season means more dust and drier air. Check filters every 30 days for best performance and air quality.
2. Inspect Vents and Registers
- Make sure all supply and return vents are open and unobstructed by furniture or rugs.
- Vacuum dust and pet hair from vent covers as needed.
3. Check for Drafts and Seal Leaks
Inspect windows and doors for drafts. Seal gaps with weatherstripping or caulk to reduce heat loss and system workload.
4. Listen for Unusual Noises
Clanking, grinding, or banging sounds may indicate mechanical issues. Address them quickly to avoid major repairs.
5. Keep the Outdoor Unit Clear (for Heat Pumps)
- Remove snow, ice, and debris from around the unit after storms.
- Never chip away ice with sharp tools; use warm water to melt build-up if necessary.
Bonus: Year-Round Maintenance Best Practices
1. Maintain a Regular Filter Replacement Schedule
Consider setting calendar reminders or subscribing to filter delivery services. Consistent filter care is the single most important DIY step for HVAC health.
2. Keep an Eye on Energy Bills
Spikes in monthly usage often signal system inefficiency or mechanical issues. Investigate promptly to avoid bigger expenses.
3. Maintain a Maintenance Log
Document filter changes, professional tune-ups, and repairs. This helps diagnose recurring problems and supports warranty claims.
4. Learn Warning Signs of Trouble
- Uneven heating or cooling
- Strange odors (burning, musty, or chemical smells)
- Water leaks around indoor units
- Short cycling (system turning on and off frequently)
Address these issues with a professional promptly to avoid compounded damage.
Safety Reminders and DIY Limitations
- Always turn off power at the circuit breaker before opening any HVAC panels.
- Do not attempt to handle refrigerants or make electrical repairs unless you are certified.
- Gas-related issues (smell, leaks, burner malfunctions) require immediate professional attention.
Know your limits—routine cleaning and inspections are safe for most homeowners, but leave complex repairs to licensed technicians.
Professional Maintenance: What to Expect
Annual professional HVAC service is a wise investment. A qualified technician will:
- Check refrigerant levels and recharge if necessary
- Test electrical connections and controls
- Inspect blower components, belts, and motors
- Clean coils, burners, and condensate drains
- Calibrate thermostat and safety controls
Ask for a written report after each visit and discuss any recommendations for repair or replacement.
Conclusion: Consistency Pays Off
Seasonal HVAC maintenance is not just a chore—it’s an investment in your home’s comfort, safety, and value. By following this detailed checklist, you’ll enjoy lower energy bills, fewer emergency repairs, and healthier indoor air. Consistent filter changes, regular inspections, and timely professional service are the keys to a system that serves you reliably year after year.
Remember, neglecting routine care can turn minor issues into major headaches, often at the worst possible time. A little attention each season goes a long way toward protecting your HVAC investment and giving your family peace of mind. Don’t wait for the next heat wave or cold snap—put this checklist into action today and ensure your home remains a haven of comfort in every season.
If you have questions about specific maintenance steps or need help choosing a qualified technician, reach out to local experts or consult your system’s manufacturer guidelines. With a proactive approach, you’ll keep your HVAC system running smoothly and efficiently, year after year.
I noticed the checklist mentions cleaning or replacing filters every 1–3 months, but as a business owner, I’m not always at the property. Is there a way to know if my HVAC filters really need replacing sooner, or should I just stick to a set schedule?
If you’re not at the property regularly, sticking to a set schedule is the simplest way to ensure filters are changed on time. However, you can also ask your maintenance staff to check for visible dirt or reduced airflow, or consider installing filter change indicators or smart thermostats that alert you when a replacement is needed. This way, you can avoid unnecessary changes while still protecting your HVAC system.
If I follow all these maintenance steps myself, when should I still bring in an HVAC pro for a full inspection, and what might they do differently than a homeowner?
Even if you handle regular maintenance yourself, it’s wise to have a professional inspect your HVAC system at least once a year—ideally before peak heating or cooling seasons. Pros use specialized tools to check refrigerant levels, test electrical components, calibrate thermostats, and spot issues homeowners usually can’t see. Their thorough inspection helps catch hidden problems early and keeps warranties valid.
When it comes to cleaning coils and checking the outdoor condensing unit, are there budget-friendly tools or supplies I should pick up as a first-timer, or can I use basic household items?
You can start with some basic household items for cleaning coils and checking your outdoor condensing unit. A soft brush or an old toothbrush helps remove surface debris, and a garden hose on a gentle setting can rinse the coils. For deeper cleaning, a coil cleaner spray from a hardware store is affordable. Just make sure the power is off before you begin, and avoid using harsh or abrasive tools.
If I’ve just noticed uneven cooling in different rooms once I start running my AC in spring, what maintenance steps from this checklist would be good to try first before calling in a technician?
Start by checking and replacing your air filters, since clogged filters can restrict airflow and cause uneven cooling. Next, make sure all air vents and registers in your rooms are open and unobstructed by furniture or curtains. Also, walk around your home to ensure nothing is blocking the return air grilles. These simple steps from the checklist often solve minor uneven cooling issues without professional help.
For someone considering switching from a standard furnace to a heat pump, does the seasonal maintenance differ significantly, or can I generally follow the same checklist for both systems?
While there is some overlap in maintenance tasks for furnaces and heat pumps, there are also important differences. Both systems need filter changes and duct inspections, but heat pumps require checks on the outdoor unit, defrost controls, and refrigerant levels, especially before heating or cooling seasons. Be sure to include those heat pump-specific steps if you make the switch.
You mention thermostat calibration as a maintenance step. If I have a programmable or smart thermostat, is calibration still necessary, and if so, how would I go about doing that without calling a professional?
Even with programmable or smart thermostats, calibration can be important to ensure accurate temperature readings. Many smart thermostats allow you to check or adjust the temperature offset in their settings menu. You can compare your thermostat’s reading with a reliable room thermometer and adjust the offset if needed. Refer to your device’s manual for specific instructions, but most users can handle this without professional help.
I noticed you mentioned checking the condensate drain, but I’m not sure where to find it on a typical split HVAC system. Could you give a bit more detail on where to look and what signs might indicate it’s clogged?
On most split HVAC systems, the condensate drain is a small PVC or metal pipe located near the indoor air handler unit, often close to where the main coil is housed. Look for a pipe coming out of the unit that either drains into a floor drain or outdoors. Signs of a clog include water pooling around the air handler, musty odors, or the system shutting off unexpectedly due to a safety switch. If you see any of these, the drain likely needs cleaning.
When you mention cleaning or replacing filters every 1–3 months, does that timeframe apply to all filter types, or are there different recommendations for HEPA or high-efficiency filters? I want to make sure I’m not over-maintaining or under-maintaining mine.
The 1–3 month guideline generally applies to standard fiberglass or pleated filters. For HEPA or high-efficiency filters, you may not need to replace them quite as often—every 6 to 12 months is common, but this can depend on usage and manufacturer recommendations. Always check your filter’s instructions for the best maintenance schedule.
Could you clarify what tools or cleaning solutions are safe to use when cleaning the outdoor condenser unit in spring? I want to make sure I do not accidentally damage any parts while trying to follow your checklist.
When cleaning your outdoor condenser unit, use a soft brush or vacuum with a brush attachment to remove debris from the fins. For cleaning the coils, a gentle garden hose spray is safe—avoid pressure washers as they can bend the fins. If needed, use a coil cleaner labeled specifically for HVAC use, following the manufacturer’s instructions. Avoid harsh chemicals or abrasive tools, as these could damage delicate components.
You mention changing or cleaning air filters every 1–3 months, but with allergies in the house and a pet, should I be aiming for the lower end of that range, or is once every three months usually okay?
With both allergies and a pet in your home, it’s best to change or clean your air filters every month. Pet hair and dander, along with allergens, can clog filters more quickly. Sticking to the lower end of the 1–3 month range helps keep your indoor air cleaner and your HVAC system running efficiently.
For homeowners who are not very experienced with DIY tasks, which maintenance steps from your checklist are truly essential versus ones that might be better left to a professional?
Homeowners with little DIY experience should focus on essentials like changing air filters, clearing debris around outdoor units, and making sure vents are unobstructed—these are simple and safe to do. Tasks like checking refrigerant levels, inspecting electrical components, or deep cleaning coils are best left to a professional, as they require special tools and expertise.
When it comes to cleaning or replacing filters every 1–3 months as suggested, how can homeowners tell if their specific filter needs changing sooner, especially if there are pets or allergies in the household?
If you have pets or allergies at home, you should check your HVAC filter more often. Signs it needs changing sooner include visible dirt or dust buildup, a musty smell, or if airflow from your vents seems weaker than usual. Hold the filter up to a light—if you can’t see light passing through, it’s time to replace it. Regular checks every month are a good idea in these cases.
Could you elaborate on what signs I should look for when inspecting the condensate drain, particularly for older HVAC systems? I want to avoid water damage but am not quite sure what issues are most common.
When inspecting the condensate drain, especially on older HVAC systems, look for standing water around the unit, visible algae or mold in the drain pan, and slow drainage from the line. Check for any cracks or rust in the drain pan and ensure the drain line isn’t clogged or disconnected. Unusual odors or dampness near the system are also warning signs. Address any blockages or leaks right away to prevent water damage.
I saw that you recommend both coil cleaning and thermostat calibration. If I only have time or budget for one maintenance task this season, which would you say has the bigger impact on efficiency or bills for a small retail shop?
If you need to choose just one, coil cleaning generally has a bigger impact on your HVAC system’s efficiency and energy bills, especially for a small retail shop. Dirty coils make the system work harder, which increases costs and can reduce cooling performance. Thermostat calibration is helpful, but coils tend to have a more direct effect on energy use.
You mentioned that air filters should be replaced or cleaned every 1–3 months, especially at the start of spring. Are there signs I should look for that indicate it’s time to replace the filter sooner, even if it hasn’t been that long?
Absolutely, there are a few signs that your air filter may need replacing sooner than planned. If you notice reduced airflow from your vents, increased dust around your home, or your HVAC system seems to run longer than usual, it’s a good idea to check the filter. Also, if the filter looks visibly gray or clogged with dust and debris, it should be replaced even if it hasn’t reached the usual 1–3 month period.
Can you give a rough estimate of how much time seasonal HVAC maintenance usually takes for a homeowner who’s not very handy? I’m worried about juggling this with a busy family schedule but still want to keep the system running smoothly.
For homeowners who aren’t very handy, seasonal HVAC maintenance usually takes about 1 to 2 hours per session. This includes simple tasks like replacing filters, clearing outdoor debris, checking vents, and changing thermostat settings. If you stick to the basics, you can break these tasks into smaller chunks to fit your schedule. For anything more complex, it’s best to schedule a professional service, which typically takes about an hour as well.
You mention changing or cleaning the HVAC filters every 1–3 months, but how do I know which type of filter my system uses and if it’s reusable or disposable? Is there a way to tell without opening the unit?
You can usually find information about your HVAC filter type in your system’s owner’s manual or on a label near the air return grille. Sometimes, the size and type are printed right on the outer edge of the existing filter if it’s accessible. If you see wording like ‘washable’ or ‘reusable’, you have a reusable filter. Otherwise, most filters are disposable. If you’re still unsure, checking the manual or contacting your system’s manufacturer can help clarify the exact filter type.
You mention both heat pumps and furnaces in the essentials section. Are there any maintenance steps in the checklist that differ between these two heating systems?
Yes, there are some key differences in maintenance steps between heat pumps and furnaces. For heat pumps, it’s important to check the reversing valve and ensure the outdoor unit is clear of debris year-round since it provides both heating and cooling. Furnaces, especially gas ones, require checking the burner, heat exchanger, and testing for gas leaks. Both systems need filter changes and thermostat checks, but the specifics of cleaning and inspection will vary depending on the system type.
For homeowners with both a furnace and a heat pump rather than a standard air conditioner, are there any extra maintenance steps they should keep in mind each season?
Yes, if you have both a furnace and a heat pump, you should maintain each system according to its unique needs. For the heat pump, clean coils and filters regularly, check for refrigerant leaks, and make sure the outdoor unit is clear of debris. For the furnace, inspect and change the filter, check the blower, and have the burner and flue system inspected before heating season. Scheduling professional inspections for both systems before their peak seasons helps ensure efficient, safe operation all year.
I noticed the article says to replace or clean air filters every 1–3 months, but how do I know exactly when it’s time to do it? Are there any warning signs besides just looking dirty?
In addition to a visibly dirty filter, there are several signs it might need changing. If you notice reduced airflow from vents, more dust settling in your home, musty or unusual odors when your system runs, or an increase in allergy symptoms, these can all suggest your filter is due for replacement. Listen for your system running longer than usual, too. If any of these happen, it’s a good idea to check and possibly swap out the filter, even if it’s before your usual schedule.
You talk about inspecting and cleaning the outdoor condenser unit in spring—what should I do if I notice leaves and dirt inside the unit but am worried about damaging anything when cleaning?
If you see leaves and dirt inside your outdoor condenser unit, first turn off the power to the unit for safety. Use gloved hands or a soft brush to gently remove debris from around the fins. Avoid using sharp tools or force, as the fins can bend easily. If you’re uncomfortable reaching inside or if debris is deep within the unit, it’s best to call a professional for a thorough but safe cleaning.
Are there low-cost preventative measures I can take each season beyond what you listed, to help avoid unexpected HVAC breakdowns that might disrupt business?
Absolutely, there are a few extra low-cost precautions you can take. Regularly check that vents and registers are clear of dust and obstructions, and ensure outdoor units are free from debris like leaves or grass clippings. Listen for unusual noises and address them early. Also, consider using programmable thermostats efficiently to reduce strain on the system. These small habits can further reduce the risk of unexpected breakdowns.
If I accidentally skip one of the maintenance tasks for a season, like cleaning the air handler or checking the drain, is there a way to catch up later, or could that cause bigger issues for my system?
If you’ve missed a maintenance task like cleaning the air handler or checking the drain, you can still catch up by doing it as soon as possible. However, skipping regular upkeep can let dirt or clogs build up, which may lead to bigger issues like reduced efficiency or even system damage. It’s best to complete any missed tasks promptly to help prevent long-term problems.
When it comes to cleaning or replacing air filters every 1–3 months, how do I know if my reusable filter is actually clean enough to put back in? Is there a specific method to check, or do you just go by how it looks?
To check if your reusable filter is clean enough, hold it up to a light source after washing and drying. If you can see light passing evenly through most of the filter, it’s generally clean. Also, make sure there’s no visible dust, debris, or discoloration. If the filter still looks dirty or clogged, give it another wash or consider replacing it if buildup remains.
Do you have any recommendations for specific types of air filters that are best for improving air quality in college apartments, especially if several people have allergies?
For college apartments where multiple people have allergies, consider using high-efficiency pleated filters with a MERV rating between 11 and 13. These filters are effective at trapping dust, pollen, pet dander, and other allergens without overly restricting airflow. Make sure to check your HVAC system’s manual for the highest MERV rating it can handle, and remember to replace the filter every 2–3 months for the best results.
If a homeowner spots issues with the condensate drain during their seasonal check, what are some common troubleshooting steps they can try before deciding it’s time to call in a technician?
If you notice problems with your HVAC condensate drain, you can start by turning off the system and checking for visible clogs or debris in the drain line or pan. Gently clear any blockages using a wet/dry vacuum or a flexible brush. You can also flush the drain with a mixture of water and mild vinegar to help clear buildup. If water continues to back up or leak after these steps, it may be time to call a technician.
I noticed you mention both replacing and cleaning filters every 1–3 months depending on their type. As a business owner trying to minimize downtime and costs, is there an advantage to investing in reusable filters over disposable ones for a small office HVAC system?
Reusable filters can be a cost-effective choice for a small office, since they only need to be cleaned rather than replaced regularly. While they require a bit more maintenance, the long-term savings on replacements can add up. However, it’s important to ensure they’re thoroughly cleaned each time to maintain air quality and system efficiency. If your staff has the time for regular cleaning, reusable filters are a solid option to minimize ongoing costs.
Your checklist mentions both coil cleaning and thermostat calibration. Should these be handled by a professional, or are there reliable ways for a business owner to do them safely on their own?
Coil cleaning can sometimes be done by a business owner if it’s just light dust on accessible areas—turn off power, gently vacuum, and avoid damaging fins. However, deeper cleaning or any sign of mold is best left to a professional. Thermostat calibration is usually straightforward if your model has an easy-to-follow manual, but precise calibration tools and experience ensure accuracy, so professionals are recommended for optimal results.
You mention cleaning the outdoor condenser unit in spring. What budget-friendly tools or cleaning products would you recommend for a small business owner doing this for the first time?
For cleaning your outdoor condenser unit, you’ll mainly need a soft-bristled brush, a garden hose with a gentle spray, and a screwdriver to remove the cover if needed. You can use a mild detergent mixed with water or pick up an affordable coil cleaner from a hardware store. Avoid using pressure washers or harsh chemicals, as these can damage the fins. Always turn off the power to the unit before starting.
On a tight budget, which of these maintenance steps have the most impact on avoiding costly breakdowns? I want to prioritize, especially heading into the peak cooling season.
If you need to prioritize on a budget, start with replacing or cleaning air filters, as clogged filters are a common cause of system strain and breakdowns. Next, check and clean your outdoor unit to clear any debris, ensuring proper airflow. Finally, make sure your thermostat is working accurately. These simple steps can significantly reduce the risk of costly issues during peak cooling season.
With the rising cost of energy, which part of the seasonal checklist would you say makes the biggest impact on lowering utility bills? I want to focus on changes that really pay off.
Focusing on changing or cleaning your HVAC filters regularly tends to have the biggest impact on lowering utility bills. Dirty filters force your system to work harder, using more energy. Also, making sure your thermostat is set correctly and scheduling professional tune-ups each season can further improve efficiency and reduce overall costs.
After completing the spring maintenance steps, should I schedule a professional inspection or is doing these DIY tasks usually enough for a typical apartment HVAC system?
For most apartment HVAC systems, following the spring maintenance checklist yourself is usually enough to keep things running smoothly, especially if your unit has been working without issues. However, if you notice any unusual noises, reduced performance, or it’s been more than a year since a professional last checked your system, it’s a good idea to schedule a professional inspection to catch potential problems early.
You mentioned replacing or cleaning air filters every 1–3 months. Is there a particular type or brand of filter you’d recommend for allergy reduction, or are most basic filters good enough for that?
For allergy reduction, it’s best to look for air filters with a higher MERV rating, typically between 11 and 13, as these can capture smaller particles like pollen, pet dander, and dust mites. Basic filters usually have lower ratings and may not trap allergens as effectively. Brands like Filtrete and Honeywell offer filters designed specifically for allergy reduction, but always check your HVAC system’s manual to ensure compatibility with higher-efficiency filters.
Could you share more specifics on how often to clean or replace reusable air filters if we have pets in the home? I noticed the checklist mentions every 1–3 months, but curious if that interval changes with higher dust or pet hair.
If you have pets in the home, it’s best to check and clean or replace reusable air filters more frequently than the standard 1–3 months. Pet hair and dander can quickly clog filters, so inspecting them every month is recommended. In homes with multiple pets or heavy shedding, you might even clean them twice a month to maintain optimal airflow and air quality.
You mention cleaning the outdoor condenser unit as part of spring maintenance. Is this something I can safely do myself, or are there electrical risks involved? If so, what are the safest steps I should follow as a homeowner?
You can clean your outdoor condenser unit yourself, but safety comes first. Always turn off power to the unit at the disconnect box and the breaker panel before starting. Remove debris from around the unit, then gently hose off the fins—avoid using high pressure. If you need to open the unit or see damaged wires, it’s best to call a professional to avoid electrical hazards.
When you mention cleaning the outdoor condenser unit in spring, do you have any tips for safely dealing with leaves and dirt if my unit is surrounded by landscaping? I’m not sure how far to go without risking damage.
If your condenser is surrounded by landscaping, start by gently clearing away leaves, grass, and debris from around the unit by hand, making sure to keep at least two feet of clear space. Use a soft brush or a vacuum with a brush attachment to remove dirt from the fins—never use sharp tools or high-pressure water, as these can damage the fins. If plants are close, trim them back to allow good airflow. If you’re unsure, it’s perfectly fine to call a professional for a thorough cleaning.
For someone new to DIY maintenance, which of these checklist items should absolutely be handled by a professional to avoid costly mistakes?
If you’re new to DIY maintenance, it’s best to have a professional handle tasks like checking refrigerant levels, inspecting electrical connections, and servicing internal components of your HVAC system. These jobs require specialized tools and safety knowledge. Simple tasks like changing filters, clearing vents, and cleaning around outdoor units are generally safe for beginners.
When cleaning or replacing filters every 1–3 months as mentioned, is there a noticeable difference in air quality or energy savings compared to waiting longer between changes? I’m trying to justify the investment in higher quality filters for my home.
Changing or cleaning your HVAC filters every 1–3 months can lead to noticeably better air quality, especially if anyone in your home has allergies or pets. Clean filters allow your system to run more efficiently, often resulting in lower energy bills. Waiting longer can cause dirt to build up, making your system work harder and potentially shortening its lifespan. Higher quality filters tend to trap more particles, so you might see both improved air quality and efficiency, making them a worthwhile investment for many homeowners.
I see you mentioned calibrating the thermostat. Is this something a beginner DIYer can do easily, or is it better to call in a technician? Also, how can I tell if the thermostat is actually out of calibration?
Calibrating a thermostat can sometimes be done by a beginner if your model’s manual provides clear instructions, especially for basic, non-digital models. If you have a smart or programmable thermostat, it may be trickier and safer to call a technician. Signs your thermostat is out of calibration include your HVAC not maintaining the set temperature or the thermostat reading noticeably different from a reliable room thermometer.
You mention replacing or cleaning HVAC filters every 1–3 months, but how can I tell when a filter actually needs to be replaced versus just being cleaned? Are there signs I should look for, especially if I have pets?
If you have pets, check your HVAC filter monthly. Replace it if it’s visibly clogged with dust, pet hair, or debris, or if the filter looks gray and blocks light passing through. If it’s only lightly dusty, a reusable filter can be gently cleaned. Also, if your airflow seems weaker or you notice more dust around your home, that’s a sign the filter likely needs replacing.
For students renting older houses, what should we watch for if we suspect our air handler or ductwork isn’t circulating air properly, especially after following the recommended basic maintenance steps?
If you’ve already changed filters and checked vents but still notice poor air circulation, look for weak airflow from registers, unusual noises in the ductwork, or temperature differences between rooms. Also check for visible dust buildup around vents or musty smells, which can indicate leaks or blockages in the ducts. If these issues persist, you may need to ask your landlord to arrange a professional inspection, as older systems sometimes have hidden problems that basic maintenance can’t fix.
If I’m on a tight budget and have to prioritize, which of these seasonal maintenance tasks is absolutely essential to keep my HVAC running efficiently through extreme weather?
If you’re on a tight budget, the most essential task is to regularly replace or clean your HVAC air filters. This helps maintain airflow and system efficiency during extreme weather. Also, ensure your vents are not blocked and clear any debris from around your outdoor unit. These basic steps go a long way in keeping your system running efficiently.
Could you clarify how often a business should have its HVAC filters replaced compared to a typical home? Is sticking to the 1–3 month recommendation still best if there’s higher foot traffic and dust from deliveries?
For businesses, especially those with higher foot traffic and frequent deliveries causing more dust, replacing HVAC filters more often than the standard 1–3 months is often necessary. In busy commercial settings, checking filters monthly and replacing them whenever they appear dirty or clogged is a good rule of thumb. This helps maintain air quality and system efficiency, so you may find that a monthly replacement schedule works best.
When you mention coil cleaning as part of the checklist, is there a specific type of cleaner I should use for that, or would regular household supplies work? Just trying to avoid damaging anything or spending too much.
For cleaning HVAC coils, it’s best to use a cleaner specifically labeled for coil cleaning, as these are designed to remove buildup without damaging the metal or affecting efficiency. Regular household cleaners can sometimes be too harsh or leave residues that attract dirt. If you prefer a more budget-friendly option, a mild detergent mixed with water can work for light cleaning—just be sure to rinse thoroughly and avoid anything abrasive.
Could you explain more about the condensate drain? I always hear about changing filters, but not much about that part. What signs should I watch for to know if it needs cleaning or attention?
The condensate drain removes moisture your HVAC system collects during cooling. If it gets clogged, you might notice water pooling around the unit, musty odors, or your system shutting off unexpectedly. Check the drain for visible blockages or slow drainage. Regularly cleaning it—usually with a little vinegar or by flushing with water—can prevent problems. It’s just as important as changing filters for keeping your system running smoothly.
You mention changing or cleaning air filters every 1–3 months, but how do I know if my specific HVAC system requires more frequent filter changes? Are there signs I should look out for that indicate it’s time to replace them sooner?
If you notice reduced airflow, more dust around your home, or your HVAC system running longer than usual, these are signs your filter may need changing sooner. Households with pets, allergies, or smokers often need more frequent filter changes. Also, check your filter monthly—if it looks dirty or clogged, it’s time to replace it regardless of the schedule.
In the spring maintenance section, you talk about preparing for the cooling season. Can you clarify which maintenance steps a business owner could safely perform themselves versus which really need an HVAC professional, especially for a small retail shop?
As a small retail shop owner, you can safely handle tasks like replacing air filters, cleaning air vents, removing debris around outdoor units, and checking thermostat settings. More complex steps—such as inspecting electrical components, checking refrigerant levels, or cleaning inside the unit—are best left to a certified HVAC professional, since they require specialized tools and expertise.
For someone on a tight budget, which of these seasonal maintenance steps are most critical to do myself, and which ones could potentially be skipped or delayed without causing big problems?
If you’re looking to save money, prioritize tasks like changing or cleaning air filters, clearing debris from around your outdoor unit, and checking for obvious issues like blocked vents or leaks. These are easy to do yourself and help prevent bigger problems. Professional inspections and duct cleaning can sometimes be delayed for a while, but skipping filter changes or ignoring debris could quickly affect your system’s efficiency and even cause breakdowns.
How often should a thermostat be calibrated, and is this something a DIYer can easily do, or is it usually better left to a professional?
Thermostats should generally be calibrated once a year to ensure accurate temperature control. Many modern digital thermostats rarely need manual calibration, but if you notice temperature discrepancies, you can try recalibrating yourself by following the manufacturer’s instructions. For older or complex systems, or if you’re unsure, it’s usually safer to let a professional handle it to avoid damaging the unit.
You mentioned cleaning coils and the outdoor unit in spring. Can you clarify what signs I should look for that indicate these parts need cleaning sooner, especially if my building is near a lot of trees?
If your building is near many trees, check for visible debris like leaves, twigs, or dirt on or around the outdoor unit and coils. Other signs they need cleaning sooner include reduced airflow, unusual noises, or a drop in cooling efficiency. If the coils appear dusty or clogged, or you notice the fan working harder than usual, it’s a good idea to clean them even before your scheduled maintenance.
I see the checklist recommends changing air filters every 1 to 3 months. As a small business with a higher foot traffic area, should I be changing them even more frequently, or does the same guideline apply?
For small businesses with higher foot traffic, it’s a good idea to check your air filters more often than the general 1 to 3 month recommendation. Increased activity can lead to faster buildup of dust and debris. Inspect the filters monthly—if they look dirty or clogged, change them right away. This helps maintain air quality and keeps your HVAC system running efficiently.
You talk about cleaning the outdoor condenser unit in the spring—how much of this can I realistically handle myself, and at what point should I call a professional to avoid damaging anything?
You can safely remove leaves, dirt, and debris from around the outdoor condenser unit and gently rinse the exterior fins with a garden hose. Make sure the unit is turned off before you start. If you notice bent fins, refrigerant leaks, or hear unusual noises, it’s best to call a professional. Also, if you’re uncomfortable opening the unit or need a deep internal cleaning, professional service is recommended to avoid accidental damage.
Could you clarify what signs to look out for when inspecting the condensate drain? My system has had some moisture issues, and I want to make sure I’m not missing early warning signs during seasonal maintenance.
When inspecting the condensate drain, keep an eye out for standing water around the drain pan, visible mold or algae growth, and any signs of rust or corrosion on the pan or drain line. Check for slow drainage or blockages and musty odors, which can also indicate a clog. Regularly clearing the line and ensuring it’s free-flowing will help prevent moisture issues.
I saw that both furnaces and heat pumps can provide heating, but how can I tell which type I have in my house, and does the maintenance checklist change depending on the system?
To figure out if you have a furnace or a heat pump, check your indoor unit: a furnace usually has a gas line and vent pipe, while a heat pump looks like an air conditioner and connects to an outdoor unit that both heats and cools. The maintenance checklist is similar in many ways, but heat pumps need year-round attention since they run in both seasons, while furnaces mainly need pre-winter checks.
If my HVAC system is already a few years old and I haven’t kept up with maintenance every season, what should be my first steps now to get it back on track, especially before summer hits hard?
Since your HVAC system hasn’t had regular maintenance, start by changing the air filters and cleaning any visible dust or debris around vents and outdoor units. Next, schedule a professional inspection and tune-up to check for worn parts, leaks, or efficiency issues. Address any recommended repairs before summer to ensure your system runs reliably and keeps your home comfortable.
Could you clarify how often I should inspect the condensate drain? I had issues with water leakage last summer, so I want to make sure I’m on top of this for the coming season.
Inspecting your condensate drain is especially important if you’ve had leakage before. It’s generally recommended to check it at least once every season—so four times a year. During hot weather when your AC runs often, you might want to check it monthly to ensure there are no blockages or buildup. Regular inspections will help you catch clogs early and prevent water damage.
You mention cleaning the condensate drain to remove moisture as part of spring maintenance. What are the signs that the drain might be clogged, and is this something a homeowner can easily fix on their own?
Some common signs of a clogged condensate drain include water pooling around your indoor unit, musty odors, or your HVAC system shutting off unexpectedly. Many homeowners can clear minor clogs themselves by using a wet/dry vacuum to suction out the blockage from the outside drain line. For tougher clogs or if you’re unsure, it’s best to consult a professional to prevent any damage.
You mention cleaning or replacing air filters every 1–3 months, but how can I tell if my home needs more frequent changes due to factors like pets or allergies?
If you have pets, allergies, or live in a dusty area, you might need to change your air filters more often. Signs include visible dust buildup on the filter, reduced airflow, or worsening allergy symptoms. It’s a good idea to check your filter monthly—if it looks dirty or clogged, replace it even if it’s before the typical 1–3 month mark.
You mentioned coil cleaning as part of the seasonal checklist. Is there a specific product or method you recommend for cleaning coils at home, or is this something best left to HVAC technicians? I want to make sure I don’t accidentally cause damage.
Cleaning coils can be done at home with care, using a soft brush or a no-rinse foaming coil cleaner specifically labeled for HVAC use. Make sure the unit is turned off and gently remove any debris. However, if the coils are heavily soiled or hard to access, it’s safer to have an HVAC technician handle it to prevent accidental damage.
Could you expand a bit on thermostat calibration? How do I know if my thermostat is out of calibration, and is this something a homeowner can address without special tools?
Thermostat calibration means making sure your thermostat accurately reflects the actual room temperature. Signs it may be out of calibration include rooms feeling too hot or cold compared to the setting, or large differences shown by a separate room thermometer. Basic calibration can be done by comparing your thermostat reading with a reliable thermometer and adjusting the settings if your model allows it. Most digital thermostats are pre-calibrated and rarely need adjustment, but if yours consistently reads off, you might need to consult your manual or call a professional, as some models require internal adjustment.
How do programmable thermostats factor into regular seasonal maintenance? Are there calibration steps or battery checks that should be added to the checklist beyond just setting new schedules for warmer or cooler months?
Programmable thermostats are a key part of seasonal HVAC maintenance. Besides updating the schedule for changing temperatures, you should check the thermostat’s batteries if it’s not hardwired, as weak batteries can cause system issues. It’s also a good idea to verify the thermostat’s accuracy by comparing its temperature reading with a reliable thermometer and recalibrating if necessary. These steps help ensure both comfort and efficiency throughout the year.
When cleaning or replacing air filters, how do I know if mine are reusable or need to be thrown away? The article mentions both types, but I’m not sure how to tell which I have in my system.
To figure out if your air filter is reusable or disposable, remove it and check the frame for any labels or instructions—reusable filters often say ‘washable’ or ‘permanent’. They typically have sturdier frames, often made of metal or heavy plastic. Disposable filters are usually made of cardboard and lightweight materials. If you’re still unsure, check your HVAC system manual or contact the manufacturer for confirmation.
For homeowners on a tight budget, are there certain maintenance tasks on your checklist that are okay to tackle yourself and others that are better left to the pros? I want to keep costs down but avoid mistakes.
Absolutely, there are several maintenance tasks homeowners can safely handle themselves to save money. You can change air filters, clean vents, clear debris from around outdoor units, and check thermostat settings. However, jobs like inspecting electrical connections, refrigerant levels, or deep cleaning inside the unit are best left to professionals. Doing the basic tasks yourself helps keep your system running efficiently while leaving the more complex work to the experts to avoid costly mistakes.
If my system’s thermostat seems to be reading temperatures inaccurately after winter, are there troubleshooting tips you suggest before calling in a professional for calibration?
If your thermostat reads incorrectly after winter, first check that it’s clean and free of dust—it can affect sensors. Make sure it’s level on the wall and not near direct sunlight or heat sources. Try replacing the batteries if it uses them, and double-check that the settings (heating/cooling modes) are correct. If those steps don’t help, calibration by a professional might be needed.
On the topic of outdoor unit care, do you have any tips for protecting the condenser from leaves and debris if my unit is close to a tree line? Is it worth investing in a custom cover between seasons?
If your condenser is near a tree line, regularly clear leaves, branches, and debris from around the unit to maintain airflow. Installing a mesh or breathable cover during the off-season can help protect the unit without trapping moisture. Just make sure to remove any cover before operating the system, as running it covered can cause overheating.
Are there any affordable maintenance steps that make a big difference in extending my HVAC system’s lifespan? I’d like to avoid costly repairs, but I’m not sure where to prioritize with a tight budget.
Absolutely, there are a few budget-friendly steps that can really help your HVAC system last longer. Start by regularly replacing or cleaning air filters, which improves airflow and reduces strain on the system. Keep outdoor units clear of debris and make sure vents inside your home aren’t blocked. Also, check your thermostat settings to avoid overworking the system. These small actions can prevent bigger issues down the line without breaking the bank.
If I want to clean the outdoor condenser unit myself, are there any household cleaning products I should avoid using? I don’t want to accidentally damage any parts while getting it ready for spring.
It’s wise to be cautious about cleaning products around your outdoor condenser unit. Avoid using harsh chemicals like bleach or ammonia-based cleaners, as they can corrode the metal fins and sensitive components. Stick to gently rinsing the unit with a garden hose and, if needed, a mild dish soap diluted in plenty of water. Make sure the power is off before you start, and use a soft brush if you need to remove debris—never anything abrasive.
The checklist talks about thermostat calibration. How do I know if my thermostat is out of calibration, and are there simple troubleshooting steps I can do before calling in a professional?
You might suspect your thermostat is out of calibration if your home feels too hot or cold compared to the displayed temperature, or if your HVAC system cycles on and off at odd times. To troubleshoot, place an accurate thermometer near your thermostat and compare readings after 15 minutes; a difference of more than a degree or two could indicate calibration issues. Make sure the thermostat is level, clean, and away from direct sunlight or drafts, as these can affect accuracy. If these steps don’t resolve it, professional calibration may be needed.
When cleaning the outdoor condenser unit, are there any parts I should avoid touching or any recommended cleaning solutions to prevent accidental damage?
When cleaning your outdoor condenser unit, avoid touching the electrical components and the delicate fins inside the unit, as they bend easily. Use a gentle spray from a garden hose rather than a pressure washer, and stick to mild soap and water for cleaning. Harsh chemicals or abrasive cleaners can damage the coils and other sensitive parts. Always shut off power to the unit before starting any cleaning.
You mention checking filters every 1–3 months, but for folks trying to stick to a tighter budget, is changing them every three months still safe? Or does it really impact energy bills that much to stretch it out?
Changing your HVAC filters every three months is generally safe for most households, especially if you don’t have pets, allergies, or excessive dust. Sticking to the three-month interval shouldn’t cause major issues or dramatically raise your energy bill. However, if you notice your system running longer or airflow decreasing, it might be time to check the filter a bit sooner.
Can you explain a bit more about calibrating thermostats? Is this something I can do myself with a regular programmable model, or should I call in a professional, especially if I notice inconsistent temperatures across different rooms?
Calibrating a thermostat usually means checking if it accurately reflects the actual room temperature and adjusting it if needed. For most programmable thermostats, you can compare the thermostat reading to a reliable thermometer and adjust the settings or location for better accuracy. However, if you still notice inconsistent temperatures between rooms, the issue might be with your HVAC system, not just the thermostat, so it’s wise to consult a professional in that case.
You mentioned cleaning or replacing air filters every 1–3 months, but how do I know if I should do it more often? Are there specific signs to look for, or does it depend mostly on how much my HVAC has been running?
The frequency for changing air filters depends on a few factors. If you notice dust building up quickly, reduced airflow from vents, or a musty smell, it’s time to check or change the filter. Homes with pets, smokers, or allergies may need more frequent changes. Also, if your HVAC has been running more than usual, it’s best to check the filter more often.
Can you explain how to recognize if my thermostat needs recalibration? Sometimes my house feels warmer or cooler than the setting, but I’m not sure if that’s a sign of a problem.
If your home consistently feels warmer or cooler than the temperature displayed on your thermostat, this could indicate it needs recalibration. You can check by placing an accurate room thermometer near your thermostat and comparing readings after allowing both to settle for about 15 minutes. If there’s a difference of more than a degree or two, recalibration or replacement may be necessary.
The checklist mentions cleaning coils and calibrating thermostats as part of seasonal maintenance. How can I tell if my thermostat is actually out of calibration, and is this something a homeowner can fix without calling a professional?
To check if your thermostat is out of calibration, compare its reading to an accurate thermometer placed nearby. If there’s a difference of more than a degree or two, it may need adjustment. For older mechanical thermostats, homeowners can sometimes recalibrate using the adjustment screw inside. For digital models, you may need to reset or reprogram them, but significant issues are best handled by a professional to avoid damaging sensitive electronics.