

Introduction: Why Seasonal Caulking Matters in Home Maintenance
Caulking might seem like a minor detail in the grand scheme of home improvement, but it plays a crucial role in maintaining a comfortable, energy-efficient, and healthy living space. Gaps and cracks around windows, doors, baseboards, and exterior joints are common culprits for drafts, moisture intrusion, and even unwanted pests. Over time, exposure to the elements causes caulk to degrade, shrink, or crack, reducing its effectiveness. Seasonal caulking—inspecting and renewing sealant as part of your spring and fall maintenance routines—can prevent costly problems such as water damage, mold growth, and soaring utility bills.
This guide explores the best practices for seasonal caulking, from selecting the right materials to mastering application techniques. We’ll also cover essential tools that make the job cleaner and more efficient, and provide a step-by-step seasonal checklist to ensure your home stays draft-free year-round. Whether you’re a first-time DIYer or a seasoned homeowner, these expert tips will help you protect your investment, boost comfort, and save money on energy costs.
Understanding Caulk: Types and Uses
Common Types of Caulk for Home Use
- Acrylic Latex Caulk: Ideal for interior joints, trim, and baseboards. Easy to apply, paintable, and cleans up with water.
- Silicone Caulk: Best for areas exposed to significant moisture, such as bathrooms, kitchens, and exterior joints. Highly flexible and long-lasting, but generally not paintable.
- Polyurethane Caulk: Suitable for exterior projects requiring high durability and movement, like siding and concrete. Paintable and UV-resistant, but requires mineral spirits for cleanup.
- Butyl Rubber Caulk: Used primarily for roofing and gutters. Excellent adhesion and weather resistance, though trickier to apply neatly.
Choosing the Right Caulk for Each Season
Temperature and humidity affect caulk performance. Acrylic latex is best applied in mild conditions (above 40°F/4°C), while silicone and polyurethane can handle wider temperature ranges. For spring and fall caulking, check manufacturer recommendations and avoid extreme weather—both high humidity and freezing temperatures can compromise adhesion and curing.
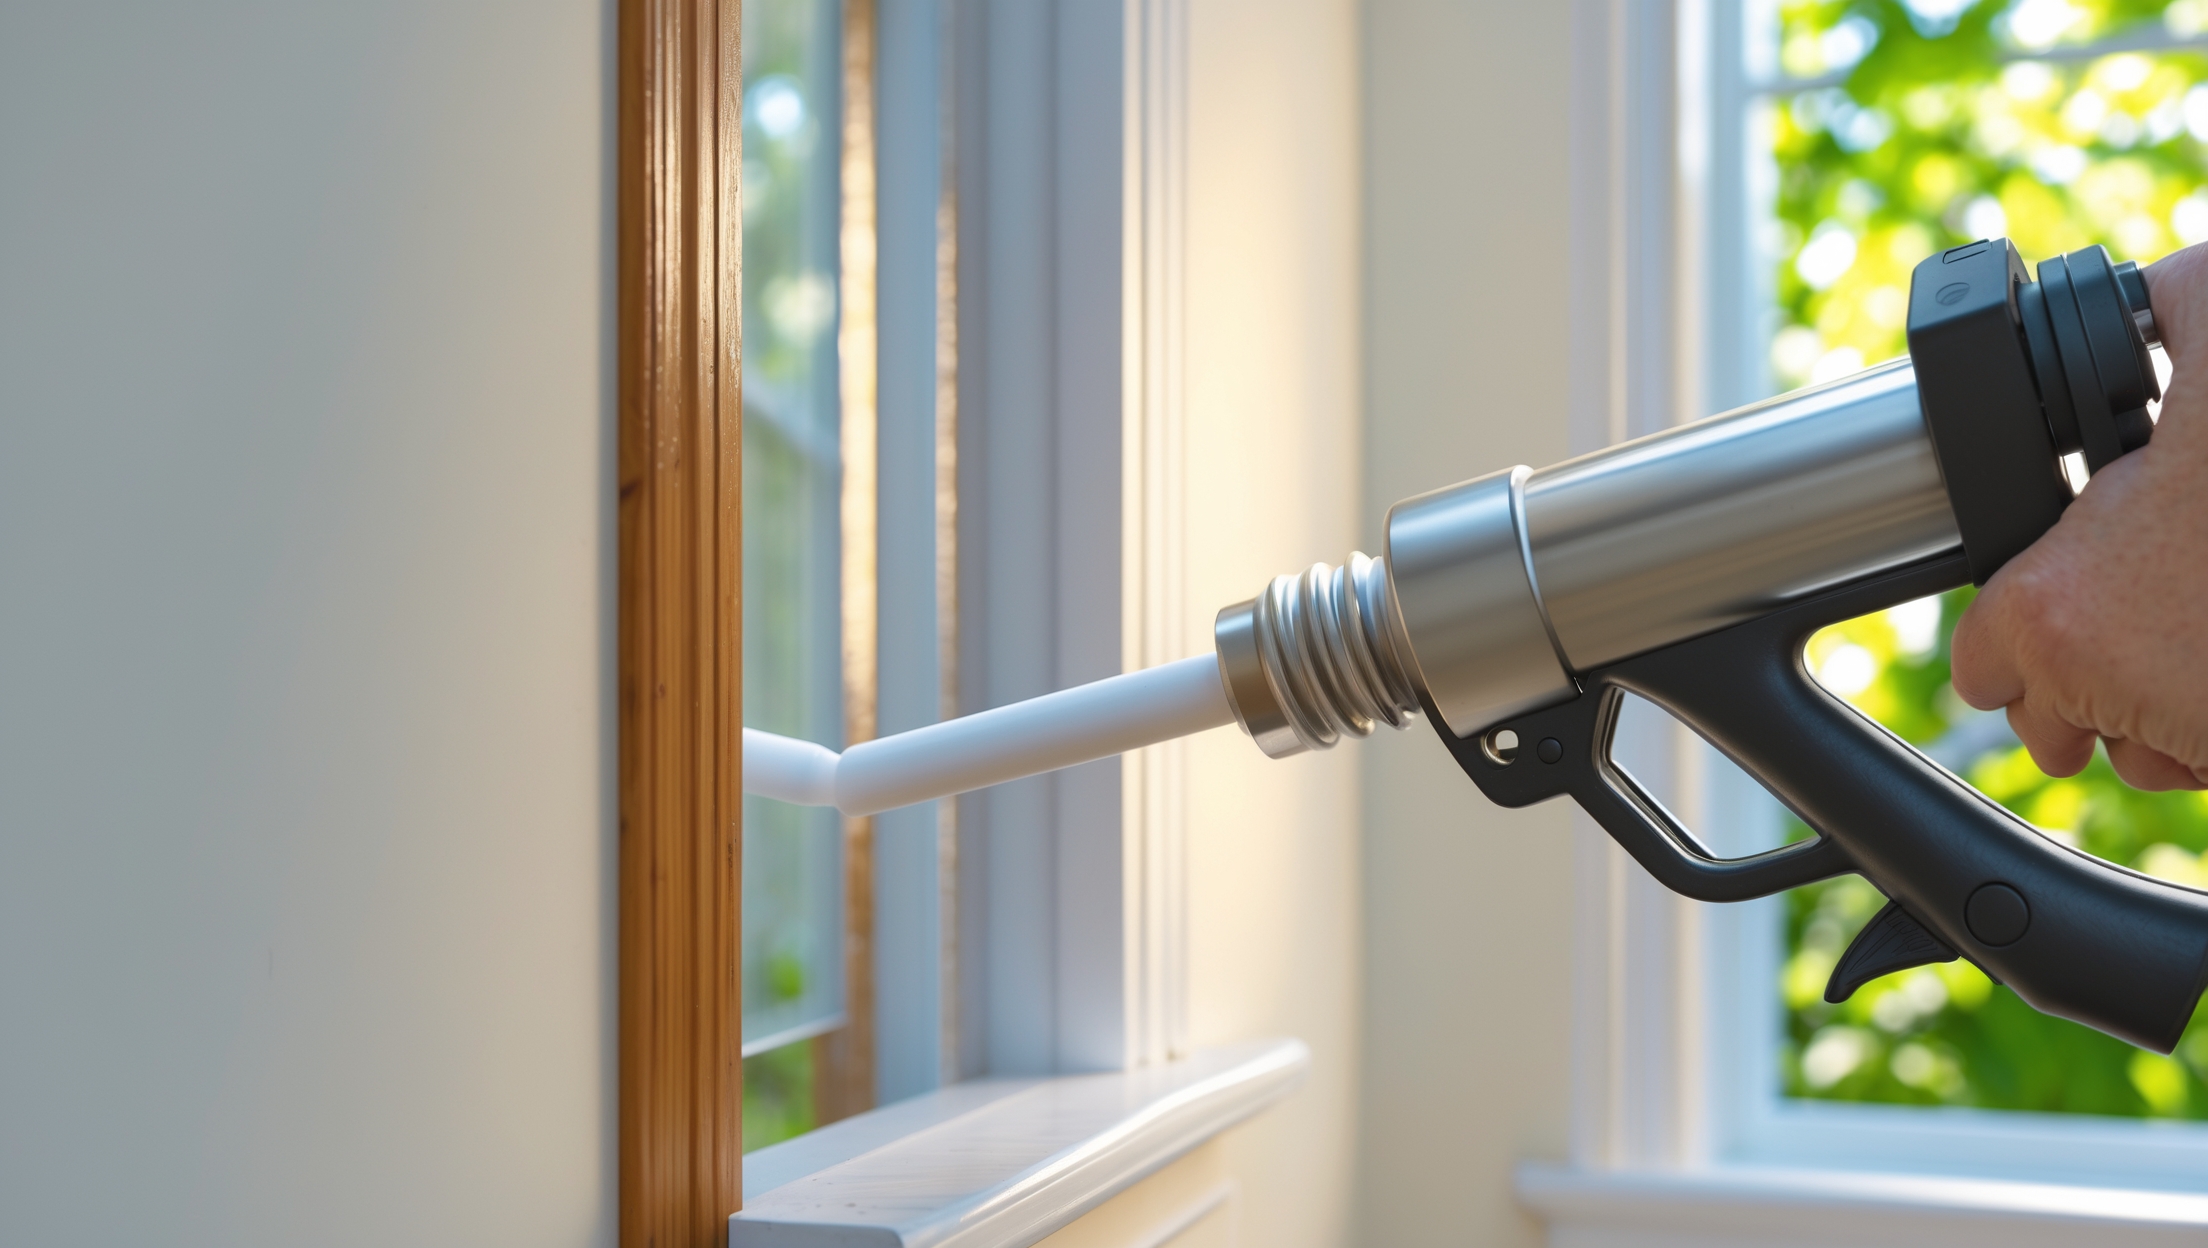
Essential Tools for Professional-Looking Caulking
- Caulking Gun: A smooth-rod or dripless gun offers better control and less mess than basic ratchet models.
- Utility Knife or Razor Scraper: For removing old caulk and cleaning the joint.
- Caulk Removal Tool: Specialized tools speed up stripping stubborn sealant.
- Painter’s Tape: Helps keep lines straight and prevents smears on surrounding surfaces.
- Caulk Smoothing Tool: Creates a clean, professional bead; a gloved finger can work in a pinch.
- Vacuum or Brush: Clears dust and debris from joints before application.
- Cleaning Supplies: Rags, sponges, and mild cleaners for prepping surfaces and wiping excess caulk.
Seasonal Caulking Checklist: Areas to Inspect and Seal
Spring Maintenance Focus
- Windows and Doors: Check interior and exterior perimeters for cracks, gaps, or peeling caulk.
- Baseboards and Trim: Inspect joints between walls and molding for shrinkage or separation.
- Kitchen and Bathroom: Examine seams around sinks, tubs, and backsplashes for water intrusion points.
Fall Maintenance Focus
- Exterior Siding and Penetrations: Seal gaps where siding meets masonry, around vents, pipes, and electrical entries.
- Foundation Joints: Check for cracks at the base of exterior walls or where patio slabs meet the house.
- Roof Flashings and Gutters: Inspect joints for weathered or loose caulk, especially before winter storms.
Step-by-Step Guide to Effective Caulking
1. Remove Old Caulk
Use a utility knife or caulk removal tool to cut and peel away deteriorated caulk. Take care not to damage surrounding surfaces. For stubborn, hardened caulk, soften with a commercial remover or apply gentle heat from a hair dryer.
2. Clean and Prep the Surface
Vacuum or brush away dust and debris. Wash the area with mild detergent and water, then allow to fully dry. For exterior joints, ensure surfaces are free of loose paint, mildew, or peeling material.
3. Apply Painter’s Tape (Optional)
Mask both sides of the joint to ensure clean, straight lines. Leave a gap slightly wider than the joint you’ll be filling.
4. Cut the Caulk Tube Nozzle
Snip the tip at a 45-degree angle, matching the bead size to the width of your joint (typically 1/8″ to 1/4″). Puncture the inner seal if required.
5. Load the Caulking Gun and Apply Caulk
Apply steady, even pressure on the trigger, moving the gun smoothly along the joint. Avoid overfilling; a continuous bead is best.
6. Smooth the Bead
Immediately run a dampened caulk smoothing tool or gloved finger over the bead to compress and shape it. Remove painter’s tape before the caulk skins over.
7. Clean Up Excess and Let Cure
Wipe away stray caulk with a damp cloth (for latex) or mineral spirits (for silicone/polyurethane). Allow caulk to cure fully per the manufacturer’s instructions—usually 24 hours for latex, up to 7 days for some silicones.
Pro Tips for Long-Lasting, Effective Caulking
- Cut Nozzle Small: Start with a small opening; you can always enlarge if needed.
- Don’t Stretch Caulk: Caulk should bridge the gap, not be dragged thin across it.
- Mind the Joint Depth: For wide or deep gaps, use foam backer rod to fill space before caulking. This prevents excessive caulk use and ensures flexibility.
- Check Cure Times: Avoid painting or exposing caulk to water until fully cured.
- Store Tubes Properly: Seal opened tubes with plastic wrap and tape to extend shelf life between seasons.
Common Caulking Mistakes and How to Avoid Them
- Applying Caulk to Dirty or Damp Surfaces: Leads to poor adhesion and early failure. Always clean and dry the joint thoroughly.
- Overfilling or Underfilling Gaps: Excess caulk looks messy and takes longer to cure, while too little won’t seal effectively.
- Using the Wrong Caulk: Interior caulk used outside, or vice versa, can degrade quickly. Match the caulk type to the location and conditions.
- Skipping Backer Rod: For gaps wider than 1/4″, backer rod provides support for the caulk bead and ensures proper performance.
- Neglecting Regular Inspections: Annual or biannual checks are essential; don’t wait until you see visible water damage or drafts.
Budgeting for Seasonal Caulking: Cost Breakdown
Material Costs
- Caulk Tubes: $3–$10 each, depending on type and quality. One tube typically covers 25–55 linear feet.
- Caulking Gun: $7–$25, with dripless models at the higher end.
- Backer Rod: $4–$8 for a 20-foot roll.
- Tape, Cleaning Supplies, Tools: $10–$30, most of which are reusable.
Labor Costs (If Hiring Out)
- Professional caulking services run $1–$4 per linear foot, depending on location and complexity. DIY seasonal caulking of all windows and doors in an average home can typically be completed in a weekend for under $50 in materials.
Maintaining Your Caulk for Maximum Longevity
- Annual Inspections: Check all caulked joints in the spring and fall for cracks, gaps, or mold.
- Prompt Repairs: Address small issues before they develop into bigger, more expensive problems.
- Clean Surfaces: Keep caulked areas free of dust and debris, especially in high-moisture zones.
- Repaint as Needed: Painted caulked joints are more UV-resistant and blend seamlessly with trim.
- Monitor for Pests: Insect activity around joints may indicate failed caulk—inspect and reseal as necessary.
Safety Considerations for DIY Caulking
- Ventilation: Open windows or use fans when applying caulk, especially solvent-based products.
- Protective Equipment: Wear gloves and, if working overhead or with strong chemicals, safety glasses and a mask.
- Ladder Safety: Use a stable ladder for exterior or high interior joints. Never stretch or overreach.
- Proper Disposal: Dispose of empty caulk tubes and chemical wipes according to local hazardous waste guidelines.
Conclusion: The Lasting Value of Seasonal Caulking
Seasonal caulking is one of the most cost-effective home maintenance practices, yet it’s often overlooked until drafts or water stains appear. By proactively inspecting and sealing joints in both the spring and fall, you can keep your home’s envelope tight, comfortable, and protected from the elements. Effective caulking not only blocks unwanted air and moisture but also reduces energy waste, deters pests, and extends the lifespan of windows, doors, and siding.
Equipping yourself with the right materials and tools, following a systematic seasonal checklist, and applying the techniques outlined above will ensure your efforts are both efficient and long-lasting. Remember, even the best caulk will eventually wear out—annual inspections and prompt touch-ups are key to maintaining a draft-free home. For homeowners seeking ways to improve energy efficiency and indoor comfort without major renovations, mastering seasonal caulking delivers impressive returns with minimal investment.
Make it a habit: add caulking to your spring and fall home maintenance routines. Your wallet, your comfort, and your peace of mind will thank you for years to come.
Is it typically more cost-effective to buy a basic set of applicators and caulking guns, or are there advanced tools that really make a difference for frequent seasonal touch-ups? I want to stay on budget but avoid making rookie mistakes.
If you’re doing basic seasonal touch-ups, a good-quality caulking gun and a set of simple applicators are usually enough and will keep costs down. Advanced tools can make applying caulk a bit easier and cleaner, especially for large or frequent projects, but they’re not essential for most homeowners. Focus on proper technique and preparation to avoid mistakes rather than investing in high-end tools right away.
When you mention that acrylic latex caulk is best applied in mild temperatures, is there an ideal temperature range to look for during spring and fall? I sometimes worry about curing properly if we get a cold snap overnight.
Acrylic latex caulk typically performs best when applied in temperatures between 40°F and 80°F. This range helps ensure proper adhesion and curing. If a cold snap is expected overnight, try to apply the caulk earlier in the day so it has time to set before temperatures drop. Avoid applying caulk if freezing temperatures are forecast within the next 24 hours, as this can interfere with curing.
You mention different types of caulk for various areas, but if I’m on a tight budget, is there a single type that could work decently for both inside and outside, or is it really best to buy separate ones for each use?
If you’re on a budget, choosing a high-quality acrylic latex caulk with silicone is a versatile option that can work reasonably well indoors and outdoors. It’s water-resistant and flexible, making it suitable for most household needs. However, for areas with high moisture or movement, like bathrooms or exterior joints, specialized caulks still perform best. If you must pick just one, go with the most multipurpose formula you can find.
The article talks about essential tools for clean and efficient caulking. For someone with a pretty tight budget, which tools are truly necessary, and which ones could I potentially skip or substitute with common household items?
For budget-friendly caulking, focus on the basics: a good caulk gun, utility knife, and a smooth rag or old cloth for cleanup. You can skip specialty items like caulk finishing tools—use your finger dipped in soapy water or a plastic spoon to smooth the bead. Painter’s tape is helpful but not essential; careful application can minimize mess. Most other tools can be improvised with everyday household items.
As someone on a tight budget, I wonder if there are situations when re-caulking can be skipped for a season without risking bigger repair expenses down the line, or is annual inspection truly essential everywhere?
Annual inspection is important so you can spot any problem areas early, but you don’t always have to re-caulk every year. If last year’s caulk still looks intact, flexible, and has no gaps or cracks, you can likely wait another season. Focus on high-risk spots like windows, doors, and any area with visible deterioration. Prioritizing these helps prevent bigger issues while staying within your budget.
What’s the best way to remove old caulk cleanly before applying new sealant, especially in areas like bathrooms where the old stuff gets really tough and moldy? Any specific tools or methods that make the job easier?
To remove old caulk cleanly, especially in bathrooms, start with a utility knife or a specialized caulk removal tool to carefully cut and scrape away as much as possible. For stubborn or moldy spots, apply a commercial caulk remover gel and let it sit as directed to soften the residue. Use a plastic scraper to avoid damaging surfaces, and finish by cleaning the area with rubbing alcohol or a mildew remover to ensure a clean surface for new sealant.
For someone on a tight budget, what are the most essential tools you really need for seasonal caulking that won’t require investing a lot up front?
If you’re on a tight budget, you only need a few basic items for effective seasonal caulking: a quality caulk gun, a utility knife for removing old caulk, and a smoothing tool or even your finger for finishing the bead. Choose a good all-purpose exterior caulk, and use a damp rag for cleanup. These essentials should keep your upfront costs very low.
Since silicone caulk is not paintable, what would you suggest for situations where I need a moisture-resistant seal but also want to match trim color inside my bathroom?
In your case, a paintable acrylic latex caulk with added silicone would be a good option. It offers moisture resistance suitable for bathrooms and can be painted to match your trim. Just make sure the caulk is labeled as both paintable and suitable for use in wet areas to ensure durability.
How often should caulking be inspected or replaced in a typical college apartment? I’m renting and want to make sure I’m not missing any important maintenance responsibilities, especially before winter.
In a typical college apartment, it’s a good idea to inspect caulking around windows, doors, and plumbing fixtures at least once a year—ideally before winter. If you spot cracks, gaps, or areas where caulk is missing, let your landlord know since repairs are often their responsibility. Doing a quick check each fall can help keep your apartment draft-free and comfortable.
Could you clarify whether it’s better to do interior caulking projects in the spring or the fall? I’m concerned about humidity levels affecting the application and drying process, especially when using acrylic latex caulk.
Spring is usually the better season for interior caulking projects, especially with acrylic latex caulk. Moderate temperatures and lower humidity in spring help the caulk cure properly. In fall, rising indoor humidity from heating systems can slow drying and affect adhesion. For best results, choose a mild dry day, keep windows open, and avoid very humid or freezing conditions.
When comparing silicone and polyurethane caulks for use around older window frames, are there specific signs of wear I should look for each season to determine which type will be most effective over time?
When checking older window frames each season, look for cracking, shrinking, or separating caulk. Silicone caulk is more flexible and resists UV damage, so if you notice cracking or yellowing, it may be time to reapply. Polyurethane caulk is tougher but can become brittle or pull away from surfaces. If you see crumbling or gaps with either type, that’s a sign to touch up or replace the caulk to ensure ongoing protection.
In the section on caulk types, you mention that acrylic latex is best for interior joints and that silicone is ideal for places exposed to moisture. Are there cases where these overlap, like around interior windowsills in bathrooms, and how should I decide between the two?
For areas like interior windowsills in bathrooms, where you have both interior use and exposure to moisture, silicone caulk is usually the better choice because it resists mold and water damage. However, if you need to paint over the joint, look for a paintable silicone or a high-quality acrylic latex labeled as suitable for bathrooms. Consider the level of moisture and whether you’ll paint the area to make your final decision.
If I run into mold or mildew while removing old caulk, what’s the safest way to clean that up before applying new sealant? Does the article recommend any specific cleaning products or tools for this step?
If you find mold or mildew while removing old caulk, the article suggests cleaning the area thoroughly before recaulking. It recommends using a mixture of water and mild detergent or a diluted bleach solution (about one part bleach to ten parts water) to scrub away the mold. Make sure the area is completely dry before applying new sealant. A stiff brush or an old toothbrush can help with scrubbing. Wear gloves and ensure good ventilation during cleaning.
When inspecting old caulk during my spring maintenance, I sometimes find spots that are cracked but not fully pulling away from the surface. Should I always remove all the old caulk before applying new, or is it okay to patch over areas that aren’t loose yet?
If you find caulk that’s cracked but still firmly attached, it’s generally best to remove as much of the damaged caulk as possible before applying new material. Patching over old, cracked caulk can cause the new layer to fail sooner, since it won’t adhere as well or create a proper seal. Focus on fully removing areas that are loose or compromised, and clean the surface thoroughly before recaulking for the best results.
Are there any budget-friendly essential tools you would recommend for someone just starting out with seasonal caulking, or is it worth investing in more specialized equipment from the get-go?
For beginners, starting with budget-friendly essentials is perfectly fine. A basic caulking gun, a utility knife for removing old caulk, a smoothing tool (or even your finger with a bit of soapy water), and painter’s tape will cover most seasonal projects. You don’t need specialized equipment right away. Once you get more comfortable or take on complex jobs, you can consider investing in higher-end tools.
You mentioned essential tools for making the job cleaner and more efficient. For someone who hasn’t done much caulking before, which tools are absolutely necessary to get started, and which ones are just nice to have?
For basic caulking, you’ll definitely need a good quality caulking gun, a utility knife for trimming old caulk, and a caulk smoothing tool or even just your finger for smoothing the bead. Painter’s tape helps create neat edges, but it’s optional. Items like specialized caulk removers, sealant finishing kits, or dripless guns make the process easier, but aren’t essential for beginners.
I noticed you mentioned that silicone caulk isn’t paintable. If I want to seal an area that gets a lot of moisture but also needs to match my wall color, what would you suggest as the best alternative?
In areas exposed to moisture where you also want to paint over the sealant, an acrylic latex caulk labeled as “paintable” and “mildew resistant” is a good choice. These caulks hold up well in damp environments like bathrooms and kitchens, and you can match them to your wall color with paint once they’re dry. Be sure to let the caulk cure fully before painting for the best results.
For someone living in an older house with a mix of wood, brick, and vinyl siding, would you suggest using different caulks for each material, or is there one type that works well across all exterior surfaces?
For a home with mixed materials like wood, brick, and vinyl siding, using a high-quality, paintable exterior polyurethane or siliconeized acrylic caulk is usually a safe bet. These types adhere well to most surfaces and remain flexible. Just make sure the product you choose is labeled for use on all the materials you have and is suitable for exterior applications.
Do you have any recommendations for removing old, cracked caulk efficiently, especially in tricky spots like around window frames or baseboards? I’m wondering if certain tools or techniques make the process less tedious before reapplying new caulk each season.
For removing old, cracked caulk, a caulk removal tool or utility knife works well for most edges, especially around window frames and baseboards. In tight spots, a plastic putty knife or an old toothbrush can help reach and loosen residue without damaging surfaces. Soften stubborn caulk by applying a commercial caulk remover or a bit of rubbing alcohol and letting it sit for a few minutes before scraping. Always clean the area thoroughly and let it dry completely before applying new caulk.
For homeowners in colder climates, how long after applying new caulk should we wait before exposing it to rain or freezing temperatures, especially when working during fall maintenance?
After applying new caulk, it’s best to wait at least 24 hours before exposing it to rain or freezing temperatures. Some fast-drying caulks may be water-ready in as little as 3 to 6 hours, but cooler fall weather can slow curing. Always check the product label for specific recommendations, and when in doubt, give it extra time to cure fully before facing harsh weather.
Regarding polyurethane caulk, is there a notable price difference compared to acrylic latex or silicone caulk, and do the long-term benefits justify the potentially higher cost for regular homeowners?
Polyurethane caulk is generally more expensive than acrylic latex and silicone caulk. However, it offers superior flexibility, adhesion, and durability, especially in areas exposed to movement or harsh weather. For regular homeowners, the higher upfront cost can be worthwhile if you need a long-lasting seal, particularly for exterior projects. If longevity and resistance to cracking are priorities, the investment in polyurethane caulk is often justified.
Is there a reliable way to check if old caulk has lost its effectiveness without having to remove it entirely first? Sometimes it looks fine, but I still notice drafts near the windows during winter.
You can test old caulk by gently pressing along its length with your finger or a blunt tool; if it feels brittle, cracks, or peels away, it’s likely no longer sealing properly. Another method is to hold a lit incense stick or candle near the caulked area—if the smoke or flame wavers, that indicates air leaks. These checks can help you identify issues without fully removing the caulk.
When applying new caulk, is it always necessary to remove all traces of the old caulk first, or can you apply a new layer directly over the old one in some situations? I’d appreciate some troubleshooting tips for ensuring a lasting, draft-free seal.
For the best results, it’s usually important to remove all old caulk before applying new material. Old caulk can prevent proper adhesion, which may lead to gaps or peeling. If the old caulk is still in good shape and firmly attached, you might be able to caulk over it, but this isn’t ideal for a long-lasting, draft-free seal. For troubleshooting, make sure surfaces are clean and dry, use a high-quality caulk, and smooth the bead with a caulk tool or wet finger to prevent gaps.
With seasonal caulking being part of spring and fall maintenance, how long should I expect the typical caulking job to last before it needs to be replaced? I’m trying to plan how often this needs to go on my schedule.
A typical caulking job usually lasts between 5 to 10 years, depending on the quality of the caulk used, exposure to weather, and the area being sealed. It’s a good idea to inspect caulking during your spring and fall maintenance, but you likely won’t need to fully replace it every year—just touch up any cracks or gaps as needed.
You mentioned polyurethane caulk is great for siding and concrete because of its durability, but it needs mineral spirits for cleanup. In practice, is the extra effort worth it for DIY projects or would you suggest sticking with something easier to use for most homeowners?
Polyurethane caulk does offer outstanding durability, especially for outdoor siding and concrete where flexibility and weather resistance matter. However, the cleanup with mineral spirits can be messy and inconvenient. For most DIY homeowners, a high-quality exterior acrylic latex caulk may be easier to work with, since it cleans up with water. If long-term durability is your top priority, the extra step might be worth it, but otherwise, acrylic latex is a practical choice.
Once you’ve applied fresh caulk, how long do you need to wait before exposing the area to water or heavy use—like in a bathroom or around exterior doors? I’d like to plan so I don’t accidentally mess up new work.
After applying fresh caulk, it’s important to let it cure properly. Most latex or acrylic caulks need about 24 hours before they can be exposed to water or heavy use. Silicone caulks may be ready sooner, sometimes in as little as 12 hours, but always check the manufacturer’s instructions on the tube for the exact drying and curing times. Waiting ensures a durable, long-lasting seal.
Can you elaborate on how often caulk should actually be inspected around windows and doors? I live in an older home and sometimes struggle to tell if the caulk is truly failing or just cosmetically aged.
For an older home, it’s a good idea to inspect caulk around windows and doors at least once a year, ideally before winter. Look for cracks, gaps, or areas where the caulk is pulling away—these are signs of failure. If it just looks discolored but is still smooth and intact, it may only be cosmetically aged and not in need of immediate replacement.
I’m on a student budget, so I’m wondering which essential caulking tools are really necessary to buy upfront for a small apartment and which ones I could maybe improvise or skip without sacrificing too much quality?
For a small apartment on a budget, you’ll want to prioritize a basic caulking gun and a tube of good-quality caulk. You can use a butter knife or an old credit card instead of a specialized caulk smoothing tool. Painter’s tape is helpful but optional for clean lines, and you can skip items like a caulk remover unless you’re dealing with old, stubborn caulk. This way, you save money without compromising results.
I’m a bit overwhelmed by the different tools the article suggests. Is it really necessary to get everything on the list, or are there a few essential tools that will handle most small caulking jobs around the house without going over budget?
You don’t need every tool listed to handle most small caulking jobs at home. For most basic tasks, a good quality caulking gun, a utility knife or scraper to remove old caulk, and a smoothing tool (or even just your finger) are usually enough. You can add specialty tools later if you tackle bigger or more complex projects.
I noticed you list several types of caulk and state that polyurethane caulk is good for external use but requires mineral spirits for cleanup. Are there any budget-friendly alternatives that are still durable and easier to clean up after application?
Yes, a good budget-friendly alternative to polyurethane caulk for external use is acrylic latex caulk. It’s durable, adheres well, and is much easier to clean up since you only need water. Some acrylic latex caulks are also labeled for exterior use and come with added silicone for better flexibility and weather resistance, making them a practical choice for outdoor applications.
I’m on a tighter budget this year, so I’m wondering whether it’s better to invest in higher-quality caulk or in specialized application tools. Does spending more on caulk extend the time before I need to recaulk again?
Spending a bit more on higher-quality caulk typically gives you a longer-lasting seal, which means you won’t have to recaulk as often. The quality of the caulk usually matters more for longevity than the tools do. However, basic application tools are still helpful, so try to get decent ones within your budget. Prioritize good caulk if you have to choose.
If I am on a tight budget this season, are there any essential caulking tools you would suggest prioritizing over others? I want to get the job done right but can’t invest in a full toolkit this year.
If you’re on a budget, focus on getting a good quality caulking gun and a utility knife or razor blade for removing old caulk. These are the essentials to apply and prep for new caulk. You can also use your finger or a simple plastic spoon for smoothing the caulk instead of buying a finishing tool. This way, you get reliable results without overspending.
The article mentions the importance of a seasonal checklist for caulking. Do you have any recommendations on how often I should check exterior caulked areas during the year, or is twice a year enough even in regions with extreme weather?
For most homes, checking exterior caulked areas twice a year—in spring and fall—works well. However, in regions with extreme weather, it’s wise to add an extra inspection after the harshest season (like after winter in cold climates or summer in very hot areas). This helps catch new cracks or wear early, keeping your home well-sealed year-round.
If I need to redo caulking on the exterior of my house, is there an ideal temperature or humidity range I should aim for to make sure the new caulk adheres properly?
For the best adhesion when caulking outdoors, aim to work when temperatures are between 40°F and 80°F. It’s also a good idea to pick a day when humidity is moderate and rain isn’t expected for at least 24 hours. Extremely hot, cold, or humid conditions can affect how well the caulk sets and adheres.
I saw you mentioned that humidity and temperature impact caulk performance. Is there a specific temperature range I should look out for in early spring or fall to get the best results?
For the best caulking results, aim to apply caulk when the temperature is between 40°F and 80°F (about 4°C to 27°C). Early spring and fall are usually fine, as long as you avoid days that are too cold or too hot. Also, try to pick a day when it’s dry and not overly humid so the caulk can cure properly.
You mentioned polyurethane caulk for exterior projects due to its durability, but what are the cleanup tips for someone who wants to avoid harsh chemicals like mineral spirits after application?
Polyurethane caulk can be tough to clean up without mineral spirits, but you can make things easier by acting quickly. While the caulk is still wet, use a damp cloth or rag to wipe away excess. For your hands, try using soap and warm water right away. Once the caulk dries, it becomes much harder to remove without chemicals, so prompt cleanup is key.
On a tight budget, are there any must-have tools you recommend I invest in for caulking, or will standard hardware store tools get the job done just as well for a beginner?
For beginners on a budget, basic hardware store tools will work well. You only really need a good quality caulking gun, a utility knife or razor blade for trimming, and a smoothing tool—or even just your finger with a little soapy water. Investing in a dripless caulking gun can make things easier, but otherwise, there’s no need for specialized equipment.
For someone on a student budget, what are the essential tools I really need for a basic caulking job, and are there any affordable brands or DIY alternatives that still get the job done well?
For a basic caulking job on a student budget, you’ll just need a caulking gun, a utility knife or scissors to open the tube, and a rag for cleanup. Most hardware stores carry affordable caulking guns that work well—no need to splurge. If you want to smooth out the bead, your finger dipped in water or a simple plastic spoon works just as well as pricier tools. Look for store-brand or generic caulk to save money without sacrificing quality.
The article covers various types of caulk and their ideal uses, but I was wondering if you have any tips on how to remove old, stubborn caulk cleanly without damaging the surfaces underneath? Are there specific tools or solvents that work best for different caulk types?
To remove old, stubborn caulk without damaging surfaces, use a plastic caulk removal tool or putty knife to gently scrape away the bulk. For silicone caulk, a silicone remover gel can soften it for easier removal. For latex-based caulk, warm soapy water or rubbing alcohol helps loosen it. Always test solvents on a hidden area first to avoid discoloration, and finish by wiping the area clean before re-caulking.
I sometimes struggle with getting a smooth finish when caulking. Are there specific tools or techniques you recommend for beginners to help make the job less messy and more efficient, especially for visible indoor areas?
A caulk smoothing tool or a simple wet finger can help you achieve a neat finish, but for beginners, plastic caulking tools are especially handy because they create consistent lines and minimize mess. Always cut the caulk tube tip at a 45-degree angle for better control, and work in small sections so you can smooth the bead before it starts to dry. Keep a damp cloth nearby to wipe away excess caulk quickly.
You talk about seasonal caulking as part of fall and spring routines. Is it okay to apply caulk in the winter if I find a draft, or should I wait until milder weather for best results?
You can apply caulk in the winter if you discover a draft, but it’s important to check the temperature guidelines on the caulk packaging. Most caulks need temperatures above 40°F (4°C) to cure properly. If it’s too cold, the caulk may not adhere well or cure correctly, so try to choose a mild winter day or use caulk formulated for low temperatures.
How long should I expect seasonal caulking to take for an average-sized home, especially if I’m fitting it in between work and kids’ activities? Any time-saving tips for busy parents?
For an average-sized home, seasonal caulking usually takes about 4 to 8 hours, though it can be split over a few evenings or a weekend to fit around your schedule. To save time, focus on the most draft-prone areas first, like windows and doors. Using a quality caulk gun with a smooth trigger and prepping all surfaces in advance will also speed things up. If needed, involve older kids with safe prep tasks to make it a family project.
When you mention that acrylic latex caulk is best for interior trim and baseboards, does it also work well for sealing small gaps around window frames, or is silicone better for that job? I get confused about which type is best for different parts of my home.
Acrylic latex caulk does work for sealing small gaps around interior window frames, especially if you plan to paint over it, as it adheres well to wood and drywall. However, for gaps exposed to moisture or frequent temperature changes—like exterior window frames—silicone caulk is a better choice because it’s more flexible and water-resistant. So, use acrylic latex for inside and silicone for outside or damp areas.
Is there a specific temperature or weather condition that works best for applying polyurethane caulk outside, or can it be done any time during the spring and fall?
For best results, apply polyurethane caulk outdoors when temperatures are between 40°F and 80°F and the weather is dry. Avoid applying if rain is expected within 24 hours or if surfaces are damp or frozen. Spring and fall are often ideal times as long as these conditions are met, but try to choose mild, clear days for your project.
If I tried caulking in colder temperatures and it didn’t adhere properly, how should I fix the problem now that the weather is warming up? Do I need to fully remove the failed caulk or can I reapply on top?
If the caulk you applied in colder temperatures didn’t adhere well, it’s best to fully remove the failed caulk before reapplying. Use a scraper or caulk remover to clear away the old material, clean the area thoroughly, and then apply fresh caulk now that the weather is warmer. This ensures a proper seal and lasting results.
You mention that temperature and humidity affect how well caulk works. If I live in an area with really unpredictable spring weather, how do I know when it’s actually the right time to apply new caulk so it cures properly?
To make sure your caulk cures properly, try to apply it on a day when temperatures are between 40°F and 80°F, and when rain isn’t expected for at least 24 hours. It’s also best if the humidity is moderate, not extremely high. If your spring weather changes quickly, check a reliable forecast and pick a mild, dry stretch—even a window of a few good days will help ensure the caulk sets well.
In your checklist, do you recommend removing all the old caulk first, or is it sometimes okay to apply new caulk over the existing sealant if it’s mostly intact?
It’s always best practice to remove the old caulk before applying new sealant, even if the existing caulk appears mostly intact. This ensures that the new caulk adheres properly and creates a reliable, long-lasting seal. Layering new caulk over old can lead to poor adhesion and potential gaps that let in drafts or moisture.
You mention a seasonal checklist for caulking—are there any tools that would help speed up the process for someone on a tight schedule, or is it best to take the slow approach for better results?
Using the right tools can definitely help you work faster without sacrificing quality. A good caulking gun with a smooth trigger provides better control and reduces hand fatigue. Tools like a caulk finishing tool or even a simple plastic spoon can help you smooth the bead quickly and neatly. If you prep surfaces and use painter’s tape for clean edges, that also speeds things up. So, you can balance speed and good results with a few handy tools and some prep.
If I want to re-caulk my windows in early spring but the weather is still pretty chilly, is there a specific type of caulk I should use, or should I wait until it gets warmer for best results?
For early spring caulking in chilly weather, choose a caulk labeled as suitable for low temperatures or specifically for exterior use. Many silicone and some polyurethane caulks can be applied in temperatures as low as 20–40°F. Just make sure surfaces are dry and clean. If conditions are wet or freezing, it’s better to wait for a slightly warmer, dry day for the best seal.
When you mention that silicone caulk isn’t paintable, does that mean it will always stand out if used on visible parts of trim or windows? Is there a workaround if I really need the moisture protection but want everything to match?
Silicone caulk does tend to stand out because most types can’t be painted, so its color remains visible on trim or windows. If you need its moisture protection but want a uniform look, consider using paintable silicone or a hybrid caulk labeled as paintable and waterproof. Another option is to apply silicone, let it cure, and then use trim or molding to cover it for a consistent appearance.
We have an older house and I’m worried about missing hidden gaps, especially around baseboards and exterior joints. Are there any essential tools or tips from your checklist that make identifying problem areas easier for beginners?
To spot hidden gaps in older homes, a bright flashlight is invaluable—shine it along baseboards and exterior joints to highlight irregularities. The article also recommends using an incense stick or smoke pencil; as you move it slowly near suspected areas, the smoke will waver where air is leaking. These tools are beginner-friendly and make it much easier to identify problem spots before you start caulking.
You wrote that polyurethane caulk is good for exterior projects, but it needs mineral spirits for cleanup. As someone trying to avoid strong chemicals, are there alternative cleanup methods or products you’d recommend?
Polyurethane caulk does require mineral spirits for cleanup because it’s not water-soluble. If you want to avoid using strong chemicals, consider switching to a high-quality exterior acrylic latex caulk instead. Acrylic latex caulk is water-based, so you can clean tools and spills with just soap and water. Unfortunately, for polyurethane caulk, there aren’t really alternative, less harsh cleaners that work as effectively as mineral spirits.
If I caulk in the spring, how often should I check the seals before considering a re-do in the fall, or will one application usually last the whole year?
If you caulk in the spring using good-quality exterior caulk, it usually lasts through the year. However, it’s smart to check the seals at least once during the summer, especially after heavy rain or heat waves, to spot any cracks or gaps early. Regular seasonal checks help catch any issues before they become bigger problems, but a single well-applied caulk job should generally hold until the fall.
You mentioned that polyurethane caulk is good for exterior projects due to its durability, but it needs mineral spirits for cleanup. How difficult is it to clean up compared to acrylic latex caulk, and is it worth the extra effort for a student on a budget?
Polyurethane caulk does require mineral spirits for cleanup, which can be messier and more expensive than simply using water for acrylic latex caulk. For a student on a budget, acrylic latex is easier to work with and clean up, making it a more practical option for most projects, unless you need the extra durability for a specific exterior area.
For someone on a tight budget, are there any essential caulking tools you think are worth splurging on, and which ones could be skipped without hurting the final result?
If you’re on a tight budget, consider investing in a good-quality caulking gun and a basic utility knife—these make the job much easier and cleaner. You can skip specialty smoothing tools and just use a wet finger or an old spoon to smooth the caulk. A painter’s tape is nice but not essential; careful application can give you neat lines without it.
I run a small property management business and often need to refresh caulking in rental units. Are there particular tools or techniques you would suggest to speed up the process without sacrificing quality, especially when dealing with various caulk types like silicone and polyurethane?
To increase efficiency while maintaining quality, consider using a high-quality caulk gun with a smooth trigger for better control and less hand fatigue. For silicone and polyurethane caulk, keep a caulk smoothing tool and a utility knife handy for clean lines and easy removal. Painter’s tape can help create neat edges, especially when working quickly. Always prep surfaces thoroughly—removing old caulk and cleaning the area speeds up application and improves adhesion for all caulk types.
I’ve tried caulking before and had trouble getting a neat finish, especially with butyl rubber caulk on gutters. Do you have any troubleshooting tips for avoiding a messy application or fixing mistakes without having to start over?
Butyl rubber caulk can be tricky since it’s stickier and harder to smooth than others. To reduce mess, apply painter’s tape on both sides of the joint to get clean lines, and use a caulking tool or a plastic spoon dipped in mineral spirits to smooth the bead. If you make a mistake, gently wipe excess with a rag dampened in mineral spirits before it cures—no need to start over if you catch it quickly.
I noticed the article mentions applying acrylic latex caulk in milder temperatures, but I live in a region where fall can get pretty chilly. What’s the lowest temperature you recommend for applying this type of caulk effectively?
For acrylic latex caulk, it’s generally best to apply it when temperatures are above 40°F (about 4°C). If it’s colder, the caulk may not cure properly or could become too stiff to work with. If you expect consistently chilly weather, try to schedule your caulking on a milder day or during the warmest part of the afternoon.
When checking caulk seasonally, how do I know if it’s actually time to remove and replace it, or if I can just add a new layer on top of the old one?
When inspecting caulk, look for signs like cracking, peeling, shrinking, or mold. If the old caulk is loose or deteriorating, remove it before reapplying. Only add a new layer if the existing caulk is firmly adhered, clean, and free of damage. Otherwise, replacement ensures a better seal and longer-lasting results.
I noticed you mentioned polyurethane caulk is UV-resistant and paintable for exterior projects. How does it perform in areas with extreme temperature shifts compared to silicone caulk?
Polyurethane caulk holds up very well against UV exposure and is paintable, making it a popular choice for exteriors. However, in areas with extreme temperature shifts, silicone caulk generally outperforms polyurethane because it remains flexible and resists cracking or shrinking, even in very hot or cold conditions. Silicone is less likely to fail when temperatures swing dramatically, while polyurethane can become brittle over time in such environments.
If I already have older caulk that’s starting to crack around my windows, is it enough to simply add new caulk on top, or do I need to remove all the old material first? What’s the best way to handle this to avoid drafts?
To ensure a proper seal and prevent drafts, it’s best to remove the old, cracking caulk before applying new material. Layering new caulk over old, damaged caulk usually doesn’t bond well and may not seal gaps effectively. Use a utility knife or a caulk remover tool to carefully scrape away the old caulk, clean the area thoroughly, let it dry, and then apply fresh caulk for the best results.
If I am on a tight budget and need to prioritize, which areas of the home would you recommend sealing first to get the most immediate impact on energy savings and draft prevention?
If you’re looking to prioritize caulking on a budget, start with sealing gaps and cracks around windows and exterior doors, as these are the most common sources of drafts. Next, check along baseboards and where plumbing or wiring enters from the outside. Focusing on these high-impact areas will help you achieve noticeable improvements in energy efficiency and comfort without a large investment.