

Introduction: Why Subfloor Repairs Matter More Than You Think
When most homeowners think of home improvement, they picture fresh paint, new flooring, or updated fixtures. Yet, beneath the surfaces you see every day is the subfloor—a structural layer critical to your home’s comfort and stability. Over time, subfloors can suffer from water damage, rot, squeaks, or sagging, leading to annoyances or even costly structural repairs if ignored. Tackling subfloor repairs may sound intimidating, but with the right knowledge and preparation, it’s a manageable project that can protect your investment and enhance your living space.
This comprehensive guide is tailored for homeowners ready to address subfloor issues with confidence. We’ll uncover common beginner mistakes, break down the real costs involved, and walk you step-by-step through the repair process. By the end, you’ll know how to spot problems early, budget smartly, and perform repairs that last. Whether you’re planning a DIY fix or deciding when to call in a pro, this article gives you the expert insights you need for a successful subfloor repair project.
Understanding Your Home’s Subfloor: Materials and Functions
What Is a Subfloor?
The subfloor is the structural layer directly above your floor joists and beneath your finished flooring (hardwood, tile, carpet, etc.). It provides a stable, level surface and supports the weight of your furnishings and daily activity. Most subfloors are made from plywood, oriented strand board (OSB), or in older homes, solid planks.
Common Subfloor Materials
- Plywood: Preferred for its strength and resistance to warping. Usually 3/4″ thick.
- Oriented Strand Board (OSB): More affordable, but less resistant to moisture than plywood.
- Plank Subfloors: Found in homes built before the 1970s. Made from 1×6 or 1×8 boards, prone to gaps and squeaks.
Key Functions of the Subfloor
- Distributes load evenly across joists
- Provides a nailing surface for finished flooring
- Maintains structural integrity and levelness
- Helps with sound insulation and energy efficiency
Beginner Pitfalls: Costly Subfloor Repair Mistakes to Avoid
1. Ignoring Moisture Issues
One of the most common (and expensive) mistakes is repairing or replacing a subfloor without addressing the underlying cause of moisture. Water leaks from plumbing, spills, or poor ventilation can result in rot, mold, or swelling. Always identify and fix the source of moisture before starting repairs.
2. Skipping Structural Inspection
Don’t assume that only the top layer is damaged. Subfloor issues often extend to joists or supports beneath. Inspect for sagging, rot, or pest damage in the framing before replacing panels. Overlooking structural problems can lead to recurring issues.
3. Using the Wrong Materials
Replacing damaged sections with mismatched thickness or material (e.g., using 1/2″ plywood instead of 3/4″) can lead to uneven floors, squeaks, and weak spots. Always match or exceed the original material specs.
4. Failing to Secure Panels Properly
Inadequate fastening is a recipe for squeaky floors. Use the right screws or nails, and ensure they’re spaced correctly (every 6–8 inches along edges, 12 inches in the field). Consider construction adhesive to minimize movement and noise.
5. Overlooking Building Code and Permit Requirements
Some jurisdictions require permits for extensive subfloor work, especially if structural framing is replaced. Skipping this step could cause problems during home sales or insurance claims.
6. Skipping Safety Precautions
Neglecting PPE (personal protective equipment) when dealing with mold, dust, or power tools can lead to serious health risks or injuries. Always prioritize safety—wear gloves, goggles, and a dust mask.
Cost Breakdown and Smart Budgeting for Subfloor Repairs
Estimating Your Project Scope
Start by measuring the affected area. Subfloor panels are typically 4×8 feet (32 sq. ft.), so divide your project area by 32 to estimate the number of panels needed. Don’t forget to budget for fasteners, adhesives, and potential joist repairs.
Material Costs
- Plywood (3/4”): $40–$70 per 4×8 sheet
- OSB (3/4”): $25–$45 per 4×8 sheet
- Construction adhesive: $5–$8 per tube
- Screws/Nails: $15–$30 per box
- Moisture barrier (if needed): $0.25–$0.50 per sq. ft.
Tool Rental or Purchase
- Circular saw: $50–$150 (purchase) or $20–$40/day (rental)
- Pry bar: $10–$25
- Drill/driver: $50–$150
- Jigsaw (for curves): $40–$100
Additional Expenses
- Dumpster or disposal fees: $50–$150
- Mold remediation (if needed): $500–$2,500 (professional)
- Professional labor: $35–$70/hr, or $400–$1,500 for typical repairs
Sample Budget: 100 sq. ft. DIY Subfloor Repair
- 3 sheets plywood @ $60 = $180
- Adhesive, screws, misc. = $60
- Tool rental = $70
- Disposal = $75
- Total: $385 (excluding labor and unexpected issues)
Tips for Saving Money
- Buy materials in bulk for larger jobs
- Rent tools you won’t use frequently
- Check for local Habitat for Humanity ReStores for surplus building materials
- Address moisture and structural issues early to avoid repeat repairs
Tools and Materials: What You Need to Succeed
Essential Tools
- Pry bar and hammer (removing old floor and subfloor)
- Circular saw or reciprocating saw (cutting panels)
- Drill/driver and bits
- Measuring tape and chalk line
- Jigsaw (for irregular cuts)
- Level and square
- Shop vacuum (cleaning debris)
- Personal protective equipment: gloves, goggles, dust mask/respirator
Materials Checklist
- Plywood or OSB panels (match existing thickness)
- Construction adhesive
- Deck screws or ring-shank nails
- Moisture barrier (for ground-level or basement areas)
- Wood filler or patch (optional, for minor fixes)
Nice-to-Have Extras
- Knee pads (comfort during installation)
- Laser level (for checking floor flatness)
- Moisture meter (detect hidden dampness)
Step-by-Step Subfloor Repair: From Diagnosis to Finish
Step 1: Diagnose the Problem Thoroughly
- Walk across the floor to locate squeaks, soft spots, or sagging.
- Remove a small section of finished flooring for inspection (carpet, laminate, etc.).
- Check for discoloration, mold, or dampness.
- Probe with a screwdriver to test for rot or sponginess.
- Inspect joists for signs of damage.
Step 2: Prepare the Work Area
- Remove furniture and cover nearby fixtures with plastic sheeting.
- Clear the finished floor over the damaged area.
- Set up good lighting and ventilation (especially if cutting or using adhesives).
- Put on PPE: gloves, goggles, and dust mask.
Step 3: Remove Damaged Subfloor Sections
- Use a circular saw set to the subfloor thickness—avoid cutting into joists.
- Cut out the damaged section, making straight, square cuts for easy patching.
- Use a pry bar to lift and remove old subfloor panels.
- Clean debris and check the condition of joists and insulation below.
Step 4: Assess and Repair Joists (If Needed)
- If joists show signs of rot or damage, sister new lumber alongside for strength.
- Address any mold with appropriate cleaning or remediation.
- Replace or reinforce blocking as needed for panel support.
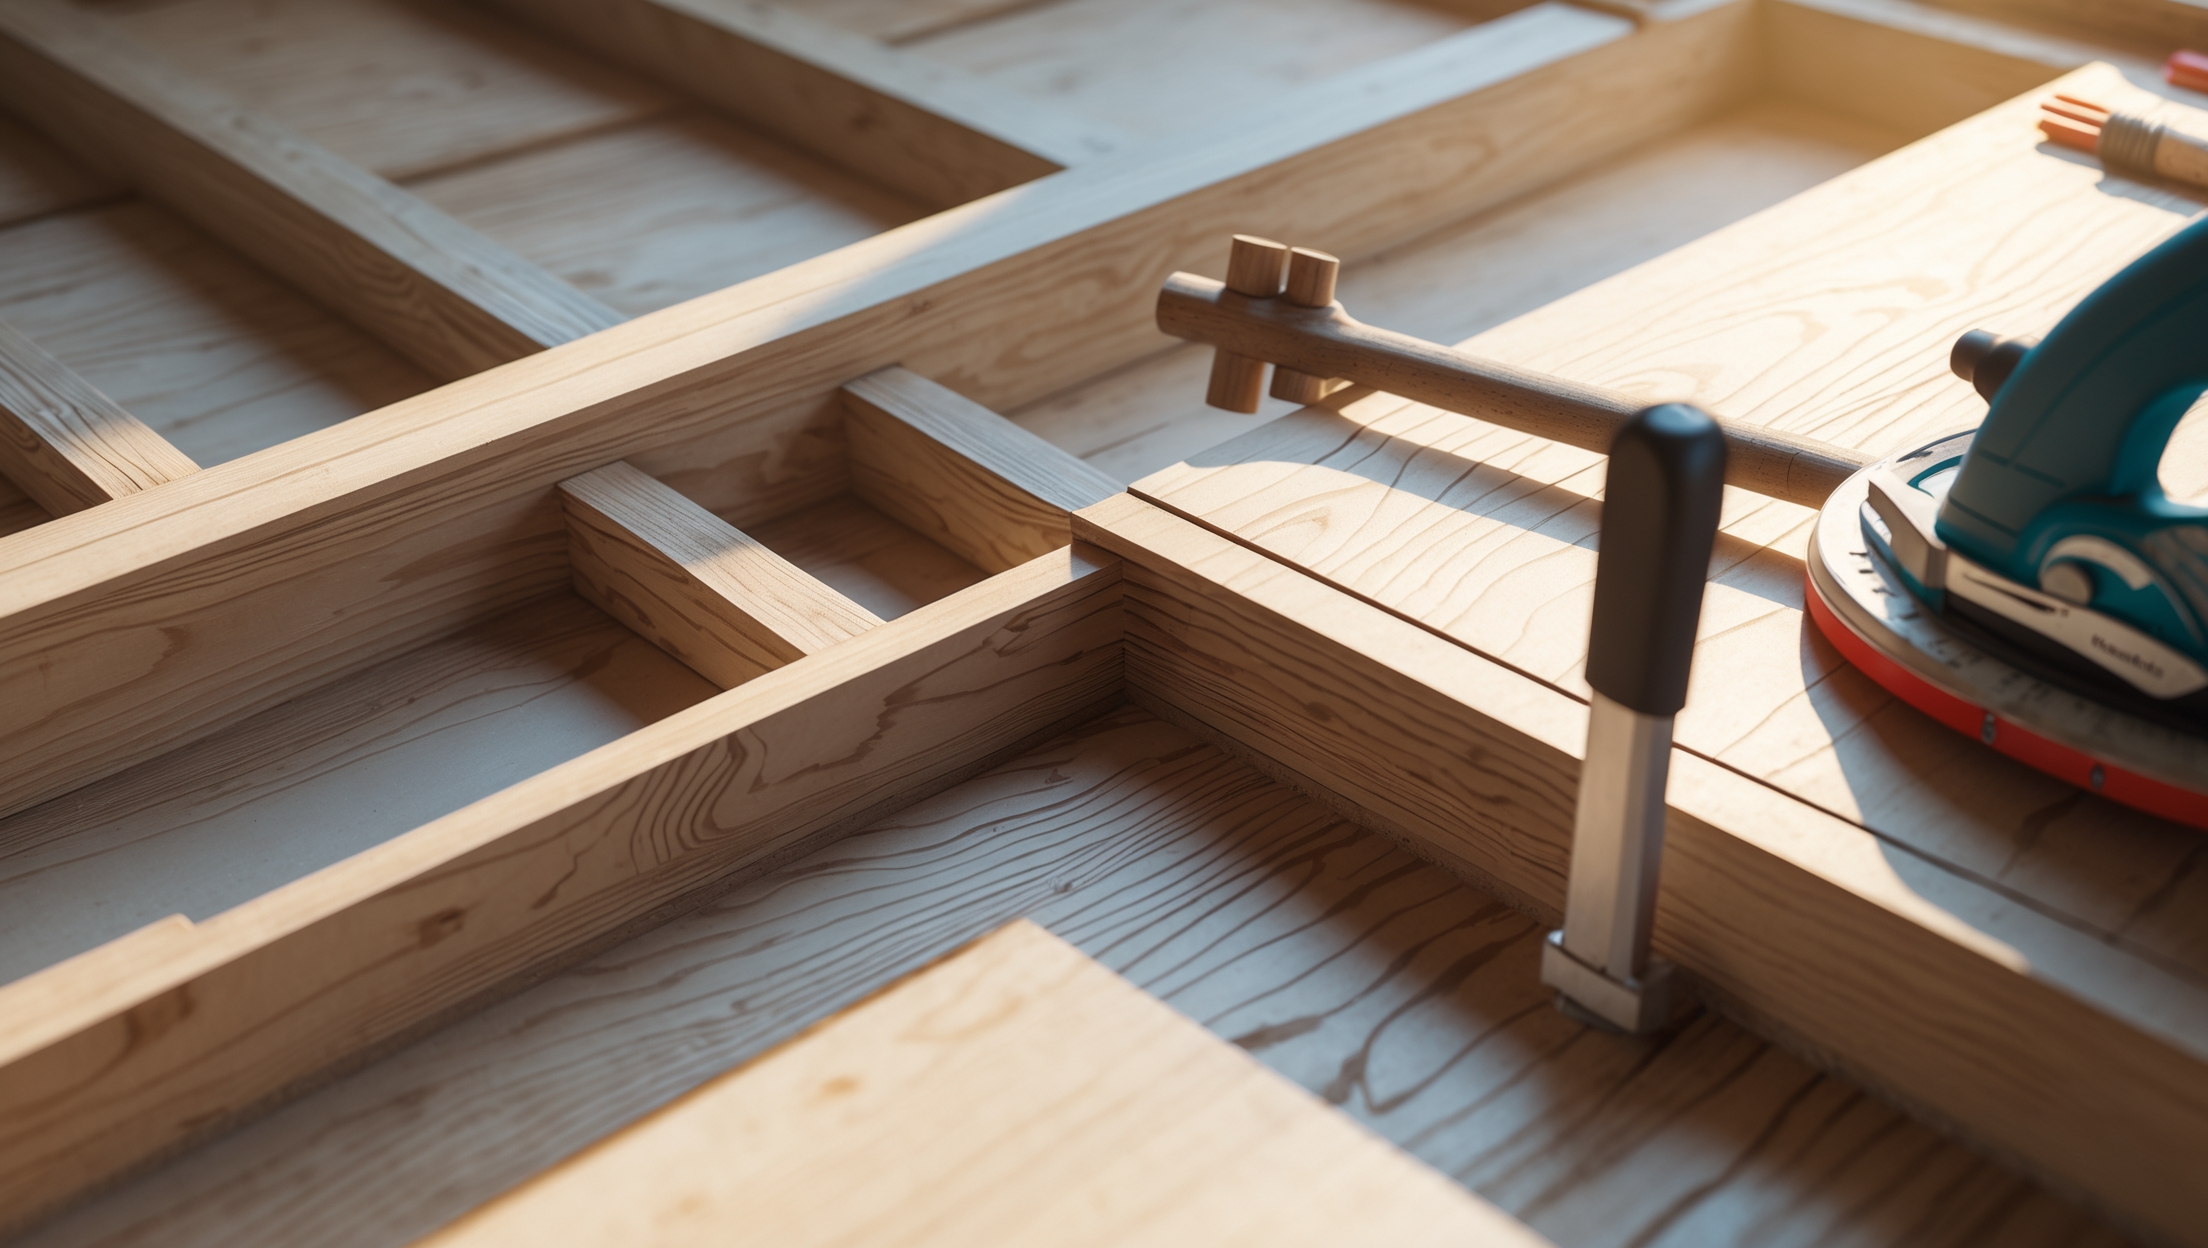
Step 5: Install the New Subfloor
- Cut new panels to size, allowing a 1/8″ gap for expansion.
- Apply construction adhesive to joists for added stability.
- Lay panels perpendicular to joists and stagger seams for strength.
- Fasten panels with screws every 6–8 inches along edges, 12 inches in the field.
Step 6: Seal and Protect
- Apply a moisture barrier if recommended for your space (especially on ground floors or basements).
- Fill small gaps or seams with wood filler if needed.
- Allow adhesives to cure per manufacturer’s instructions.
Step 7: Reinstall Finished Flooring
- Replace carpet, laminate, or hardwood as needed.
- Check for squeaks before finalizing—add screws through the subfloor into joists if necessary.
- Clean up thoroughly and remove debris.
Maintenance Best Practices: Keeping Your Subfloor in Top Shape
Proactive Moisture Control
- Fix plumbing leaks promptly.
- Use exhaust fans in kitchens and bathrooms.
- Ensure gutters and downspouts direct water away from foundations.
Routine Inspection
- Listen for new squeaks or spongy spots—these may indicate early issues.
- Check basements and crawl spaces for signs of water intrusion.
- Use a moisture meter in trouble areas after storms or plumbing incidents.
Squeak Prevention
- Address minor squeaks with special subfloor screws that anchor to joists.
- Avoid excessive humidity indoors; use dehumidifiers if needed.
Safety Checklist: Subfloor Repair Do’s and Don’ts
- Always shut off power if electrical wiring may be exposed during cutting.
- Wear PPE: gloves, goggles, dust mask or respirator.
- Lift heavy panels safely—get help to avoid back injury.
- Keep the work area clear of tripping hazards.
- Dispose of moldy or hazardous materials safely, following local regulations.
- Follow all tool safety instructions and use guards/shields.
When to Call a Professional
- If you discover extensive rot or structural damage to joists.
- When mold is widespread or health risks are present.
- If the repair area is large (>150 sq. ft.) or involves load-bearing walls.
- When permits or inspections are required by local code.
Professionals can handle complex repairs efficiently and ensure compliance with building codes. For most DIYers, small-to-moderate subfloor repairs are manageable, but don’t hesitate to seek expert help when the scope feels overwhelming.
Conclusion: Invest in Your Home’s Foundation the Right Way
Repairing your home’s subfloor isn’t the most glamorous project, but it’s one of the most important investments you can make in your property’s safety, comfort, and value. Ignoring or patching over subfloor problems often leads to bigger headaches down the road—think warped floors, persistent squeaks, or costly structural fixes. By tackling the job with careful preparation, smart budgeting, and the right techniques, you ensure a strong, stable foundation for every room above.
Remember to start with a thorough assessment, always address moisture issues first, and match your repair materials to the original specs for best results. Don’t cut corners on safety or code compliance. With the practical, step-by-step approach outlined in this guide, most homeowners can take on subfloor repairs with confidence—saving money, preventing future problems, and gaining valuable DIY experience along the way.
Take pride in knowing that the work you do beneath the surface is just as important as any visible upgrade. Your home’s longevity—and your peace of mind—depend on it. Ready to tackle your subfloor repair? Gather your tools, follow these expert tips, and enjoy the solid sense of accomplishment that comes from building a better home from the ground up.
For someone dealing with an older home that has plank subfloors, do you recommend replacing them entirely with plywood or OSB, or are there effective repair techniques to address gaps and squeaks without a full replacement?
If your plank subfloors are generally solid, you don’t always need a full replacement. You can fill gaps with wood filler or slivers of wood, and secure loose boards with screws to address squeaks. Adding a layer of plywood over the planks is another option for more stability without full removal. Full replacement is usually only necessary if the planks are badly damaged or rotted.
When budgeting for subfloor repairs, what are some hidden costs that tend to catch homeowners off guard? I’m especially worried about things that might come up once I start removing finished flooring.
When removing finished flooring, homeowners are often surprised by hidden costs like repairing or replacing damaged joists, fixing moisture or mold issues, disposing of old material, and unexpected structural repairs if rot or pest damage is discovered. Buying extra subfloor material for unforeseen soft spots or damaged sections is also wise. Having a contingency fund, typically about 10–20% above your initial estimate, can help manage these surprises.
Could you explain how to tell if a squeaky floor is just an annoyance or if it signals a deeper issue with my subfloor, especially in an older home with plank subfloors?
A squeaky floor is often caused by loose boards or nails and can be just an annoyance. However, in older homes with plank subfloors, pay attention to signs like sagging, soft spots, or uneven surfaces—these can suggest deeper issues such as rot or water damage. If the squeaks are widespread or accompanied by movement when you walk, it’s wise to inspect the subfloor closely or consult a professional.
Could you elaborate on the budgeting aspect? For a medium-sized room, what kind of cost range should homeowners expect if they choose quality materials versus more economical ones for subfloor repair?
For a medium-sized room (about 200 square feet), using quality materials like premium plywood or advanced subfloor panels, homeowners might spend $800 to $1,200 including materials and basic tools. Opting for more economical options, such as standard-grade plywood, the cost could range from $400 to $700. Labor costs will be higher if you hire professionals, but DIY projects generally stay within these material estimates.