

Introduction: Why Roof Leak Repairs Matter
Few home maintenance tasks carry as much urgency as addressing a roof leak. Left unchecked, even a minor leak can quickly escalate into significant water damage, structural decay, mold growth, and costly repairs. Water finds the path of least resistance, seeping into insulation, interior walls, ceilings, and even electrical systems. Yet despite the risk, many homeowners feel overwhelmed by the prospect of roof repair, unsure where to begin, what it will cost, or how to prevent future issues. This guide demystifies roof leak repairs, providing a practical breakdown of costs, a step-by-step tool checklist, and actionable prevention strategies. Whether you’re a seasoned DIYer or considering professional help, this resource will help you make informed decisions to keep your home dry, safe, and protected year-round.
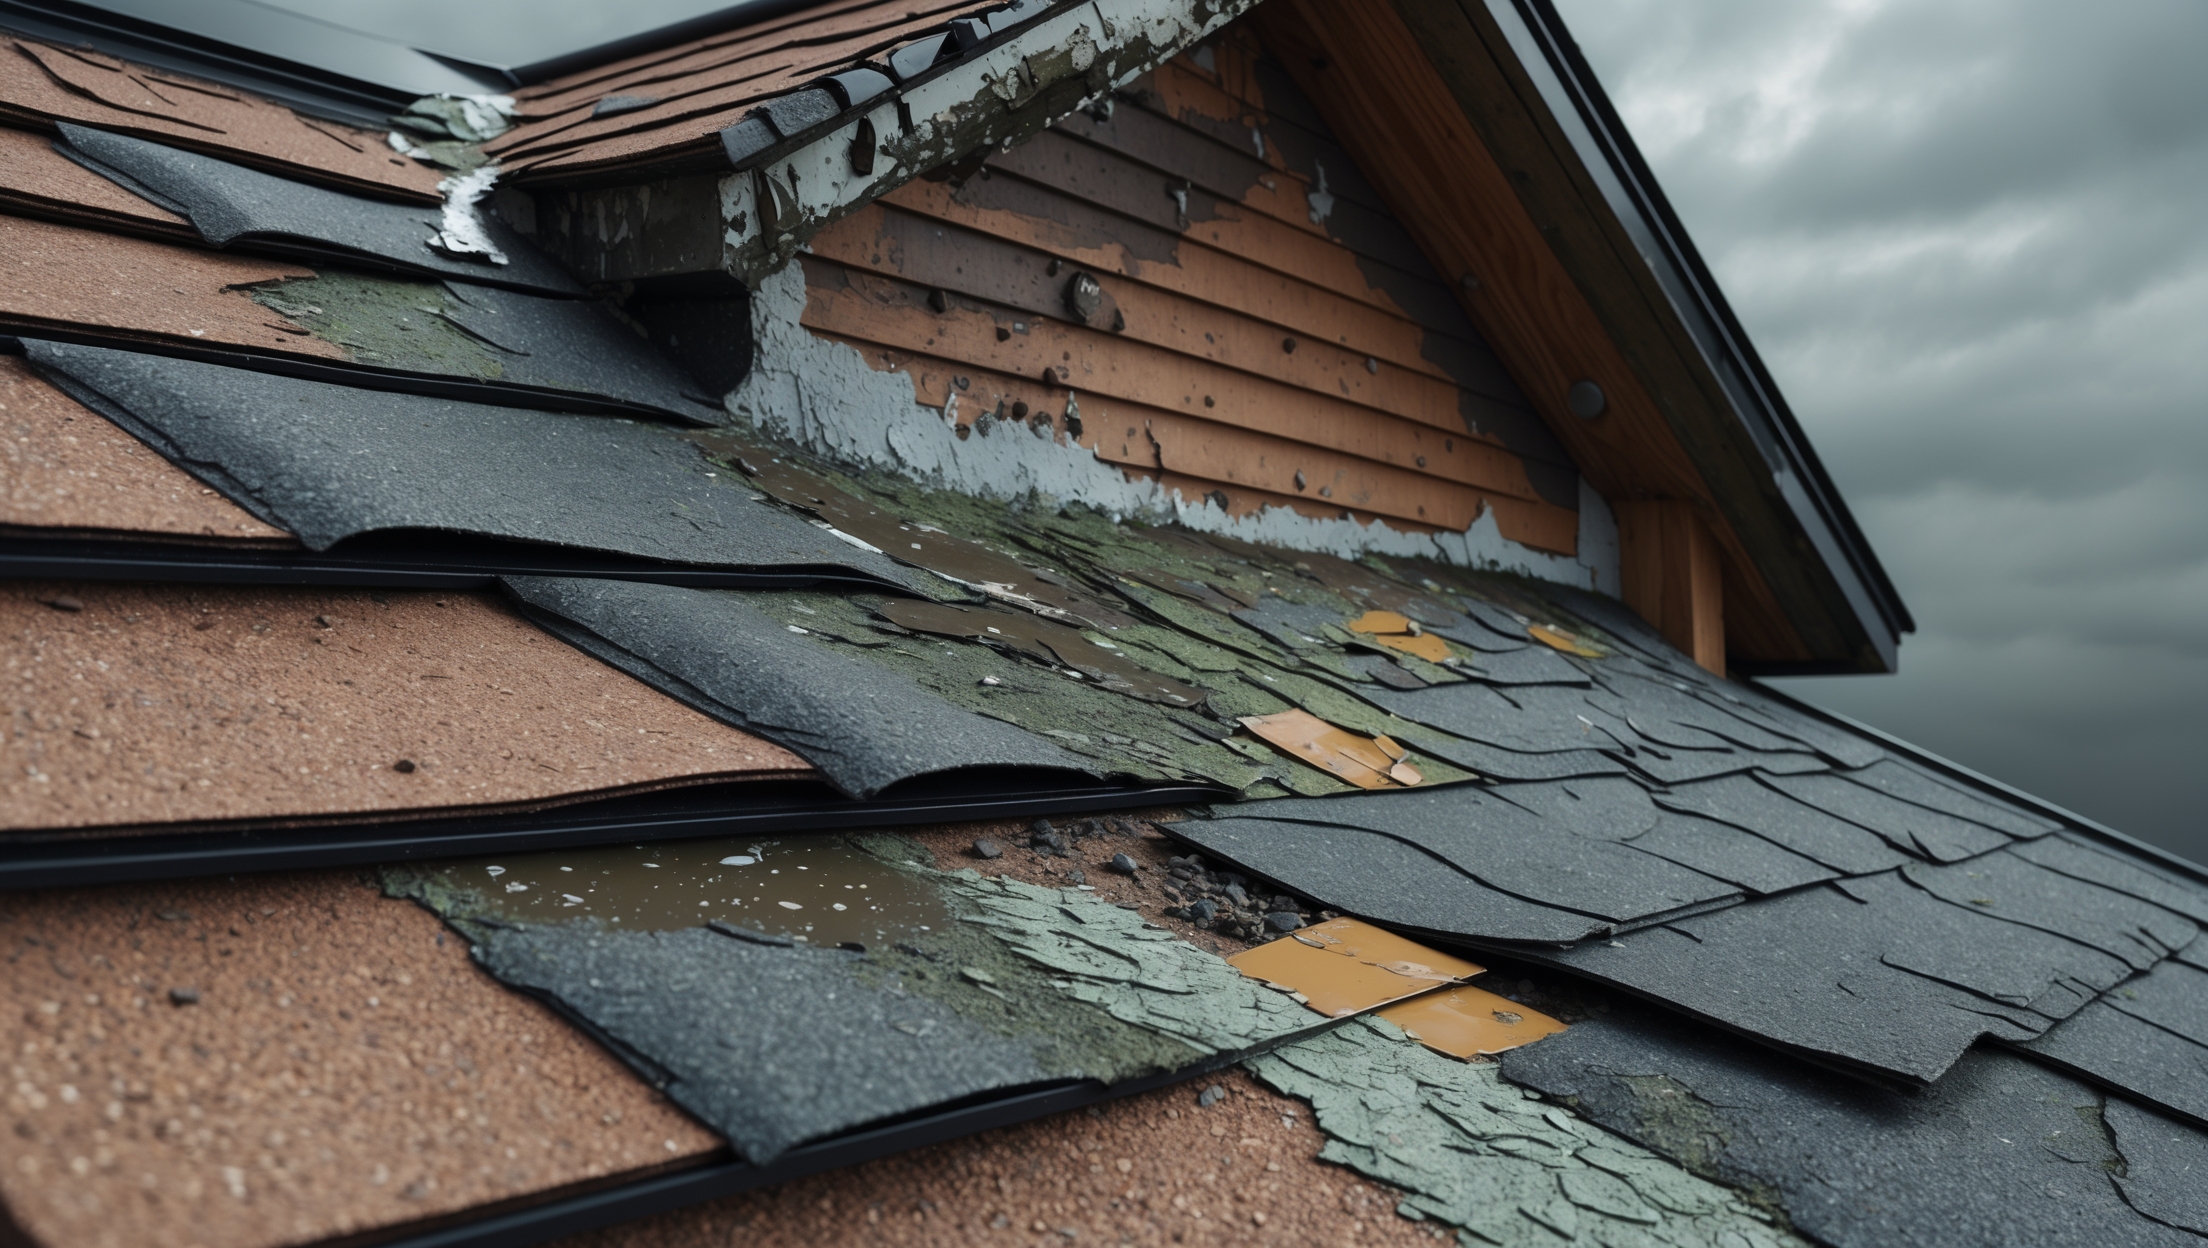
Common Causes of Roof Leaks
Understanding what typically causes roof leaks is the first step toward effective repairs and prevention. Here are the most common culprits:
- Damaged or Missing Shingles: High winds, hail, or aging can crack, curl, or dislodge shingles, exposing the underlayment.
- Faulty Flashing: Flashing seals the joints around chimneys, skylights, vent pipes, and valleys. Rust or improper installation leads to leaks.
- Clogged Gutters: Backed-up gutters cause water to pool and seep under shingles at the roof edge.
- Worn Sealant: Sun and weather degrade caulking around penetrations and flashing, opening paths for water.
- Poorly Sealed Valleys: Roof valleys handle large water volumes and are vulnerable if not properly sealed.
- Ice Dams: In colder climates, ice buildup along the eaves forces water under shingles.
- Improper Roof Vent Installation: Badly installed or deteriorated vents can be prime leak sources.
How to Identify a Roof Leak
Finding the source of a roof leak can be more challenging than spotting its symptoms. Water can travel along rafters and joists before appearing inside your home. Here’s how to track it down:
Interior Signs
- Brown or yellow stains on ceilings or walls
- Peeling paint or bubbling plaster
- Dampness or mold around attic vents or chimneys
- Visible dripping, especially after rain
Attic Inspection
- Look for dark spots or wet insulation directly beneath the roof deck
- Trace stains or streaks along rafters to their highest point
Roof Surface Check
- Search for cracked, curled, or missing shingles
- Inspect flashing and caulking for rust, gaps, or deterioration
- Check roof valleys and areas around penetrations (vents, skylights, chimneys)
Water Test
If the source remains elusive, use a garden hose to systematically wet different roof sections while a helper watches inside for leaks.
Cost Breakdown: DIY vs. Professional Roof Leak Repair
Understanding the potential costs can help you budget and decide whether to tackle repairs yourself or hire a professional. Below is a realistic cost breakdown for common roof leak repairs as of 2024 (actual prices may vary by region and roof type):
DIY Roof Leak Repair Costs
- Replacement shingles (bundle): $30–$50
- Roofing nails (1 lb box): $5–$8
- Roofing cement/sealant (tube): $6–$12
- Flashing (10 ft roll): $15–$25
- Roof patch kit: $20–$40
- Disposable gloves, safety glasses: $10–$15
- Basic hand tools (if not already owned): $50–$100
- Ladder (if not owned): $100–$250
Typical DIY repair total: $50–$350 (assuming you already have a ladder and basic tools; cost increases if you need these items)
Professional Roof Leak Repair Costs
- Minor repairs (single leak): $175–$450
- Moderate repairs (multiple leaks, flashing replacement): $400–$1,000
- Extensive repairs (partial re-roof, major flashing or valley work): $1,000–$3,000
Labor costs depend on roof pitch, accessibility, material type, and your location. Emergency repairs after storms or during busy seasons may cost more.
Essential Tools and Materials for Roof Leak Repair
Having the right tools and materials on hand is crucial for effective, safe, and lasting roof repairs. Here’s a comprehensive checklist for typical leak fixes:
Tool Checklist
- Sturdy extension ladder with stabilizer
- Roofing hammer or pry bar
- Utility knife (for cutting shingles and underlayment)
- Caulking gun (for sealants)
- Putty knife (for applying roofing cement)
- Chalk line (to ensure straight shingle rows)
- Measuring tape
- Safety harness and roof anchors (especially on steep roofs)
- Work gloves and safety glasses
Materials Checklist
- Replacement shingles or appropriate roofing material
- Roofing nails or screws (corrosion-resistant)
- Roofing cement or high-quality exterior sealant
- Flashing (aluminum or galvanized steel)
- Roofing felt or underlayment (for larger patches)
- Patch kits or membrane (for flat roofs)
Step-by-Step Roof Leak Repair Tutorial
Below is a walk-through for repairing a typical shingle roof leak. Always exercise caution when working at heights and consider professional help for steep or high roofs.
1. Pinpoint the Leak
- Refer to the identification section above; confirm the exact location of the leak from inside and outside.
- Mark the spot with chalk or masking tape for easy reference.
2. Prepare the Work Area
- Wait for dry, calm weather.
- Set up your ladder on solid, level ground.
- Wear shoes with good grip, gloves, and safety glasses.
- Use a harness if working on a steep roof.
3. Remove Damaged Shingles
- Use a pry bar to gently lift the shingle above the damaged one.
- Remove nails from the damaged shingle and slide it out.
- If underlayment is wet or torn, cut out the affected area with a utility knife.
4. Install New Underlayment (if needed)
- Cut a piece of roofing felt or underlayment to fit the patch area.
- Slide it into place and secure with roofing nails.
5. Install Replacement Shingle(s)
- Slide the new shingle into position, aligning it with the existing row.
- Secure with roofing nails under the edge of the shingle above.
- Seal nail heads and edges with roofing cement.
6. Repair or Replace Flashing
- If flashing is rusted, loose, or missing, carefully pry it up and slide in new flashing.
- Secure with nails and seal seams with high-quality roof sealant.
7. Seal and Finish
- Apply roofing cement to any exposed seams, nail heads, or minor cracks.
- Press down gently to ensure a watertight seal.
- Clean up debris and tools.
8. Inspect Your Work
- Check for any missed gaps or loose materials.
- Use a garden hose to test the repair if weather allows.
When to Call a Professional
Some roof leaks are best left to experienced contractors:
- Leaks near chimneys, skylights, or complex roof intersections
- Large or widespread water damage
- Steep, high, or multi-story roofs
- Signs of structural damage (sagging roof deck, rot, or mold)
Professionals have the equipment and expertise to handle challenging repairs safely and effectively. Always verify that any contractor is licensed, insured, and experienced in your specific roof type.
Insurance Essentials: Navigating Claims for Roof Leaks
Will your homeowners insurance cover roof leak repairs? It depends on the cause and your policy details. Here’s what to consider:
- Sudden, Accidental Damage: Most policies cover leaks caused by storms, fallen trees, or hail.
- Wear and Tear: Gradual deterioration or lack of maintenance is typically not covered.
- Filing a Claim: Document the damage with photos. Get an inspection and detailed repair estimates. Report promptly to your insurer.
- Deductibles: You’ll pay the policy deductible before coverage kicks in.
- Preventive Maintenance: Insurers expect reasonable upkeep. Neglect could lead to denied claims.
Read your policy carefully and consult your agent with questions before pursuing repairs.
Proactive Prevention: Long-Term Strategies to Avoid Roof Leaks
Preventing leaks is always easier and less expensive than repairing water damage. Adopt these proven strategies:
- Annual Inspections: Check your roof every spring and fall, after storms, and before winter. Look for damaged shingles, flashing, and sealant.
- Clear Gutters and Downspouts: Clean out debris regularly to prevent water backup and ice dams.
- Trim Overhanging Branches: Keep trees away from your roof to minimize debris and reduce storm damage risk.
- Maintain Attic Ventilation: Proper airflow prevents heat and moisture buildup that can damage roofing materials.
- Replace Aged Roofing Materials: Asphalt shingles typically last 20–30 years; consider replacement before trouble starts.
- Upgrade Flashing: Use high-quality flashing at all roof penetrations, valleys, and edges.
- Address Small Issues Promptly: Fix minor cracks, loose shingles, or exposed nails before they allow water in.
Myths and Misconceptions About Roof Leak Repairs
- Myth: “A small spot isn’t a big problem.”
Reality: Even minor leaks can lead to significant hidden damage over time. - Myth: “Roof leaks are always directly above the stain.”
Reality: Water can travel far from the entry point before appearing indoors. - Myth: “You can always fix a leak with sealant alone.”
Reality: Underlying material damage often requires shingle or flashing replacement. - Myth: “All roofing jobs are DIY-friendly.”
Reality: Complex, high, or steep roofs are hazardous and may require professional expertise.
Roof Leak Maintenance: Best Practices for Lasting Protection
- Inspect your roof at least twice a year and after severe weather.
- Address even small repairs promptly.
- Document maintenance and repairs for warranty/insurance purposes.
- Keep gutters and downspouts free from clogs year-round.
- Monitor attic humidity and ventilation to prevent condensation.
- Use only high-quality, weather-appropriate materials for repairs.
Conclusion: Protecting Your Home for the Long Haul
Tackling a roof leak might seem daunting, but prompt, informed action can save you thousands in future repairs and safeguard your home’s structure. Whether you choose to handle minor repairs yourself or call in a professional for complex projects, understanding the causes, costs, and essential tools arms you with confidence. Don’t underestimate the value of routine inspections and preventive maintenance—these habits are your best defense against unexpected leaks and costly water damage. Keep detailed records, use quality materials, and never delay addressing even minor symptoms. By following the strategies in this guide, you’ll extend the life of your roof, protect your investment, and enjoy lasting peace of mind, rain or shine.
If you’re ever in doubt about your roof’s condition or your ability to make safe repairs, reach out to a licensed roofing contractor. Your home’s first line of defense deserves careful, expert care. Stay proactive, stay safe, and keep your home dry for years to come.
When checking for worn sealant as a potential leak source, do you recommend a particular type or brand of exterior caulk for re-sealing flashing or penetrations, especially in areas that get a lot of freeze-thaw cycles?
For areas with frequent freeze-thaw cycles, it’s best to use a high-quality exterior polyurethane or silicone caulk, as these types remain flexible and are highly weather-resistant. Many professionals prefer brands like Sashco Big Stretch or GE Silicone II, as they adhere well to flashing and roof penetrations, and hold up well in extreme temperatures. Always make sure the surface is dry and clean before sealing for the best results.
If I suspect a leak is coming from clogged gutters but can’t see obvious shingle damage, should I focus on gutter cleaning first before calling a roofer? How do I know if the issue is more serious?
It’s a good idea to clean your gutters first if you think clogs might be causing the leak, especially since clogged gutters can lead to water backing up under the roof. After cleaning, watch for leaks during the next rain. If water still comes in or you notice stains on ceilings or walls, the issue could be more serious, and calling a roofer would be wise.