

Introduction: Why Drywall Repair Matters in Every Home
Walk into almost any home and you’ll find drywall: it’s the smooth, paint-ready surface that forms your walls and ceilings. Yet, despite its ubiquity, drywall is notoriously prone to dings, dents, cracks, and holes—from rogue doorknobs to overzealous furniture moving, to simple settling over time. For homeowners and DIYers alike, understanding how to properly repair drywall is a skill that pays off in both home value and daily satisfaction. But beyond a simple dab of spackle, drywall repair involves specific tools, cost considerations, and refined techniques that separate a flawless patch from a lumpy eyesore. This in-depth guide will walk you through every stage of drywall repair: from understanding the common types of damage, to assembling an efficient toolkit, budgeting realistically, and executing professional-grade repairs. Whether you’re fixing a pinhole or patching a gaping section, you’ll learn how to restore your walls for seamless results—and dodge the most common mistakes that lead to visible “patch jobs.” Let’s demystify drywall repair so you can handle any wall mishap with confidence and skill!
Understanding Drywall Damage: Types and Causes
Common Damage Types
- Small Holes: Caused by nails, screws, or wall anchors. Typically less than 1/2-inch in diameter.
- Cracks: Result from house settling, temperature changes, or poorly taped joints.
- Dents and Dings: Surface-level indentations from furniture, moving, or accidental knocks.
- Medium to Large Holes: Often result from door handles, accidents, or plumbing/electrical work. Range from 1 inch up to 6 inches or more.
- Water Damage: Discoloration, sagging, or crumbling drywall from leaks or floods. Requires thorough remediation.
Assessing the Severity
Before you reach for your toolkit, assess the damage. Small holes and superficial cracks call for basic patching. Large holes or water damage may require cutting out and replacing entire sections. Always check for underlying issues—water leaks, structural shifts, or recurring cracks—before proceeding with cosmetic repairs.
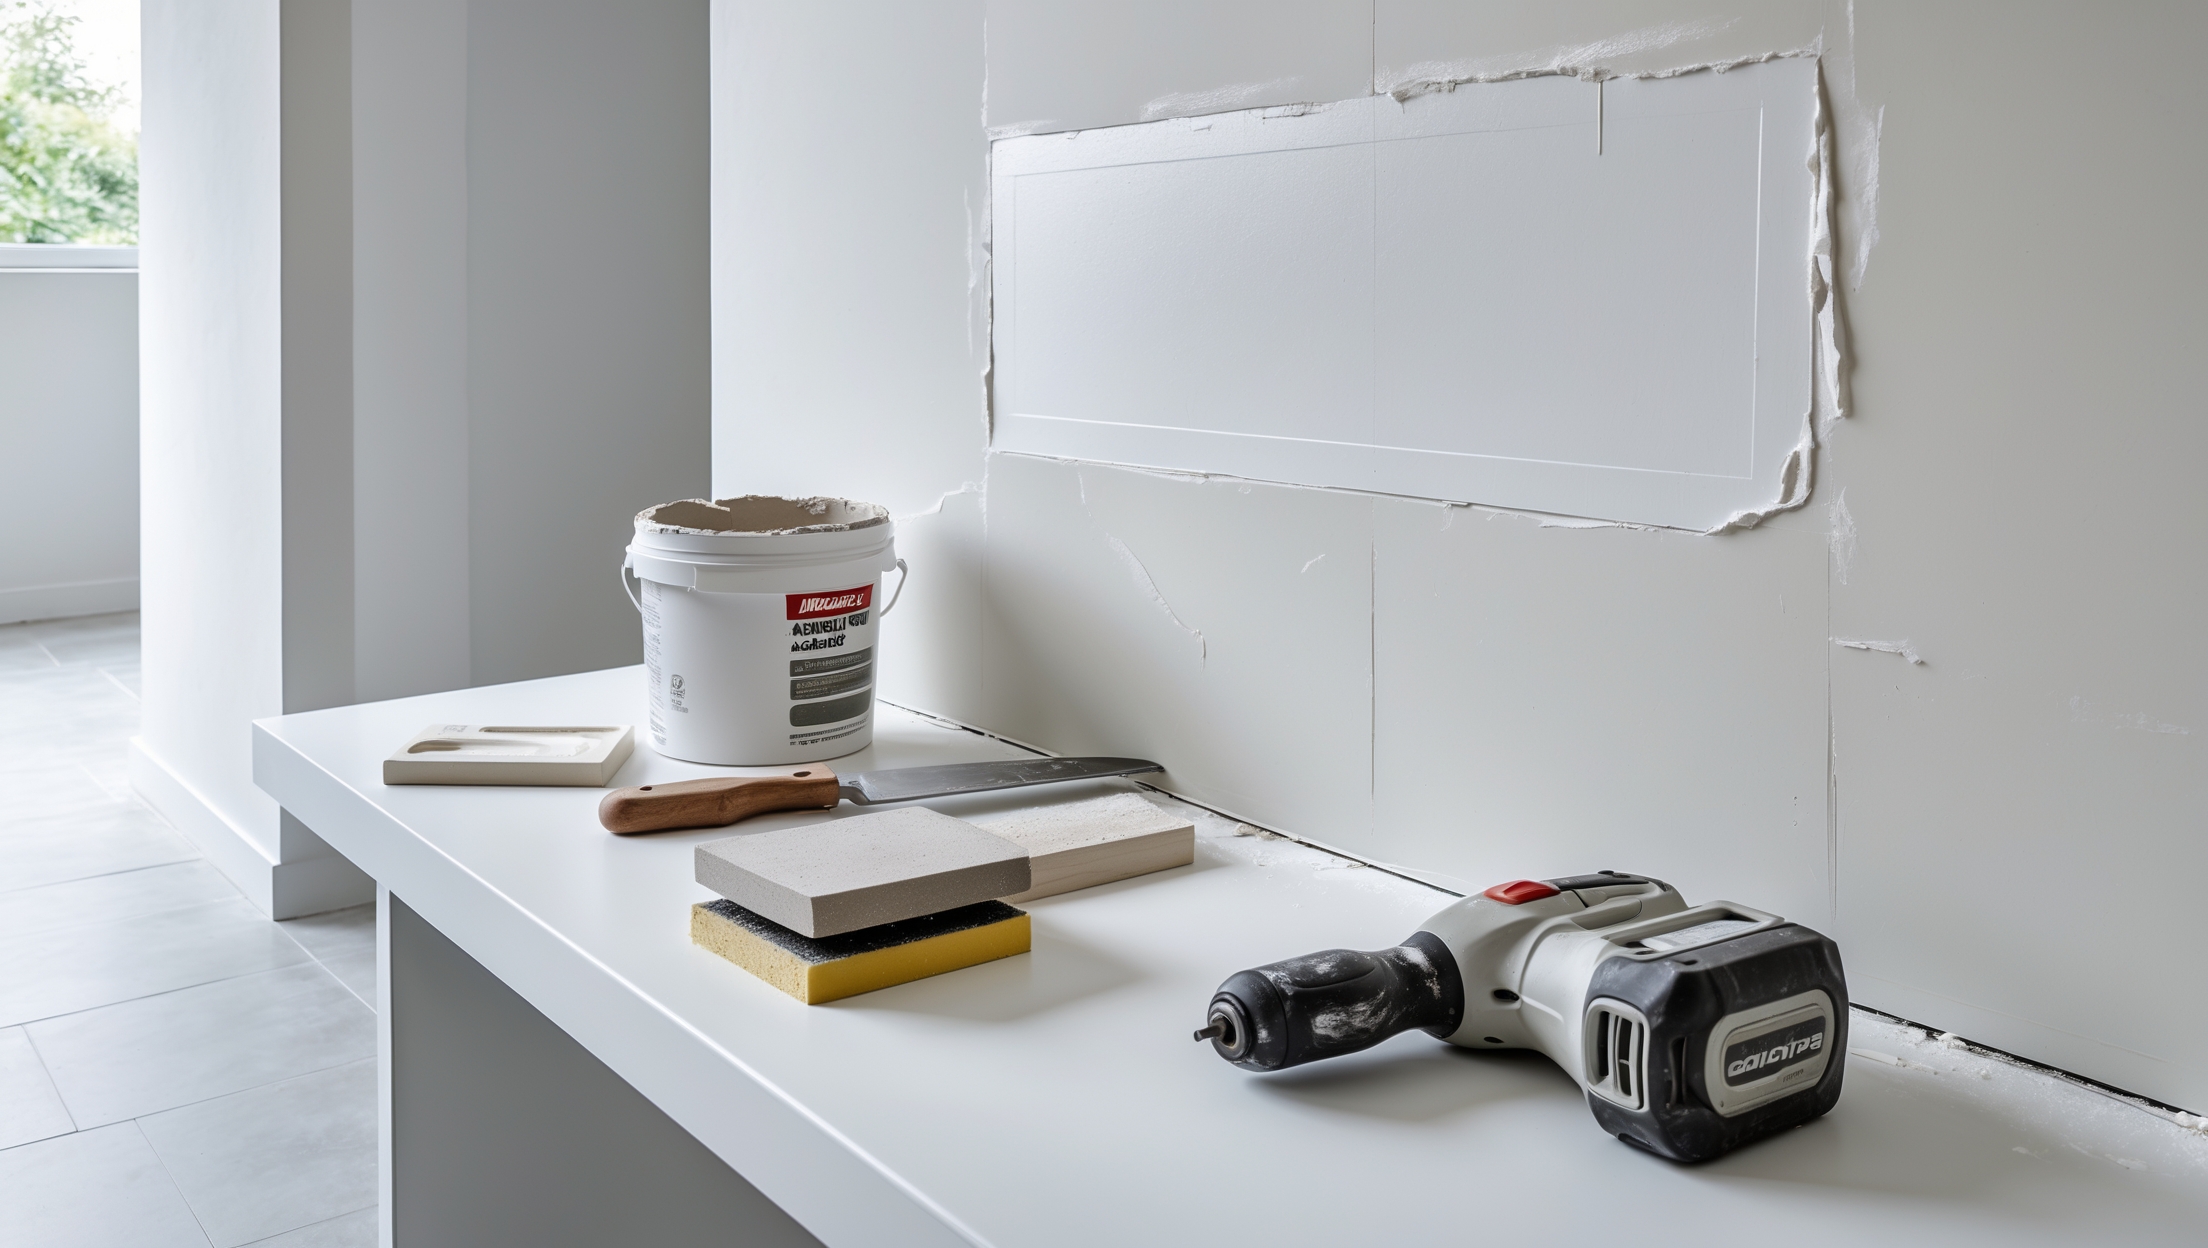
Essential Tools and Materials for Drywall Repair
Core Tools Every DIYer Needs
- Putty Knife (2″–6″): For applying patching compound and feathering edges. A set of various sizes is ideal.
- Utility Knife: For scoring and cutting damaged drywall cleanly.
- Drywall Saw or Jab Saw: Necessary for cutting out larger damaged sections.
- Sanding Block or Sponge: Ensures a smooth finish before painting.
- Painters’ Tape: Protects adjacent surfaces and creates clean lines.
- Drill and Drywall Screws: For securing patches or backing support for medium to large repairs.
Repair Materials
- Joint Compound (“Mud”): The mainstay for patching holes, cracks, and joints. All-purpose and lightweight versions are both useful.
- Drywall Tape (Paper or Mesh): Reinforces seams and cracks, preventing recurrence.
- Patching Material: Pre-made wall patches, scrap drywall pieces, or metal mesh for larger holes.
- Primer and Paint: To match the repaired area with the rest of the wall.
Recommended Extras
- Dust Mask or Respirator: Protects against fine dust during sanding.
- Drop Cloths: Keep floors and furniture clean.
- Vacuum or Shop Vac: For post-repair cleanup.
Cost Breakdown: What to Expect (DIY vs. Hiring a Pro)
DIY Drywall Repair Costs
- Basic Tools Set: $25–$50 (putty knives, utility knife, sanding block, tape)
- Materials: Joint compound ($8–$15), drywall tape ($3–$6), wall patch ($5), primer and paint ($15–$40)
- Optional: Pre-mixed patch kits for small holes ($10–$15 each)
Total DIY Cost: For a single small-to-medium repair, expect $20–$50 if you already own some tools, or $50–$100 for a full starter kit.
Professional Repair Costs
- Minor Repairs (single holes or cracks): $100–$250
- Medium Repairs (multiple holes or large patches): $200–$500
- Extensive Damage (water damage, major patching): $500–$1,500+
Hiring a professional is more costly but may be worth it for intricate textures, extensive damage, or when time is tight.
Hidden and Recurring Costs
- Paint Matching: Blending repaired areas can require a full wall repaint for a seamless finish.
- Surface Prep: Additional primer or texture materials for matching original wall finish.
- Tool Replacement: Dull blades or worn sanding blocks may need occasional replacement.
Step-by-Step Drywall Repair Techniques
Repairing Small Holes and Dents
- Clean the Area: Gently remove loose debris and dust around the hole or dent.
- Apply Patch Compound: Use a putty knife to press joint compound into the hole. Feather the edges outward.
- Let Dry and Sand: Allow to dry fully (per product instructions), then sand smooth with a block or sponge.
- Prime and Paint: Spot-prime the area and touch up with matching paint.
Fixing Cracks
- Score the Crack: Use a utility knife to open up the crack slightly. This helps the compound adhere.
- Apply Tape: Lay mesh or paper drywall tape over the crack.
- Mud and Feather: Apply joint compound over the tape, feathering edges. Let dry, sand, and repeat as needed.
- Finish: Prime and paint for a seamless look.
Medium Holes (1″–6″)
- Prepare the Hole: Use a utility knife to cut a neat, square or rectangular hole around the damaged area.
- Add Backing Support: Insert a piece of wood or drywall backing inside the hole and secure with drywall screws.
- Patch with Drywall: Cut a new piece of drywall to fit the opening. Screw it to the backing support.
- Tape and Mud: Apply drywall tape around edges, then joint compound. Let dry, sand, and repeat if needed.
- Prime and Paint: Once smooth, finish with primer and paint.
Large Holes or Water-Damaged Areas
- Assess and Remove: Cut out all damaged drywall. For water damage, ensure the underlying cause (leak) is fixed and the area is dry.
- Install New Drywall: Attach new drywall to studs or furring strips, securing with screws.
- Tape, Mud, and Sand: Proceed as for medium holes, taking extra care to match wall texture.
- Prime, Paint, and Inspect: Paint the entire wall for best blend if needed.
Pro Tips for a Flawless Drywall Patch
- Feather Wide: Always extend joint compound well beyond the repair. Wider feathering = less visible patch.
- Multiple Thin Coats: Three thin coats of compound (with sanding in between) yield better results than one thick application.
- Use a Bright Light: Shine a light parallel to the wall to reveal ridges or low spots before painting.
- Match Texture: For textured walls, use a sponge, brush, or spray texture to blend with the original finish.
- Don’t Rush Dry Times: Allow each coat to fully dry before sanding or recoating. Humidity can extend dry times.
- Prime Before Painting: Skipping primer can result in color differences or flashing where the patch is visible.
Safety Checklist for Drywall Repair
- Wear a dust mask or respirator when sanding joint compound.
- Protect floors and outlets with drop cloths and painter’s tape.
- Keep work area ventilated, especially when using primers or aerosol textures.
- Dispose of sanding dust and debris safely—avoid vacuuming with household vacuums, as fine dust can damage motors.
- Store tools and unused compounds out of reach of children and pets.
When to Call a Professional
- Extensive Water Damage: If drywall is soft, sagging, or moldy, professional remediation is critical.
- Structural Cracks: Cracks that reappear after repair may signal foundation issues—consult a contractor.
- Complex Textures: Matching knockdown, popcorn, or custom finishes is best left to pros for a seamless look.
- Large-Scale Repairs: Replacing multiple sheets or ceiling drywall often requires experience and special equipment.
Maintenance Best Practices: Preventing Future Drywall Damage
- Install doorstops behind swinging doors to prevent knob holes.
- Address minor leaks or water stains immediately to halt progression.
- Secure heavy wall-hung items with proper anchors to avoid future holes.
- Inspect and touch up high-traffic areas annually to catch issues early.
- Maintain stable indoor humidity to minimize settling cracks.
Conclusion: Take Control of Your Walls with Confidence
Drywall repair doesn’t have to be a daunting, dusty ordeal reserved for seasoned contractors. With the right tools, a clear understanding of repair techniques, and a little patience, you can restore your walls to like-new condition—saving money and increasing your home’s appeal in the process. Remember, the secret to a flawless patch lies in careful surface prep, patient application of joint compound, and meticulous sanding. For small repairs, you’ll save hundreds by tackling the project yourself. For more extensive or recurring issues, don’t hesitate to bring in a professional who can guarantee lasting results. Either way, demystifying the process puts you in control, allowing you to handle everyday wear and tear or emergency mishaps with skill and confidence. Invest in a basic drywall repair kit, build your skills with each patch, and you’ll soon see smooth, beautiful walls throughout your home—proof that home improvement expertise is just a project away. Your walls will thank you!
I noticed the article mentions both small holes and medium to large holes when it comes to drywall damage. If I have a hole that’s about 3 inches wide, do I need to replace the entire section, or can I just patch over it? Also, are the tools for this size hole different from what I’d use for a small nail hole?
For a 3-inch wide hole, you don’t need to replace the whole drywall section. A patch is the best approach—typically using a mesh or pre-made drywall patch, some joint compound, and a putty knife. The tools and process are a bit different from fixing a tiny nail hole, which usually just needs spackle and a small putty knife. For your hole size, you’ll also want a utility knife, sanding sponge, and possibly a drywall saw.
When dealing with medium to large holes in drywall, do you recommend using pre-made patch kits or is it better to cut and replace an entire section for a more seamless finish? Would love some insight based on your experience.
For medium to large holes, cutting out the damaged area and installing a new drywall section usually gives a more seamless and durable result. Pre-made patch kits can work for smaller holes, but with larger repairs you’ll get better blending and stability by replacing the section, taping, mudding, and sanding it flush with the wall. This approach also helps prevent future cracking.
After making a professional-grade repair following your guide, how long should I wait before sanding, priming, and painting the patched section to ensure the best final appearance?
After completing your drywall repair, it’s important to let the joint compound fully dry before moving on. Drying time depends on the product used, patch thickness, and room humidity, but most repairs need 24 hours for each layer to dry. Test by gently pressing the patch—if it’s hard and not cool to the touch, it’s ready for sanding. Once sanded smooth, you can immediately prime and then paint for the best finish.
Could you elaborate on how to budget realistically for more extensive drywall repairs like larger holes or water damage? Are there hidden costs with tools or materials that first-timers often overlook?
When budgeting for larger drywall repairs, factor in not only the cost of drywall sheets and joint compound, but also specialty tools like a drywall saw, sanding pole, and possibly a utility knife replacement. For water damage, you may need mold-resistant materials or primers, which add to the cost. First-timers often overlook expenses for drop cloths, dust masks, and even paint for touch-ups after the repair. Always allow about 10-15% extra in your budget for unexpected issues or material wastage.
For small holes and cracks, do you recommend a particular type of joint compound or spackle for the smoothest finish, or are they basically interchangeable if I follow the right technique?
For small holes and cracks, lightweight spackle is a great choice because it dries fast and sands easily, giving a very smooth finish. Joint compound also works well, especially if you already have it on hand, but it may take longer to dry. As long as you apply thin layers and sand carefully, both products can deliver a seamless result.
Can you clarify how to tell when water-damaged drywall needs a full replacement instead of just patching? I’m nervous about lingering moisture and possible mold, so some guidance on assessing the severity would be helpful.
If drywall feels soft, crumbly, or sags after drying out, it usually needs full replacement rather than patching. Dark stains, a musty smell, or visible mold are also strong signs that the damage is severe. Even if the surface looks intact, lingering dampness behind the drywall can cause mold growth, so use a moisture meter to check. If moisture readings are above 1% or if insulation behind the wall is wet, it’s safest to replace the affected section completely.
If I have several small dents and nail holes scattered across different rooms, do I need to use a different tool or technique for each, or is there a way to efficiently handle them all at once without compromising the overall finish?
You can efficiently handle multiple small dents and nail holes with the same basic tools and technique. Use lightweight spackle or joint compound, a small putty knife, and light sanding for each spot. Once patched and dry, go over all areas with primer and paint for a uniform finish. Doing them together saves time and ensures consistency.
How long should I wait after patching a hole or crack before sanding and painting the repaired spot? Is there any difference in drying time based on the size of the repair or the type of joint compound used?
After patching a hole or crack, it’s important to let the joint compound fully dry before sanding and painting. Drying time generally ranges from 12 to 24 hours for most repairs, but larger patches or thicker layers will take longer. Quick-setting compounds can dry in as little as 20–90 minutes, while premixed types may need more time, especially for deep repairs. Always check the manufacturer’s instructions and ensure the surface feels completely dry to the touch before moving on.
When you mention avoiding the ‘lumpy eyesore’ look, what are some beginner mistakes to watch out for during patching or sanding? My last attempt ended up with uneven walls despite following a video tutorial.
Uneven walls often result from using too much joint compound or not feathering the edges enough. Common mistakes include not sanding between layers, skipping primer before paint, or using a sanding block that’s too rough. Be sure to apply thin, even coats, let each layer dry completely, and use fine-grit sandpaper to blend the patch smoothly into the surrounding wall. Taking your time with each step helps prevent lumps and visible seams.
When you mention avoiding common mistakes that lead to visible patch jobs, what are the most frequent errors beginners make, and how can you tell early on if a repair is likely to end up lumpy or obvious?
Beginners often use too much joint compound or don’t feather the edges smoothly, which can make patched areas appear raised or uneven. Another common mistake is skipping proper sanding between coats. Early signs of a potential lumpy repair include thick edges, visible ridges, or patches that aren’t flush with the surrounding wall. Checking for smoothness by running your hand over the area and inspecting it under good lighting can help you catch issues before painting.
You mentioned different tools for drywall repair, but I was wondering if there are any reliable budget options for someone just starting out with home projects. What are the bare minimum tools you’d recommend for small to medium repairs?
For small to medium drywall repairs, you only need a few basic tools to get started affordably. A 6-inch putty knife, a utility knife, a sanding sponge, and a basic drywall saw will handle most tasks. For patching, pick up some all-purpose joint compound and self-adhesive mesh tape. Most hardware stores offer budget versions of these, perfect for beginners without a big investment.
If my drywall has a medium-sized hole from a door handle and I’m not very experienced, do you recommend I try patching it myself with the tools you mentioned, or is it worth hiring someone to avoid a visible patch job?
Patching a medium-sized hole from a door handle is definitely doable for a beginner, especially with the right tools like a pre-made patch kit, putty knife, and joint compound. If you take your time to follow the steps—cutting a clean hole, attaching the patch, applying compound smoothly, and sanding—it can look nearly invisible. However, if you’re worried about the finish or you want a flawless look, hiring a pro might be worth considering.
For repairing drywall after water damage, do you have any tips on making sure the area is fully dry and safe before closing it up? I’m worried about missing hidden moisture or mold, especially since you mentioned thorough remediation is necessary.
Before you close up any repaired drywall after water damage, make sure the area is completely dry by using fans or dehumidifiers for at least 48 hours. A moisture meter can help check for hidden damp spots. Inspect for any signs of mold; if you find any, clean with a mold remover or consult a professional for larger infestations. Taking these steps will help prevent future issues behind the wall.
You mention that water damage may require cutting out sections of drywall. What specific steps should a homeowner take to make sure all the underlying moisture issues are addressed before moving forward with the repair?
Before repairing drywall after water damage, it’s important to identify and fix the source of the moisture, such as leaky pipes or a roof issue. Once that’s addressed, thoroughly dry the affected area using fans or a dehumidifier. Check for mold or mildew and remove any you find. Only after everything is completely dry should you proceed with cutting out and replacing the damaged drywall.
Could you explain a bit more about when you would actually need to replace a whole section of drywall instead of just patching it? My house has a couple spots with water damage, and I’m not sure how to tell if patching would be enough.
If the drywall has significant water damage—like sagging, crumbling, or mold growth—it’s best to replace that whole section rather than just patching. Patching works for small holes and surface damage, but if the drywall feels soft, has visible staining, or smells musty, replacement is safer to prevent further issues. Make sure the source of the water is fixed before repairing.
I often see cracks reappear after I repair them, especially in areas where the house seems to settle. Do you have recommendations for preventing these cracks from coming back after patching, or is it just something I have to keep on top of over time?
Cracks in drywall that reappear, especially in areas where the house settles, are a common challenge. To help prevent them from coming back, try using a flexible mesh tape over the crack before applying joint compound. This reinforces the area and allows for some movement. Also, use a high-quality, flexible joint compound designed for patching. While these steps can reduce the chances of recurrence, some cracks in settling areas may need occasional touch-ups over time.
You listed assembling an efficient toolkit as an important step. For a small business trying to keep overhead low, which tools are truly essential versus nice-to-have for professional-looking repairs?
For a small business focused on cost-efficiency, the essentials for professional drywall repair include a utility knife, taping knife, sanding block or sponge, drywall saw, drill, and a mud pan. These cover most repair scenarios. Nice-to-have tools like specialty sanders, corner tools, or high-end automatic tapers can speed up large jobs but aren’t strictly necessary for quality results in smaller projects.
When dealing with small cracks that seem to keep reopening due to regular house settling, are there specific techniques or products you recommend to ensure a long-lasting repair that won’t just crack again after a few months?
For small cracks caused by house settling, using a flexible, paintable caulk or an elastomeric patching compound works well, as these products move with the wall. Apply the patching product into the crack, smooth it, and let it dry fully. For added strength, place a strip of fiberglass mesh tape over the crack before applying joint compound. Once dry, sand lightly and repaint. This approach helps prevent the crack from reopening.
When patching dents and dings from moving furniture, is there a specific tool or technique that helps avoid those lumpy spots that are super obvious after painting? I’m not very experienced, so tips for a smoother finish would be helpful.
For a smooth finish when patching dents, use a flexible putty knife to apply a thin layer of lightweight joint compound. Feather the edges by spreading the compound slightly beyond the damaged area. Once it dries, gently sand with a fine-grit sanding sponge until the surface feels even with the surrounding wall. Applying compound in thin layers and letting each layer dry before sanding really helps avoid noticeable lumps after painting.
You mentioned that water damage needs thorough remediation before repairing the drywall. Could you explain what specific steps I need to take if I find discolored or sagging drywall from a small leak?
If you notice discolored or sagging drywall from a small leak, start by identifying and stopping the source of water. Next, let the area dry completely using fans or a dehumidifier. Remove any damaged drywall that feels soft or crumbles. Check for mold—if you see or smell it, clean with a mold remover or consult a professional for larger areas. Only after everything is dry and clean should you patch or replace the drywall.
If past repairs have turned out a bit lumpy, is it usually a problem with the type of joint compound, the application technique, or something else? I’d love to avoid repeating those mistakes this time around.
Lumpy repairs are most often caused by application technique rather than the type of joint compound used. Common issues include not feathering the edges, applying too much compound at once, or insufficient sanding between coats. For better results, use thin layers, let each coat dry fully, sand smoothly, and clean dust before painting.
After reading about how cracks can form from house settling or temperature changes, I’m curious—how can you tell if a crack is just cosmetic or if it’s a sign of a bigger structural issue before repairing it?
To tell if a drywall crack is cosmetic or a sign of a bigger structural issue, look for warning signs like wide or jagged cracks, cracks that keep reopening after repair, or those running at an angle or through both wall and ceiling. If doors or windows nearby start sticking or misaligning, that can also indicate structural movement. For peace of mind, if you’re unsure, it’s a good idea to consult a professional before repairing.
When repairing medium to large holes—like those over 1 inch that you mention—what’s the most efficient way to get a seamless blend with the existing texture? I run a handyman business and have noticed some patches stand out even after painting.
To achieve a seamless blend on larger patches, it’s important to feather the joint compound well beyond the patch—usually 8–12 inches past the repair edge. After applying mesh tape and compound, use a wide drywall knife for smooth, gradual feathering. Once dry, lightly sand and, if needed, repeat with skim coats. To match texture, use a brush, sponge, or spray texture that replicates the original pattern, blending the edges. Always prime before painting, as this helps unify the sheen and finish.
If I’m patching several dents and dings in different rooms at once, should I do all the repairs first and then paint everything at the end, or is it better to finish and paint each repair before moving on?
It’s usually best to patch all the dents and dings first, then paint everything at the end. This way, you can sand and smooth all the repairs together, which helps create a more even surface. Painting everything in one go also ensures a more consistent color and finish throughout your rooms.
You mentioned that water damage often requires cutting out and replacing sections of drywall. How can I tell for sure if water damage is severe enough to need replacement instead of just patching or repainting?
To determine if drywall with water damage needs replacement, look for signs like soft or crumbly texture, sagging, bulging, or any visible mold. Persistent stains or a musty smell can also indicate deeper damage. If the drywall feels solid and there’s only minor discoloration, patching or repainting may be enough. If in doubt, pressing gently on the area can help—if it gives way, replacement is probably necessary.
Sometimes my repairs end up bumpy or you can see the patch outline after painting. Are there specific techniques or materials that help make the patched area truly seamless, especially for cracks or dents?
To make your drywall repairs blend in seamlessly, use a lightweight joint compound for the final coats and feather the edges several inches beyond the patch. Sand gently between coats with fine-grit sandpaper. For cracks, apply mesh tape before mudding to prevent re-cracking. Always prime the repaired area before painting to ensure even color and texture.
If I’m patching a larger hole left from a plumbing repair, is there a quick way to make sure the patch blends in with the rest of my wall texture? My main concern is that the repair will always be obvious.
To help your patch blend in, try using a texture spray or a premixed drywall texture that matches your existing wall finish. Apply the texture in light layers and feather the edges into the surrounding wall. Once dry, lightly sand any high spots. Finish by priming and painting the area, which helps make the patch less noticeable.
When you mention ‘budgeting realistically’ for drywall repair, could you break down how much I should expect to spend on tools versus materials for a typical medium-sized hole? Are there any cost-effective alternatives for homeowners who might not need to invest in professional-grade tools?
For a typical medium-sized drywall hole, expect to spend around $10–$20 on basic tools like a putty knife, sanding sponge, and utility knife. Materials such as a repair patch, joint compound, and paint can add another $15–$30. Instead of buying professional-grade tools, consider affordable all-in-one patch kits found at most hardware stores, which often include everything you need for one or two repairs at a lower total cost.
For someone dealing with repeated small cracks due to house settling, do you recommend any specific tools or materials from your toolkit that help prevent those cracks from coming back after repair?
For recurring small cracks from house settling, using a flexible, high-quality drywall joint compound is helpful, as it can move a bit with your walls. Fiberglass mesh tape is also a great addition since it reinforces the repair area better than paper tape. After repairing, consider using a paint with a bit of flexibility, like an elastomeric paint, which can help hide future minor movement.
When you mention that water-damaged drywall might require replacing entire sections, are there warning signs homeowners should look for before deciding the damage is severe enough to warrant replacement instead of patching?
Yes, there are several warning signs to watch for with water-damaged drywall. Look for sagging, warping, or a spongy feel when you press the surface. Staining, mold growth, or a musty smell are also red flags. If the drywall feels soft, crumbles easily, or the damage covers a large area, replacement is usually safer than patching.
I’m curious about water damage repairs—how can you tell if the affected drywall needs to be fully replaced rather than just patched, and are there any signs to watch out for even after patching?
If drywall has been soaked through, feels soft, crumbles, or shows warping and sagging, it usually needs full replacement rather than patching. After patching, keep an eye out for recurring stains, bubbling paint, mildew smells, or new soft spots—these can signal lingering moisture or hidden mold. Make sure the area is fully dry before any repair to prevent future issues.
When assembling a drywall repair toolkit for small holes and cracks, are there any tools or materials that can be skipped by someone on a tight budget, or are all the listed items truly essential for a seamless finish?
If you’re working with a tight budget, you can simplify your toolkit a bit. For small holes and cracks, a putty knife, lightweight spackle or joint compound, and some fine-grit sandpaper are the core essentials. You can often skip specialty sanding pads or patch kits if you’re only tackling minor repairs. A basic utility knife and a small paintbrush or roller for touch-ups round out what you really need for a good finish.
The article notes that poor technique can result in visible ‘patch jobs.’ What are some common mistakes DIYers make that lead to lumpy results, and how can I spot them early before finishing up the repair?
Common mistakes include applying too much joint compound at once, not feathering the edges, and failing to sand between coats. These can leave obvious bumps or thick edges. To catch issues early, run your hand gently over the repair to feel for raised spots and look at the patch from an angle under good lighting. If you notice any unevenness, sand and reapply compound as needed before painting.
How long should I wait before painting over a freshly patched drywall section to make sure the repair blends in seamlessly? Does drying time vary depending on the type of patch or material used?
You should generally wait 24 hours for standard joint compound to dry before sanding and painting over a patched drywall section. Drying time can vary based on the thickness of the patch, the specific compound used, and humidity levels. Quick-setting compounds might be ready in as little as 20–90 minutes, while larger or deeper repairs may take longer. Always ensure the surface feels completely dry and smooth before painting for the best blend.
When budgeting for a drywall repair project at home, what are the main cost factors that people often overlook? Are there hidden expenses with certain tools or materials that tend to catch beginners off guard?
People often overlook costs like patching compound waste, sandpaper replacements, primer, and paint for blending after the repair. Tool-wise, putty knives and sanding sponges may need to be replaced if they wear out quickly, especially if you buy cheaper versions. Renting or buying a shop vac for dust control can also add to your expenses. Unexpected damage behind the drywall, like insulation or wiring issues, can increase your budget as well.
Could you explain a bit more about which specific tools are most helpful for someone completely new to drywall repair? I want to avoid buying unnecessary supplies but still be prepared for common dents and small holes.
For beginners handling common dents and small holes, you’ll want a putty knife (about 6 inches wide), a sanding sponge or fine-grit sandpaper, a utility knife, and a small tub of pre-mixed joint compound or spackle. A paintbrush or roller for touch-up painting is also useful. These basics should cover most minor repairs without overwhelming you or your budget.
When it comes to repairing medium to large holes, you mention possibly having to cut out and replace entire sections of drywall. How do I know if a hole is big enough to require a full replacement versus just patching it?
For medium to large holes, consider replacing the entire section if the hole is larger than about 6 inches in diameter or if the surrounding drywall is cracked or damaged. Patching works well for smaller holes, but for bigger ones, a full replacement ensures the repair is sturdy and blends in seamlessly. If you can’t securely anchor a patch to solid drywall, it’s usually best to cut out and replace that whole section.
Your mention of water damage caught my eye. How can a homeowner tell if the underlying structure behind the drywall has been affected after a leak, and what extra steps should be taken before patching?
To check if the structure behind drywall is affected after a leak, look for signs like persistent dampness, soft spots, mold, or a musty smell. Press gently on the area—if it gives way or feels spongy, there may be deeper damage. Before patching, let everything dry thoroughly, remove any damaged insulation or framing, and treat for mold if needed. You may want to consult a professional if you notice extensive structural issues.
I noticed you mentioned cost factors in drywall repair. Could you elaborate on what typically contributes most to the overall expense—materials, tools, or labor? Any budgeting tips for someone attempting a medium-sized patch for the first time?
Labor is usually the biggest cost in drywall repair, especially if you hire a professional. For DIY projects, materials like joint compound, drywall panels, and tape are generally affordable, while tools can add some upfront expense if you don’t already own essentials like a putty knife or sanding block. To budget wisely, consider borrowing or renting tools, and buy only as much material as your patch requires. Planning your steps in advance can help you avoid waste and keep costs down.
If a repaired section ends up looking lumpy or obviously patched due to user error, what’s the best way to fix it without making things worse? Is sanding alone enough, or would you recommend reapplying compound and starting over in some cases?
If the repaired section looks lumpy or stands out, sanding alone might not be enough, especially if the unevenness is significant. In that case, lightly sand the area to smooth out the highest spots, then apply a thin layer of joint compound to fill in low spots and feather the edges. Let it dry, sand again, and repeat if needed until the surface is smooth and blends with the surrounding wall.
If I end up with a patch that’s noticeably lumpy even after following the pro techniques, what troubleshooting steps would you recommend to achieve a smoother finish? Is it best to sand down and start over, or are there more targeted fixes?
If your patch is lumpy, you don’t need to start completely over. First, let the area dry thoroughly. Then use fine-grit sandpaper to smooth out the high spots. Wipe off dust and apply a thin layer of joint compound to fill in any low areas. Feather the edges as you spread it, allow it to dry, and then sand gently again. Repeat as needed before priming and painting.
Could you give a ballpark estimate of what a typical homeowner might spend on tools and materials for repairing a few small holes and one large crack, assuming basic DIY skills? I want to budget realistically but avoid underestimating.
For a few small holes and one large crack, expect to spend about $30 to $60 on tools and materials if you already have basics like a utility knife. This covers joint compound, a small tub of patching plaster, a putty knife, sanding sponge, drywall tape, and possibly a drywall saw. If you need to buy everything from scratch, the total could reach $75 to $90. This should be enough for most simple DIY repairs.
Could you elaborate on the cost factors for repairing a medium to large hole versus just patching a small dent? I’m trying to budget more accurately for different types of drywall fixes in my rental units.
Repairing a medium to large hole usually costs more due to the need for extra materials like larger drywall patches, joint compound, and possibly new insulation or support behind the wall. Labor is also higher since the process takes longer and may involve additional steps like texturing and repainting. In contrast, patching a small dent often just requires some spackle, sanding, and paint, making it much quicker and less expensive. Budget more for big repairs, especially if hiring a professional.
Could you explain more about how to tell when water damage has gone beyond surface discoloration and actually requires cutting out and replacing drywall instead of just patching?
To determine if water damage requires full drywall replacement, look for signs beyond discoloration. If the drywall feels soft, crumbly, or warped when you press it, that’s a clear sign the structure is compromised. Also, check for mold growth, persistent musty odors, or bubbling/peeling paint. If any of these are present, it’s best to cut out and replace the damaged section rather than trying to patch it.
After patching dents or holes, what’s the best way to ensure that the repaired area doesn’t stand out once I repaint the wall? I worry about ending up with a visible patch job even after prepping carefully.
To achieve a seamless finish, make sure you feather the joint compound out several inches beyond the patch so it blends smoothly into the surrounding wall. Sand the area thoroughly once dry, using a fine-grit sandpaper. Before painting, apply a primer to the patched area to prevent flashing. Finally, use the same type and sheen of paint as the rest of the wall, and consider painting the entire wall if color matching is a concern.
I noticed the article highlights avoiding common patch job mistakes that cause lumpy finishes. Can you clarify some troubleshooting steps if a patch job ends up uneven or obviously visible after painting?
If a patch job looks uneven or stands out after painting, start by lightly sanding the area with fine-grit sandpaper to smooth out lumps or ridges. Wipe away dust, then apply a thin layer of joint compound to fill low spots, feathering the edges. Let it dry, sand again if needed, and spot-prime before repainting. Repeat these steps until the surface blends seamlessly with the surrounding wall.
I’ve tried patching small holes left by wall anchors, but sometimes my repairs still look uneven after painting. Is there a specific pro patch technique or tool you recommend to make these small fixes completely invisible?
For small anchor holes, using a high-quality lightweight spackle and a flexible putty knife can help you get a smoother finish. After applying the spackle, lightly feather the edges with the knife. Once dry, gently sand the area with fine-grit sandpaper before priming and painting. For best results, make sure the patch is completely flush with the wall and blend paint slightly beyond the patch to help it disappear.
When it comes to budgeting for drywall repairs, what are some hidden or unexpected costs I should look out for? Is it usually just the materials, or are there other expenses that tend to come up during a first-time project?
In addition to materials like drywall, joint compound, and tape, you might encounter extra costs such as tool rentals, disposal fees for old drywall, primer and paint for touch-ups, and even minor repairs to electrical or plumbing if wires or pipes are discovered behind the wall. Many first-timers also underestimate the cost of sanding and cleanup materials. Factoring in a small buffer for these surprises can help keep your project on track.
If I need to patch a few dents and holes but only have nights and weekends free, about how much time should I set aside for the whole process, including drying and sanding between steps?
For patching a few dents and holes, you can typically expect to spend about 2 to 3 hours working, spread out over two or three sessions. Each step—filling holes, letting compound dry, sanding, and possibly applying a second coat—needs some drying time in between, usually a few hours or overnight. Planning to complete the project across two evenings or a weekend should be enough.
Could you give an estimate of what a typical homeowner might expect to spend on materials for fixing a medium to large hole? Does the cost vary a lot based on the tools or techniques you mentioned?
For repairing a medium to large drywall hole, most homeowners spend between $30 and $75 on materials. This usually covers a drywall patch, joint compound, sandpaper, putty knife, and paint for touch-up. Costs can vary depending on whether you already have some tools or need to buy everything new. The technique you choose matters too—using mesh patches or repair kits might be a bit more expensive than basic patching, but usually not by much.
Could you clarify what would be considered a realistic budget for all the essential drywall repair tools mentioned? I’m just starting out and want to plan ahead before buying supplies for future repairs.
For a beginner assembling essential drywall repair tools, you can expect to spend between $40 and $100. This covers basics like a utility knife, taping knife, putty knife, sanding sponge, drywall saw, drill, joint compound, and drywall tape. Prices may vary depending on quality, but starting with standard tools from a hardware store should keep you in this range. As your skills grow, you can upgrade or add specialized tools if needed.
I usually have just weekends free, so I’m wondering about the typical time commitment for fixing medium-sized holes versus small cracks. Can most repairs be done in a single day, or do some steps need to dry overnight?
For small cracks, you can usually complete the repair in a single day since joint compound dries quickly and often needs just a light sanding before painting. For medium-sized holes, patching and applying compound often take about an hour, but drying time between coats is important—sometimes you’ll need to wait overnight before sanding and painting. So, small cracks are a one-day job, while medium holes may take two days.
I run a painting business and often encounter walls with both dents and larger holes. Could you clarify how the toolkit or materials differ when patching a small ding versus a 6-inch hole? I want to make sure my crew is prepared for both on the same job.
For small dings or dents, your crew mainly needs lightweight spackle, a putty knife, and fine-grit sandpaper. For a 6-inch hole, they’ll need more robust supplies: a drywall patch or mesh, joint compound, a utility knife, a drywall saw, and possibly backing material like a wooden support strip. It’s wise to stock both types of materials so your team can tackle any repair they encounter during a job.
After patching a water-damaged area, how long should I realistically wait before repainting or hanging anything on the repaired spot? The guide covers water damage but I’m unsure about proper drying and curing times.
After patching a water-damaged area, you should generally wait at least 24 to 48 hours for the patch to dry fully. However, if the area was heavily saturated, it may take several days. Make sure the surface feels completely dry and solid before repainting or hanging anything. Using a fan or dehumidifier can speed up drying, but always err on the side of caution to avoid trapping moisture.
If a repaired section of drywall ends up looking lumpy or uneven, is there a specific troubleshooting technique or product you recommend to smooth it out without having to redo the entire patch?
If your drywall repair looks lumpy or uneven, you don’t have to redo the whole patch. Use a wide drywall knife and gently sand the area with fine-grit sandpaper to smooth out high spots. If needed, apply a thin layer of joint compound (also called skim coating), feathering the edges well. Let it dry, sand again, and repeat as necessary until the surface is even. This approach should help you achieve a smooth finish without a complete redo.
I noticed you listed different damage types like medium to large holes and cracks from house settling. Is there a different approach or technique for repairing a long crack versus a round hole of the same length? Which is more challenging for a beginner?
Repairing a long crack usually involves cleaning out the crack, applying joint compound, and embedding paper or mesh tape to reinforce the area. For a round hole, especially if it’s larger, you’ll often need to cut a patch piece of drywall and secure it before taping and mudding. Generally, cracks are less challenging for beginners, since patching a hole requires more cutting, fitting, and blending with the existing wall.
If I patch up a medium-sized hole in a high-traffic hallway, how soon can I safely paint over it and let kids or pets near the repaired area without worrying about bumps or the patch coming loose?
After patching a medium-sized hole, you should wait until the joint compound is completely dry—usually 24 hours per layer, depending on thickness and humidity. Once dry, sand the area smooth, apply primer, and then paint. After the paint dries (typically 4–6 hours), it’s safe for kids and pets to be around. This process helps prevent bumps and ensures the patch stays secure.
You mention assembling an efficient toolkit for drywall repair. Are there specific brands or types of joint compound and patch materials you’ve found make a noticeable difference for achieving pro-quality results?
For pro-quality drywall repairs, many professionals prefer brands like USG Sheetrock or DAP for joint compound due to their smooth consistency and reliable finish. For patch materials, self-adhesive mesh patches from brands like FibaTape hold up well and make blending easier. Lightweight joint compounds are great for quick jobs, while all-purpose types work best for larger repairs. Choosing quality tools and materials really does help produce smoother, longer-lasting results.
After patching and sanding a repaired area, how can I make sure the texture and paint match the rest of the wall so the patch job isn’t noticeable? I struggle with blending everything together smoothly.
To blend the patched area seamlessly, try to replicate your wall’s original texture with joint compound before painting. Use a sponge, brush, or texture roller to mimic the pattern. Let it dry, then lightly sand for a smooth transition. When painting, feather the edges by overlapping the repaired area with slightly diluted paint to match the wall. This helps hide lines and creates a uniform finish.
If I have a few dents and small holes from my kids running into the wall with toys, do I really need all the specialized tools mentioned? What’s the minimum toolkit I can get away with to handle basic repairs?
For small dents and holes, you don’t need every specialized tool listed. A basic toolkit should include a putty knife, lightweight spackle or joint compound, a sanding sponge, and a small paintbrush or roller for touch-ups. These few items are enough to repair minor damage and blend the patch with your wall.
Could you clarify what specific tools are essential for patching medium to large holes, as opposed to the smaller holes or cracks you mentioned? I want to make sure I have everything on hand before I start a bigger repair.
For medium to large drywall holes, you’ll need a few extra tools beyond what you’d use for small holes or cracks. Make sure you have a drywall saw or utility knife to cut neat edges, a tape measure for accurate sizing, a piece of drywall for the patch, joint compound, drywall tape (mesh or paper), a putty knife, sanding block, and a screw gun with drywall screws to secure the patch. A dust mask and drop cloths can also help keep your work area clean and safe.
When repairing medium to large drywall holes, is there a particular backing material or patch style you recommend to ensure a strong, invisible finish? I’ve struggled with patches that either sag or show through after painting.
For medium to large drywall holes, using a solid backing like a piece of plywood or a furring strip behind the patch is key. Secure it inside the hole, then screw your drywall patch to it, ensuring it’s flush with the wall. Paper tape and lightweight joint compound will help blend the seams. Sand thoroughly between coats for a smooth, invisible finish that won’t sag or show after painting.
When it comes to assembling a toolkit, are there certain tools you consider non-negotiable for DIY drywall repair, or are there budget-friendly alternatives for beginners?
For DIY drywall repair, a few tools are really essential: a utility knife, putty knife, sanding sponge, and a paintbrush or roller. These items are hard to do without, but you don’t need top-of-the-line versions—budget-friendly options work fine for beginners. If you want to save even more, some home improvement stores offer small repair kits that include the basics, which can be a great starting point.
I saw that the article breaks down the different hole sizes. For medium to large holes (like from door handles), is it better to use a mesh patch or should you actually insert new drywall? What gives a more seamless result?
For medium to large holes, inserting a new piece of drywall (a drywall patch) generally gives a more seamless and durable result compared to just using a mesh patch. Mesh patches work well for small to medium holes, but larger areas often need the support and smoothness that a solid drywall insert provides. After inserting the drywall, use joint compound and sand the area for a flawless finish.
You mention that water-damaged drywall sometimes needs to be cut out and replaced, but how can you tell when a stain is just cosmetic versus when the drywall is actually compromised and needs to be removed completely?
A stain that is only cosmetic usually feels dry, firm, and shows no signs of warping or softness. If the area is soft to the touch, crumbly, has a musty smell, or feels spongy, the drywall is likely compromised and should be replaced. Persistent discoloration, bubbling paint, or sagging are also signs that the damage goes deeper than just a surface stain.
When dealing with medium to large holes caused by accidents or plumbing work, does the article suggest any particular brand or type of patch kit that stands out for durability and seamless results?
The article doesn’t mention any specific brand or type of patch kit for medium to large holes. Instead, it focuses on essential tools and techniques, like using mesh or metal patches for larger repairs and emphasizing proper feathering and sanding for seamless results. If you’re looking for a durable outcome, choosing a high-quality patch kit with a metal reinforcement plate is generally recommended.
You mentioned that water damage requires more thorough remediation compared to regular holes or cracks. Could you clarify what extra steps are involved if my wall has some minor water stains but isn’t sagging or crumbling?
If your wall has minor water stains but isn’t sagging or crumbling, you’ll want to ensure the source of the moisture is fixed first. After that, let the area dry completely. Clean the stained spot with a mild detergent, then apply a stain-blocking primer before repainting. These extra steps help prevent stains from bleeding through and guard against future issues.
How long do typical drywall patch jobs take to dry between steps, and are there ways to speed up the process if I need to finish the wall repair quickly before painting?
Drywall patch compounds usually need 24 hours to dry between coats, but this can vary depending on product type, thickness, and room humidity. Quick-setting joint compounds, labeled as ‘hot mud,’ dry in as little as 20–90 minutes and are great for speeding up the process. You can also use fans or a dehumidifier to help patches dry faster before you start painting.