

Introduction: The Art of Creating Space Where There Is None
Living in a small home doesn’t mean you have to sacrifice comfort or style. Whether you’re in a city apartment, a cozy cottage, or a downsized house, the daily challenge of finding a place for everything is real. But here’s the good news: maximizing space isn’t about expensive renovations or knocking down walls—it’s about smart, intentional storage solutions. With creativity and a strategic approach, you can make every square foot work harder. This article explores actionable tips, product recommendations, and clever hacks for transforming cramped quarters into organized, functional, and attractive living spaces. We’ll cover everything from vertical storage and hidden compartments to budget-friendly DIY projects and specialized products. Whether you’re decluttering a studio or optimizing an awkward hallway, these ideas will help you reclaim your home, reduce stress, and enjoy your space—all without major construction. Ready to make your small home feel spacious? Let’s dive in.
Assessing Your Space: The Foundation of Smart Storage
Room-by-Room Inventory
Start with a clear-eyed assessment of your home. Walk through each room and list items that need a dedicated spot. Pay special attention to clutter hotspots: entryways, closets, the kitchen, and bathrooms. Take measurements of underutilized areas, such as the space above doors or beneath furniture.
- Entryway: Shoes, coats, bags, keys.
- Living Room: Books, electronics, blankets, remote controls.
- Kitchen: Small appliances, utensils, pantry goods.
- Bedroom: Clothing, accessories, bedding.
- Bathroom: Towels, toiletries, cleaning supplies.
Identifying Dead Spaces
Look for overlooked storage goldmines:
- Under stairs
- Behind doors
- Above cabinets
- Unused corners
- Walls with no shelving
Note these zones for targeted improvements later.
Vertical Solutions: Going Up, Not Out
Wall-Mounted Shelving
Walls are often the most underutilized space in a small home. Installing shelves high up draws the eye upward and frees up floor space. Consider:
- Floating Shelves: Ideal for books, plants, and decorative storage bins.
- Picture Ledges: Shallow ledges work well for spice jars, small frames, or toiletries.
- Adjustable Track Systems: Customizable shelves adapt as your needs change.
Over-the-Door Organizers
Don’t let doors go to waste. Over-the-door racks and pockets are perfect for shoes, cleaning supplies, or even pantry items. Choose clear organizers for easy visibility or canvas pockets for a neater look.
Ceiling-Mounted Storage
In kitchens, garages, or laundry rooms, ceiling-mounted racks provide out-of-the-way storage for seasonal items or infrequently used gear. Always ensure proper anchoring and weight limits for safety.
Multi-Functional Furniture: Double Duty for Every Piece
Sofa Beds and Daybeds
Opt for furniture that serves more than one purpose. A sofa bed or daybed lets your living area double as a guest room without taking extra space. Look for models with built-in storage drawers underneath.
Ottomans and Benches with Storage
An ottoman with a lift-up top can hide blankets, board games, or electronics. Entryway benches with cubbies or baskets keep shoes and bags off the floor and out of sight.
Expandable Dining Tables
Choose a drop-leaf or extendable table for small kitchens and dining areas. When not in use, fold it down to save space. Some models include built-in storage for linens or flatware.
Hidden Storage: Out of Sight, Not Out of Mind
Under-Bed Solutions
Use rolling bins, shallow drawers, or vacuum-sealed bags beneath beds to store off-season clothing, shoes, or spare bedding. Platform beds with built-in drawers are a game-changer for tiny bedrooms.
Staircase Storage
If your home has stairs, the space beneath can become a closet, pull-out drawers, or even a compact home office nook. For renters or non-renovators, consider stackable bins or baskets that fit neatly underneath.
Toe-Kick Drawers and Kick Plates
In kitchens and bathrooms, the space beneath lower cabinets (the toe-kick) can house slim pull-out drawers for trays, cutting boards, or cleaning supplies. DIY kits are available for retrofitting existing cabinets.
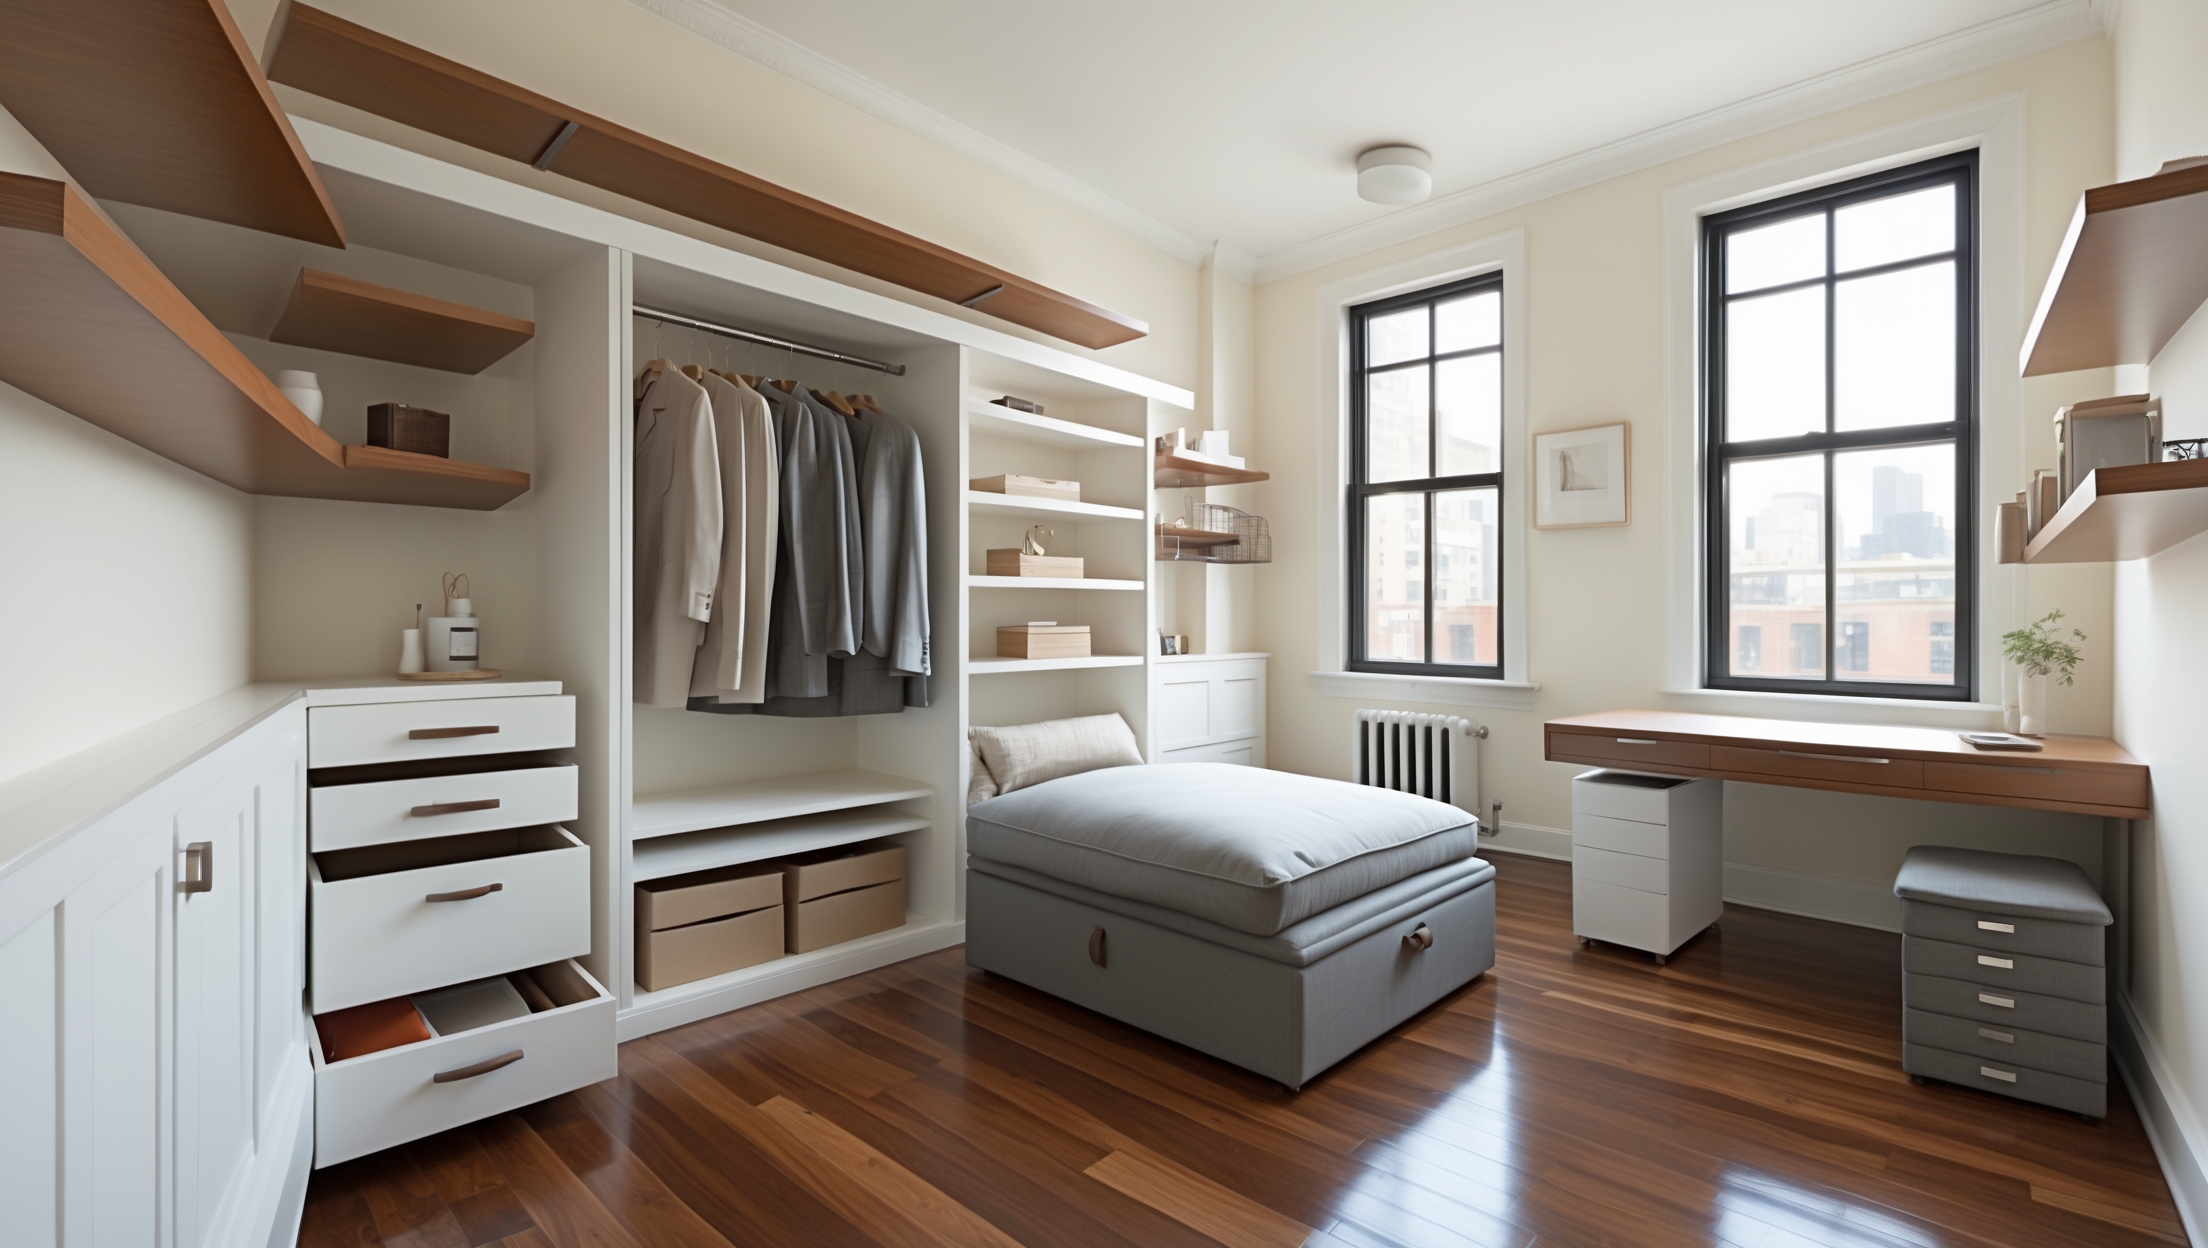
Closet Optimization: Making the Most of Limited Wardrobe Space
Double Hanging Rods
Increase hanging capacity by adding a second rod below the first. Perfect for shirts, pants, or children’s clothing.
- Use tension rods for temporary solutions.
- Install adjustable closet systems for flexibility.
Slim Hangers and Shelf Dividers
Swap bulky hangers for slim, non-slip versions to fit more clothes. Shelf dividers keep stacks of sweaters or linens neat and accessible.
Door and Wall Accessories
Attach hooks, jewelry organizers, or pocket shoe racks to closet doors or walls. Magnetic strips or pegboards can hold accessories, belts, or scarves.
Kitchen Organization: Squeezing Storage from Every Nook
Pull-Out Pantry Units
If you’re short on cabinet space, a tall, slim pull-out pantry can fit beside the fridge or in a broom closet. These units maximize vertical space and keep pantry goods organized and accessible.
Magnetic Racks and Hooks
Use magnetic strips for knives, spice jars, and utensils on the backsplash or inside cabinet doors. Adhesive hooks can hold potholders, mugs, or measuring spoons.
Stackable Containers and Lazy Susans
Clear, stackable containers make the most of pantry shelves and let you quickly see supplies. Lazy Susans are perfect for corner cabinets or organizing condiments in the fridge.
Under-Sink Organizers
Choose tiered shelves, pull-out baskets, or adjustable racks to corral cleaning supplies and maximize under-sink real estate. Don’t forget the back of the cabinet door for additional hooks or small bins.
Bathroom Storage: Small Space, Big Impact
Over-the-Toilet Shelving
Install a slim shelving unit above the toilet to store towels, toiletries, and decorative items. Look for freestanding models if you’re renting or want to avoid drilling into walls.
Medicine Cabinet Upgrades
Replace shallow medicine cabinets with deeper, mirrored versions. Add stick-on organizers to the inside of the door for makeup, razors, or dental floss.
Shower and Tub Solutions
- Use hanging caddies over the showerhead or mounted shelves in the corner for shampoos and soaps.
- Suction cup baskets and adhesive hooks hold loofahs, razors, and brushes.
Entryway and Hallway Hacks: Containing Clutter at the Door
Wall Hooks and Peg Rails
Install sturdy hooks or a peg rail for coats, umbrellas, and bags. For shoes, a low-profile shoe rack or boot tray keeps dirt contained and walkways clear.
Mail and Key Stations
Designate a small table or wall-mounted organizer for incoming mail, keys, and sunglasses. Use labeled baskets or bins for each family member to corral miscellaneous items.
Creative DIY Storage Projects
Repurposed Furniture
Convert old trunks into coffee tables with hidden storage or turn a ladder into a blanket rack. Stack wooden crates for a customizable bookcase or shoe organizer.
Built-In Nooks
Even a shallow alcove can become a mini office, reading nook, or display shelf with a custom-cut board and brackets. Paint or wallpaper the back for a designer touch.
Pegboard Organizers
Pegboards aren’t just for garages. Painted and framed, they make adjustable organizers for kitchens, craft rooms, or entryways. Use hooks, baskets, and shelves to store tools, utensils, or accessories.
Budget Breakdown: Storage Solutions for Every Wallet
Low-Cost Upgrades (Under $50)
- Adhesive hooks and magnetic strips
- Stackable bins and baskets
- Tension rods for closets and cabinets
- Over-the-door organizers
Mid-Range Investments ($50–$200)
- Freestanding shelving units
- Custom closet systems
- Multi-functional ottomans or benches
- Pull-out pantry racks
Splurge-Worthy Options (Over $200)
- Platform beds with drawers
- Built-in under-stair storage
- Custom cabinetry
- Ceiling-mounted garage racks
Plan your upgrades by choosing the most impactful solution for your biggest pain point first, then build up as budget allows.
Maintenance and Best Practices: Keeping Clutter at Bay
Regular Decluttering
Set a quarterly reminder to review each storage area. Donate, sell, or discard items you no longer use. Use the “one in, one out” rule for clothing, toys, and kitchen gadgets to prevent overflow.
Label Everything
Clear labeling makes it easy for household members to find and return items to their proper place. Use a label maker or write directly on bins and baskets.
Routine Cleaning
Wipe down shelves and organizers regularly to prevent dust and grime buildup. Rotate items seasonally—store winter gear in summer, and vice versa, to free up accessible space for what you need now.
Safety and Compliance: What to Watch Out For
Weight Limits for Shelving
Always check the manufacturer’s weight recommendations before loading shelves, especially wall-mounted or ceiling racks. Use proper anchors for drywall and avoid overloading.
Avoiding Fire Hazards
Keep storage clear of radiators, heaters, and electrical panels. Don’t stack boxes or bins near exits or in hallways where they could impede escape in an emergency.
Rental and HOA Restrictions
If you rent or live in a community with a homeowners association, check the rules before installing permanent fixtures or making modifications. Opt for freestanding or adhesive solutions when in doubt.
Conclusion: Living Large in a Small Space
Maximizing space in a small home isn’t about having less—it’s about making what you have work smarter. With intentional organization, creative solutions, and the right storage products, you can turn even the tiniest corners into functional, beautiful spaces. Remember, the best storage plan starts with a clear-eyed look at your real needs and habits. Don’t be afraid to experiment, repurpose, or invest in a few key pieces that make daily life easier. Most importantly, maintain your systems with regular decluttering and cleaning, so your home always feels open and welcoming. Small spaces can offer big comfort—if you approach storage with strategy and style. Whether you’re starting with a single shelf or taking on a full-room makeover, these ideas will help you enjoy a home that feels spacious, organized, and uniquely yours, no renovation required.
Could you share more ideas for making use of those awkward hallway spaces mentioned in the article? I have a long, narrow hallway that seems impossible to organize without making it feel even more cramped.
For a long, narrow hallway, slim wall-mounted shelves or cabinets can add storage without taking up much space. Try using hooks or pegboards for keys, bags, or hats. Tall, narrow shoe racks or umbrella stands can go at the ends. Mirrors can help the hallway feel larger and brighter, and a slim console table with baskets underneath can add both storage and style without overcrowding the space.
For small kitchens with minimal counter and cabinet space, would you recommend focusing on hidden compartments or specialized products? What are the trade-offs in terms of accessibility and day-to-day usability?
Hidden compartments are great for keeping clutter out of sight, but they can make frequently used items less accessible. Specialized products like pull-out shelves, stackable organizers, and magnetic racks keep essentials within easy reach and often improve day-to-day usability. The trade-off is that while hidden compartments maximize visual tidiness, specialized products usually offer better accessibility for daily cooking and chores. You might consider a mix: use hidden storage for rarely used items and specialized organizers for things you reach for every day.
For vertical storage options like wall-mounted shelving, what weight limits or installation methods should homeowners consider to ensure safety, especially in older buildings with uncertain wall quality?
When installing wall-mounted shelving, it’s important to check what kind of wall you have—plaster, drywall, or masonry. For older homes, wall quality can vary, so always use wall anchors or toggle bolts rated for the expected weight, and try to mount shelves directly into wall studs whenever possible. For safety, avoid overloading shelves and stick to the manufacturer’s weight recommendations. If you’re unsure about your walls’ integrity, consider consulting a professional before installation.
The article mentions specialized products as part of the solution, but I’m on a tight budget. Are there affordable storage hacks you recommend that don’t involve buying a lot of new items, maybe using things most people already have at home?
Absolutely, you can maximize storage without spending much. Try reusing sturdy boxes or baskets as organizers in closets or under beds. Hooks or tension rods can be repurposed to hang bags, scarves, or kitchen utensils. Even old jars and containers work well for sorting small items. Get creative with stacking or using vertical space—sometimes just rearranging what you have can free up a surprising amount of room.
After implementing some of these storage hacks, what’s the best way to maintain an organized space and prevent clutter from re-accumulating, especially in high-traffic areas like entryways and kitchens?
To keep your home organized after using these storage hacks, try to assign specific spots for everyday items, especially in busy areas like entryways and kitchens. Make tidying up a daily habit by spending just a few minutes putting things back. Use labeled baskets, hooks, or trays to catch frequently used items, and regularly reassess what you really need to keep to avoid unnecessary build-up.
I’m interested in some of the budget-friendly DIY projects you mentioned. Could you give an example of a simple project for maximizing storage in an entryway without spending a lot upfront?
A simple and budget-friendly DIY project for an entryway is creating wall-mounted hooks using inexpensive materials like wooden dowels or repurposed knobs. Attach these to a painted piece of scrap wood or directly into wall studs to hang coats, bags, and keys. Adding a small shelf above the hooks can also provide space for baskets or decorative storage boxes, helping you keep the entryway organized without major expense.
I’m trying to identify those “dead spaces” you mentioned, like above cabinets and under stairs, but my small apartment doesn’t really have obvious spots like that. Do you have examples or photos of how these areas can actually be used for storage?
Absolutely, sometimes dead space isn’t immediately obvious, especially in apartments. Areas above doors, under beds, or even corners can often be used for storage with the right solutions like floating shelves, stackable boxes, or corner units. While I can’t share photos here, you could look for inspiration by searching for ‘small space storage ideas’ or ‘dead space storage solutions’—you’ll find plenty of creative examples.
When you mention identifying dead spaces, like under the stairs or behind doors, what are some practical storage solutions for renters who can’t make permanent changes? Are there temporary products or hacks you’d suggest for these tricky areas?
For renters, there are plenty of non-permanent storage options for dead spaces. Under stairs, try using stackable bins, rolling carts, or freestanding shelves that fit the available area. For space behind doors, consider over-the-door organizers, hanging hooks, or slim storage racks. These products can be easily removed when you move out and won’t damage walls or floors.
When taking a room-by-room inventory to reduce clutter, how do you suggest prioritizing what should be stored out of sight versus what can stay visible without making the space look crowded?
Start by identifying the items you use daily—these can stay visible if they’re tidy and contribute to the room’s style, like attractive kitchen tools or well-stacked books. Things used less often, or items that don’t add to the decor, should be stored out of sight. Prioritize keeping surfaces clear and store away anything that tends to pile up, especially if it makes the space feel busy.
If I’ve already tried decluttering and still struggle with things piling up in entryways and closets, what are some practical next steps to keep these problem spots organized long term?
If decluttering hasn’t solved the issue, consider adding wall-mounted hooks or slim shelving in entryways for everyday items like bags and keys. Use labeled bins or baskets in closets to separate categories—shoes, scarves, or seasonal gear. Rotate out-of-season items to higher shelves or under-bed storage. Establish a weekly routine to reset these spaces, putting everything back into its designated spot to keep clutter from building up again.
You mentioned taking a room-by-room inventory—can you give examples of how to store kids’ toys or sports equipment in small entryways without it looking cluttered?
To keep kids’ toys and sports equipment organized in small entryways, try using wall hooks or sturdy pegboards for items like helmets, bags, or jump ropes. Baskets or bins that fit under benches can store balls and smaller toys out of sight. Also, a slim storage cabinet or shoe organizer can help keep items tidy and make the entryway look less cluttered.
When you talk about taking measurements of underutilized areas like under furniture or above cabinets, what are some common mistakes people make when trying to add storage there? Are there things to avoid so the space doesn’t just collect dust?
People often overlook ventilation and accessibility when adding storage under furniture or above cabinets. It’s easy to choose containers that are too big or hard to reach, which makes items difficult to retrieve and the area likely to collect dust. Avoid packing things too tightly—leave enough space for cleaning and airflow. Also, use bins with lids or baskets that fit neatly, so the area stays tidy and practical.
For DIY storage solutions on a tight budget, especially in awkward corners or around doors, what kind of materials or products would you recommend that are sturdy enough for a business environment?
For business settings, consider using industrial-strength wire shelving, adjustable metal brackets with plywood shelves, or heavy-duty plastic bins. These materials are sturdy, affordable, and can be cut or sized to fit awkward spaces or around doors. Wall-mounted cube organizers or modular shelving units also work well for corners and are easy to assemble with basic tools.
When you mention taking measurements of underutilized areas like above doors or beneath furniture, do you have any tips for measuring awkward or hard-to-reach spaces accurately, especially in older homes with odd layouts?
For tricky or hard-to-reach spots, a flexible tape measure works best, since it can bend around corners and fit into tight spaces. Consider using a laser distance measurer for high or awkward areas, as it gives precise measurements without needing a ladder. In older homes, always check for uneven surfaces or angles, and measure in several places to account for any irregularities in walls or ceilings.
If I’m on a really tight budget, which of the strategies mentioned would you suggest tackling first for the most noticeable impact? Is there an order in which you recommend trying them?
If you’re on a tight budget, starting with decluttering and reorganizing your existing space will make the biggest immediate difference without spending money. Next, try repurposing items you already have for storage, like using baskets or boxes. After that, focus on wall-mounted shelves or hooks, which are affordable and easy to install. This step-by-step order should give you the most noticeable results without needing a large investment.
How do you suggest prioritizing which clutter hotspots to tackle first in a small home, especially if someone only has a weekend to dedicate to these storage upgrades and decluttering?
Focus first on the areas you use most often, like entryways, kitchens, or living rooms—these high-traffic spots usually collect the most clutter. Start by clearing visible surfaces and sorting everyday items. Next, tackle storage zones such as closets or cabinets. Since you only have a weekend, set a timer for each space to stay on track and avoid getting overwhelmed. Prioritizing in this way gives you noticeable results quickly and helps keep your home functional.
A lot of your storage ideas sound clever, but I’m on a tight budget. Which product recommendations or DIY storage hacks would you suggest starting with that are both effective and inexpensive?
For a tight budget, focus on DIY hacks like using tension rods to create extra hanging space in closets or cabinets, repurposing shoeboxes and baskets for drawer dividers, and mounting simple shelves with brackets. Over-the-door hooks and organizers are also affordable and instantly increase storage. These solutions are budget-friendly, require minimal tools, and make the most of existing space without major expenses.
When doing a room-by-room inventory as you suggested, what’s the best way to decide which items really need dedicated storage versus what could be donated or discarded?
When taking inventory, look at whether you’ve used each item in the past year and if it truly serves a purpose or brings you joy. Set aside things you rarely use or have multiples of for donation or discarding. Items you use often or are essential deserve dedicated storage, while everything else can be let go to free up valuable space.
When taking inventory room by room as recommended, what tips do you have for people who also use part of their small home for a home-based business, especially in the living room or kitchen?
For those running a business from a small home, try to separate work and living items during your inventory. Use labeled bins or shelves to distinguish business supplies from personal ones, even if they share the same space. Multi-functional furniture, like fold-away desks or portable carts, can help keep business materials organized and easy to store when not in use, especially in shared areas like the living room or kitchen.
Could you recommend budget-friendly stores or product lines for specialized storage solutions that work well in small kitchens and bathrooms, specifically for renters who can’t make permanent changes?
For renters seeking budget-friendly storage options, stores like IKEA, Target, and Walmart offer a variety of non-permanent solutions. Look for tension rods, over-the-cabinet organizers, rolling carts, and adhesive hooks—these are all renter-friendly and don’t require drilling. Product lines such as IKEA’s VARIERA and STÖDJA or Target’s Made By Design are affordable and popular for small kitchens and bathrooms.
When conducting the room-by-room inventory you suggest, how do you recommend prioritizing which clutter hotspots to address first if I only have a weekend to tackle a small space?
Start by focusing on the areas you use most each day, like entryways, kitchens, or living spaces. Tackle the most cluttered or disruptive spot first—often the one that limits movement or makes daily tasks harder. Prioritize quick wins, such as clearing surfaces or organizing high-traffic areas, to see immediate results and stay motivated through the weekend.
Once I’ve identified dead spaces and started adding storage, how do I avoid making my home feel cluttered or visually overwhelming? Do you have guidelines for keeping things organized and still stylish?
To keep your home feeling organized and stylish, focus on using storage that blends with your decor, like baskets, decorative boxes, or closed cabinets to hide clutter. Stick to a consistent color palette, and avoid overfilling shelves or surfaces. Regularly edit your belongings—only keep what you really use or love. Display a few favorite items, but store the rest out of sight to maintain a balanced, visually calm atmosphere.
The article mentions budget-friendly DIY projects for organizing small spaces. For someone who isn’t very handy, what are some simple first steps that don’t require tools or a lot of experience?
If you’re not comfortable with tools or DIY projects, there are still plenty of easy ways to get organized. Consider using storage bins, baskets, or drawer organizers that can be placed on shelves or under beds—no installation needed. Over-the-door hooks or hanging organizers are also simple options. Start by decluttering and grouping similar items together, then use these ready-made solutions to keep everything tidy and accessible.
I like the idea of using the space above doors and behind doors for storage, but do you have suggestions on how to add shelves or hooks there without damaging the walls or doors too much? I’m renting, so I want something reversible.
For renters, tension rods or over-the-door organizers are great non-permanent options. You can place tension rods above doors and use them to hold lightweight baskets or storage bins. Over-the-door shelves and hooks simply hang over the top of the door, requiring no installation or drilling. Both solutions are easily removable and shouldn’t damage walls or doors when it’s time to move out.
When you’re talking about taking a room-by-room inventory, do you have any strategies or checklists for figuring out what to actually keep versus what to store away, especially if you’re on a tight budget or have sentimental stuff?
When taking a room-by-room inventory, start by sorting items into categories: keep, donate, store, or toss. Focus on what you use regularly and what truly adds value to your daily life. For sentimental items, limit yourself to a set number of meaningful pieces per room. For tight budgets, use clear bins or labeled boxes for storage, and revisit your inventory every few months to reassess.
I’m curious about vertical storage—have you found any issues with wall-mounted shelving in rental apartments, especially regarding the need to avoid damaging walls? Any tips for renters?
Wall-mounted shelving can be tricky in rentals due to restrictions on drilling or leaving large holes. Many renters use adhesive hooks or tension rods to create shelves or hanging storage without permanent changes. If you must drill, try to use existing holes or opt for small anchors, and always patch holes before moving out. Freestanding tall shelves or ladder shelves are also great vertical options that won’t damage walls.
I noticed you mentioned using the space above doors and under furniture for storage. Do you have any specific product recommendations or DIY ideas that work well for maximizing those areas, especially in rentals where I can’t make permanent changes?
For above-door storage in rentals, consider over-the-door shelves or racks that hook onto the doorframe without any drilling. For under furniture, try slim rolling bins or fabric storage drawers that easily slide out from under beds or sofas. DIY options include using stackable boxes with lids or repurposing shallow baskets. All these ideas are non-permanent and can be removed when you move out.
You mention wall-mounted shelving as an underused option, but are there affordable or DIY shelving ideas that work well for renters or people on a tight budget? Most of the options I see online get pricey or need power tools.
Absolutely, there are renter-friendly and budget-conscious shelving ideas that don’t require power tools. Consider using adhesive wall shelves, which stick on and remove cleanly. Tension rod shelves can fit between walls or inside closets without drilling. You can also repurpose crates or sturdy boxes stacked and secured with zip ties for flexible, affordable storage. All of these options avoid damaging walls and are easy to take with you if you move.
For people on a tight budget, which DIY storage projects have you personally tried that made the biggest impact in reducing clutter, especially in entryways or small kitchens?
One of the most effective DIY projects I’ve done is creating wall-mounted racks with inexpensive hooks and shelves in the entryway—perfect for keeping bags, keys, and shoes organized. In the kitchen, using tension rods inside cabinets for holding cleaning sprays or small baskets for snacks really helped free up counter space. Both options are budget-friendly and easy to install.
The article talks about doing a room-by-room inventory. About how much time should I expect to spend on this process for a small two-bedroom home, and do you have tips for keeping it organized?
For a small two-bedroom home, doing a thorough room-by-room inventory typically takes about 2 to 4 hours, depending on how much you have in each space. To keep it organized, tackle one room at a time with a notebook or digital list, and group items by category like clothes, books, or kitchenware. Label boxes or storage bins as you go, and consider taking quick photos to help remember where things are stored.
When considering vertical storage like wall-mounted shelving, are there particular weight limits or installation tips to keep in mind for renters who can’t make permanent changes?
For renters, it’s important to check the weight limits of wall-mounted shelving, as most are designed for light to moderate loads (generally up to 20-30 pounds per shelf). Use adhesive hooks or tension rod shelving systems if you can’t drill into walls. Always follow the manufacturer’s instructions and distribute weight evenly. If you must anchor shelves, consider removable wall anchors or ask your landlord for permission first.
When you mention vertical storage like wall-mounted shelving, do you have recommendations for products that work well in rentals where I can’t drill into the walls? Are there any strong adhesive options or freestanding alternatives?
Absolutely, for rentals where drilling isn’t allowed, consider tension pole shelving units that use floor-to-ceiling pressure instead of screws. Strong adhesive shelves like those with Command strips can hold lightweight items and are easy to remove later. Freestanding shelving units or ladder-style shelves are also great since they don’t require any installation and can be moved easily if needed.
When taking a room-by-room inventory as suggested, how do you recommend deciding what should be stored out in the open versus tucked away in hidden compartments or closed cabinets?
When taking a room inventory, think about how often you use each item and whether it adds to the room’s look. Items you use daily or that enhance your decor, like attractive dishes or books, can be displayed openly. Things you use less often or that create visual clutter, such as seasonal gear or paperwork, are best stored out of sight in cabinets, drawers, or hidden compartments.
You mention taking a room-by-room inventory and measurements as a starting point. How often should I reassess my storage setup? Is it best to do this seasonally, or just when I notice things piling up?
It’s helpful to reassess your storage setup at least once or twice a year, such as during spring cleaning or before the holidays, since that’s when routines and belongings tend to change. However, if you notice clutter building up or your storage areas getting crowded, that’s a good sign to do a mini review sooner. Regular check-ins help keep things manageable without becoming overwhelming.
When you mention measuring areas like above doors and beneath furniture for storage, do you have any tips for accurately sizing and selecting the right products, especially for older homes with unusual dimensions?
For older homes with unique dimensions, use a tape measure to note both width and height of the areas you want to utilize. Always measure twice for accuracy and account for any trim or molding that might affect fit. When shopping for storage solutions, look for adjustable or customizable products, or consider modular options that can be trimmed or stacked to suit your space.
When doing a room-by-room inventory to address clutter hotspots, do you suggest tackling one area at a time or decluttering the whole house in stages? What’s proven more effective for busy families trying not to get overwhelmed?
Tackling one area at a time is usually more effective, especially for busy families. Focusing on a single room or hotspot lets you see quick progress without feeling overwhelmed. Trying to declutter the whole house at once can be daunting and harder to fit into a busy schedule. Small, focused sessions tend to build momentum and keep things manageable.
You mention taking measurements of underutilized areas like above doors and beneath furniture. What are some practical storage products or DIY solutions for these specific spots that won’t damage walls or require permanent installation, especially for renters?
For above doors, consider tension rod shelves or lightweight over-the-door racks that don’t require drilling. For space under furniture, low-profile bins or rolling drawers work well and can slide in and out easily. Adhesive hooks or Velcro strips are also handy for mounting small baskets or organizers without damaging walls—perfect for renters looking for temporary storage solutions.
You mention using the space above doors and behind doors as potential storage areas. Are there specific products or DIY solutions that work best in these spots, especially if renting limits what I can install permanently?
For above-door storage, consider tension rod shelves or lightweight over-the-door racks that don’t require drilling. Behind doors, over-the-door hooks, fabric organizers, or shoe racks are renter-friendly and won’t damage walls. Command hooks or adhesive strips can add hanging storage without leaving marks. These solutions are easy to install and remove when you move out.
When you talk about identifying ‘dead spaces’ like behind doors or under stairs, what’s the best way to keep those areas organized and accessible, especially for things you use regularly?
To keep dead spaces organized and accessible, use open shelving or labeled baskets so you can easily see and reach your items. For spaces like under the stairs, consider pull-out drawers or rolling carts that slide out smoothly. Behind doors, over-the-door organizers or hooks work well for frequently used items. Keeping everything visible and within easy reach makes it much more practical for daily use.
Could you give some examples of budget-friendly DIY storage projects that don’t require owning a lot of tools or previous experience? I like the idea of maximizing space but don’t want to invest in expensive equipment just to get started.
Absolutely! You can create budget-friendly storage by using items like stackable plastic bins, adhesive wall hooks, or hanging organizers for closets and doors. Try repurposing old crates or sturdy boxes as under-bed storage or open shelving. Shoe racks can double as organizers for pantry or cleaning supplies, and tension rods can be used inside cabinets for extra hanging space. All these options require minimal tools and are beginner-friendly.
If I’m on a really tight budget, are there any particular DIY tricks or affordable products you suggest for creating hidden compartments or maximizing space in places like hallways or bathrooms?
For tight budgets, try using over-the-door organizers in bathrooms or hallways for extra storage. Floating shelves or wall hooks can also make use of vertical space. In hallways, you can mount narrow shelves or use slim shoe cabinets with hidden compartments. Repurposing baskets or bins under sinks or benches works well for storage without major expense. Simple DIY options like adding hooks inside cabinet doors or using stackable containers can make a big difference.
When taking a room-by-room inventory, how do you suggest prioritizing which clutter hotspots to tackle first if I have both limited time and budget?
Start by focusing on the areas you use most often, like your entryway, kitchen, or bedroom. Prioritize spots where clutter interferes with daily activities or causes the most frustration. Tackle one small hotspot at a time, such as a countertop or a closet shelf, so you can see quick progress and stay motivated without feeling overwhelmed or overspending.
For small kitchens specifically, you suggest utilizing underutilized spots and vertical storage. Are there any affordable products you recommend for renters who want extra pantry space, but can’t drill into the walls?
For renters looking to add pantry space without drilling, consider freestanding shelving units or slim rolling carts that fit between appliances. Over-the-door organizers can hang on pantry or cabinet doors for extra storage. Stackable bins and baskets work well on existing shelves or countertops and can be easily moved when you relocate.
After assessing each room as suggested, how do you prioritize which clutter hotspots to tackle first? I always get stuck deciding between the entryway chaos and the overflowing kitchen cabinets.
It can be tricky to choose where to begin, but try starting with the area that causes the most daily frustration or disrupts your routine the most. For many people, the entryway is a great first step because a tidy entrance sets a calmer tone for the whole home. Once that’s under control, move on to kitchen cabinets or other high-traffic spots. Tackle one hotspot at a time to keep the process manageable.
What’s a good first step if I’m feeling overwhelmed and my entryway is already overflowing with shoes and bags? Do you suggest clearing everything out first or adding new storage even before decluttering?
When your entryway feels overwhelming, it’s best to start by clearing out the space before adding new storage. Take everything out so you can see what you actually use and what can be donated or relocated. Once you’ve sorted and only kept what’s necessary, you’ll have a better sense of what kind of storage or organizational tools you really need for that area.
I like the idea of room-by-room decluttering, but what tips do you have for organizing items that get used in multiple rooms, like cleaning supplies or small electronics, without them ending up as clutter again?
For items like cleaning supplies or small electronics that move between rooms, try using portable storage solutions such as caddies, baskets, or rolling carts. Assign each category a dedicated container and store it in a central, easily accessible spot. After using them, make it a habit to return items to their assigned place. Labeling containers also helps everyone know where things belong, minimizing the chance of clutter.
How expensive are some of the specialized products or DIY projects you recommend? We’re on a tight budget and want to avoid hidden costs, so any cost breakdowns or affordable alternatives would be helpful.
Many specialized storage products, like modular shelves or under-bed drawers, can range from $30 to $100 each depending on size and material. DIY options, such as wall-mounted hooks or repurposed crates for shelving, usually cost much less—often under $20 in materials. For an affordable approach, try using baskets, over-the-door organizers, or secondhand furniture, which can be found at thrift stores. These alternatives keep costs low while still helping maximize your space.
For the spaces you mentioned like above doors or under furniture, are there specific storage solutions you recommend that don’t require permanent installation or altering the structure, especially for renters?
For renters or anyone avoiding permanent changes, try using over-the-door organizers for above-door storage—these hang directly on the door and are easy to remove. For under furniture, look for rolling storage bins or shallow baskets that slide out easily. Stackable boxes and collapsible containers also fit well under beds or sofas, keeping things organized without any installation.
I noticed the article suggests using vertical space, like wall-mounted shelving, but how do you recommend doing this safely in homes with young kids who might try to climb shelves?
To use wall-mounted shelving safely around young children, choose shelves that are installed well above their reach and make sure they’re securely anchored into wall studs, not just drywall. Consider using closed cabinets rather than open shelves, or use shelving only for lightweight items. Always avoid placing tempting objects or toys on higher shelves to discourage climbing.
For renters on a tight budget, which storage hacks from your list offer the best balance between cost and practicality without making permanent changes to the apartment?
For renters, some of the most practical and budget-friendly storage hacks include using over-the-door organizers for shoes or toiletries, incorporating stackable bins or baskets in closets, and opting for under-bed storage containers. Floating shelves with removable adhesive strips can also add space without leaving marks. These options maximize storage while being easy to remove when you move out.
I noticed you mentioned utilizing the space above doors and under furniture. Are there any products or DIY ideas that maximize these spots without making the area look cluttered?
Absolutely! For above-door space, slim shelves or floating cabinets work well and keep items neatly organized—just choose designs that match your decor for a cohesive look. Under furniture, low-profile rolling bins or fabric storage baskets can slide under beds or sofas, keeping things out of sight. Opt for containers with clean lines and neutral colors to prevent the area from appearing cluttered.
The article talks about decluttering and doing a room-by-room inventory. How often do you suggest repeating that process, and any advice for sticking to it if you’re short on time or get overwhelmed?
Doing a room-by-room inventory and decluttering every 3 to 6 months works well for most people. If you’re short on time or feel overwhelmed, try focusing on just one small area—like a drawer or shelf—each week. Setting a timer for 15 minutes can make it feel less daunting. Keeping a donation box handy also helps make the process ongoing without feeling like a big project.
When taking a room-by-room inventory as suggested, how do you recommend prioritizing which items to store out of sight versus which to keep easily accessible, particularly in entryways with limited space?
In entryways with limited space, prioritize keeping items you use daily—like keys, jackets, and shoes—easily accessible. Store out of sight anything that is seasonal, rarely used, or just for guests. Consider small baskets or wall hooks for essentials, while less-used items can be stored in bins or on higher shelves to keep clutter at bay.
I noticed you recommend budget-friendly DIY projects for optimizing storage. Are there any materials or tools you’d suggest avoiding for beginners, or any you’ve found especially practical for easy custom builds in older homes with odd-shaped spaces?
For beginners, it’s usually best to avoid heavy-duty power tools like table saws or complicated joinery unless you’re comfortable with them. Stick with simple hand tools, a cordless drill, a stud finder, and a reliable measuring tape. Plywood, MDF, and adjustable shelving kits are practical materials for custom builds, especially in older homes with unusual spaces, since they’re easy to cut and adapt. Avoid overly cheap particle board, as it’s less durable and can be tricky to anchor securely in older walls.
Could you share more about how to measure tricky spaces, like above doors or under furniture, to ensure new storage solutions actually fit without making things look cluttered?
To measure tricky spaces, use a tape measure to get the height, width, and depth, noting any obstacles like trim or hinges. For areas above doors, measure from the top of the door frame to the ceiling and side to side. Under furniture, check the clearance height and depth. Sketch the space and jot down these dimensions. When choosing storage, pick items that are slightly smaller than your measurements to keep things tidy and prevent a cluttered look.
When you talk about taking measurements of underutilized spots like beneath furniture, are there specific types of ready-made storage products you recommend for those spaces, or are custom solutions usually better?
For underutilized spaces like beneath beds, sofas, or cabinets, there are plenty of ready-made storage options available, such as rolling bins, low-profile drawers, or flat storage boxes. These can fit well if standard sizes match your space. However, if you have unique furniture dimensions or very tight spaces, custom solutions like made-to-measure drawers or built-in cubbies might maximize the available area even further.
If I wanted to start with just one area, like the entryway, how long does it usually take to implement some of these smart storage ideas? I’m wondering if I could handle it in a weekend or if it’s a longer process.
Focusing on the entryway is a great place to start, and many smart storage solutions for that area—like installing hooks, adding a small bench with storage, or setting up shelves—can typically be finished in a weekend. Most projects involve basic assembly and organizing, so with some planning ahead, you should be able to complete the makeover in a day or two.
When using wall-mounted shelving in rented spaces, what are some damage-free installation methods or products that actually hold up over time without permanent alterations?
For wall-mounted shelving in rentals, consider using adhesive strips or hooks specifically designed for heavier loads, such as those from well-known brands that advertise damage-free removal. Tension pole shelving units are another solid choice since they don’t require any wall holes. Always check the weight limits and follow instructions to ensure long-lasting support without causing damage to your walls.
Can you give some specific examples of budget-friendly DIY storage projects that work well in rental apartments where I can’t make permanent changes? I’m interested in solutions that are easy to install and remove.
You might find over-the-door organizers useful for shoes, cleaning supplies, or pantry items, since they hang easily and leave no marks. Freestanding shelves or stackable cube units are another flexible option—they don’t require drilling and can be moved around. Tension rods work well for hanging extra storage baskets in closets or under sinks. Adhesive hooks and removable wall-mounted baskets can add vertical storage without damaging walls.
For DIY projects aimed at creating hidden compartments or vertical storage, what kind of skill level and tools are usually needed? I’m new to DIY and want to avoid projects that require major power tools or advanced skills.
For beginners, many hidden compartment and vertical storage projects can be completed using basic tools like a hammer, screwdriver, measuring tape, and a hand saw. Look for ideas such as floating shelves, under-bed storage bins, or behind-the-door organizers, which usually only need simple assembly. Avoid complex built-ins or anything that involves cutting into walls, as these often require advanced skills and power tools.
When doing the initial room-by-room inventory, how much time should I plan to set aside for measuring and listing items if my schedule is already packed with work and kids’ activities?
For a busy schedule, try setting aside 30 minutes per room over a few days rather than doing the whole inventory at once. Focus on one room at a time, measuring and listing only the major items and storage needs. You can always add details later if needed. This approach keeps the task manageable without overwhelming your schedule.
You mention using wall-mounted shelving as a vertical solution, but I’m worried about damaging my apartment’s walls. Are there renter-friendly options that don’t require drilling, especially for heavier items like books?
Absolutely, there are renter-friendly shelving options that don’t require drilling. Look for sturdy tension pole shelves, which extend between the floor and ceiling and can hold a decent amount of weight. Freestanding ladder shelves are another good choice—they lean against the wall and offer vertical storage without attachments. For heavier books, make sure to pick units with solid construction and stable bases to prevent tipping.
When you talk about decluttering and taking inventory room by room, what’s the best way to prioritize which items to store, donate, or toss, especially if you’re short on time?
Start by quickly sorting items into three categories: keep, donate, or toss. Focus first on things you rarely use or haven’t used in the past year. As you move through each room, handle one small area at a time, like a drawer or shelf. Prioritize items that are broken, expired, or duplicates to toss or donate, and only store what you truly need or love.
You mentioned using the space above doors and under furniture for storage. Could you share some specific, easy-to-install products or DIY ideas for making the most of these tricky spots without damaging the walls or floors?
For above-door storage, consider tension rod shelves or lightweight, over-the-door shelves that hang securely without screws. For under furniture, look for low-profile rolling storage bins or fabric storage bags—these slide under beds or sofas easily and require no installation. If you’re into DIY, you can use decorative baskets with handles, or repurpose sturdy boxes with felt pads underneath to prevent floor scratches. These options let you boost storage without causing any damage.
When assessing clutter hotspots like entryways and bathrooms, I sometimes find it hard to decide what should be out versus hidden away. How do you strike a balance between accessibility and minimizing visual clutter in small spaces?
Finding the right balance comes down to prioritizing items you use daily versus those you need less often. Keep essentials—like keys, soap, or towels—easily accessible using trays, baskets, or open shelves. Store backup items and seldom-used belongings in closed cabinets, bins, or drawers. Rotating seasonal items and doing regular declutters helps maintain order without sacrificing convenience.
I noticed you mention taking measurements of underutilized areas like above doors or under furniture. Can you give some practical tips on how to actually install storage in those spots, especially if I’m not experienced with tools?
Absolutely! For above-door storage, consider buying ready-made floating shelves with simple mounting hardware and clear instructions—they often need just a screwdriver. For under furniture, look for rolling bins or drawers that don’t require installation. Adhesive hooks can add small storage under shelves. Measuring carefully before buying is key, and you can often find beginner-friendly options that avoid drilling or heavy tools.
For someone who’s never installed wall-mounted shelving before, how difficult is it to do yourself, and are there specific tools or hardware I should plan on buying for a basic setup?
Installing wall-mounted shelving is a manageable DIY project for most beginners. You’ll need basic tools like a drill, level, stud finder, measuring tape, screwdriver, and potentially wall anchors if you can’t find studs. Most shelving kits include the necessary brackets and screws. Take your time measuring and marking for accuracy, and always check that the shelves are level before drilling. Reading the instructions thoroughly will also help make the process smoother.