

Introduction: Why Replacing Old Caulk Matters
Old, cracked, or discolored caulk is more than just an eyesore—it’s an open invitation for water intrusion, mold growth, and even costly structural damage. Whether it’s the seam between your bathtub and tile, or the gap around your window frames, failed caulk can silently undermine your home’s integrity. Yet, many homeowners overlook this simple but crucial maintenance task, assuming it’s either too trivial or too tricky to tackle themselves. The reality? Replacing caulk is one of the most impactful, cost-effective DIY projects you can do to protect your investment, improve energy efficiency, and keep your living spaces fresh and healthy.
This in-depth, step-by-step guide demystifies the entire process of removing and replacing caulk—focusing specifically on windows and tubs, two of the most vulnerable areas in any home. You’ll learn how to identify when caulk needs attention, what tools and materials deliver the best results, and how to apply new caulk for a watertight, professional-grade finish. Whether you’re a first-timer or looking to level up your technique, this guide has you covered with practical tips, troubleshooting advice, and maintenance best practices. Let’s get started and banish those leaks, drafts, and mildew for good.
How to Spot Caulk That Needs Replacing
Common Signs of Failing Caulk
- Cracks and Gaps: Visible splitting or separation from the surfaces.
- Discoloration: Yellowing, browning, or black mold/mildew staining the caulk line.
- Peeling or Lifting: Edges of the caulk pulling away, leaving gaps.
- Persistent Drafts or Dampness: Feeling cold air, noticing condensation, or finding moisture damage near windows or tubs.
Why Timely Replacement Is Critical
Delaying caulk replacement can lead to leaks, energy loss, wood rot, and mold growth behind surfaces. Regular inspections—at least twice a year—can catch issues early.
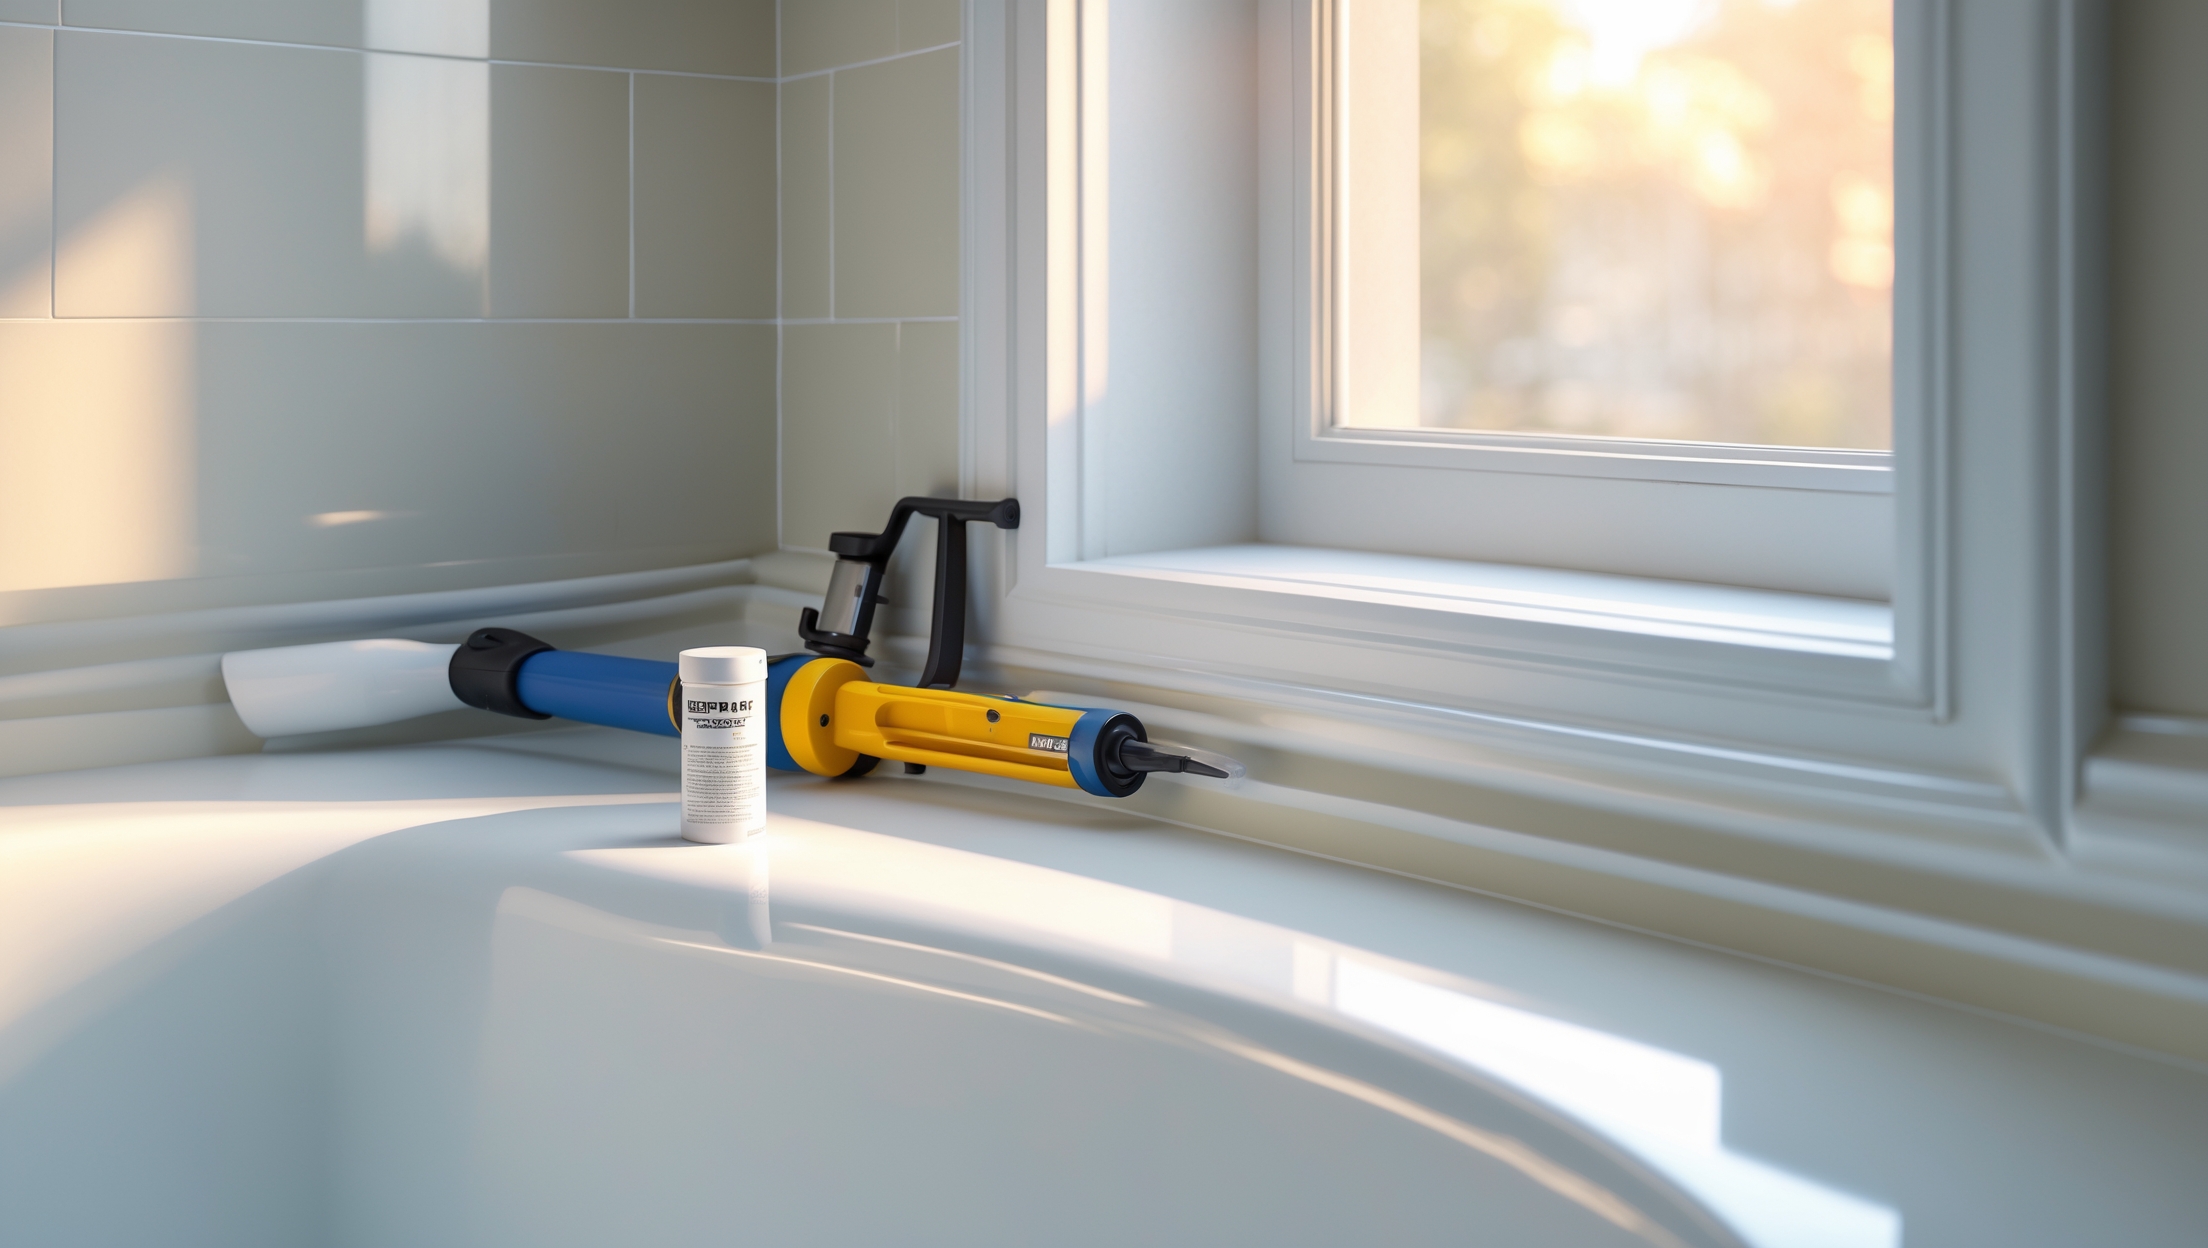
Essential Tools and Materials: What You’ll Need
- Utility knife or specialized caulk removal tool
- Plastic scraper or putty knife
- Rubbing alcohol or mineral spirits
- Cleaning rags or paper towels
- Painter’s tape (for crisp lines, optional but recommended)
- Vacuum or brush (to clear dust/debris)
- High-quality caulk (Silicone for baths, windows; Acrylic latex for painted areas)
- Caulk gun (for standard tubes)
- Disposable gloves
- Bowl of water and dish soap (for smoothing, if using latex caulk)
Step 1: Removing Old Caulk—The Right Way
Safety First
Wear gloves to protect against mold, mildew, and sharp tools. If you suspect mold, use a mask and ventilate the area well.
Softening Stubborn Caulk
Most old caulk can be removed dry, but if it’s especially hard, apply a commercial caulk remover gel and let it sit per instructions.
Cutting and Scraping
- Score along both edges of the old caulk with a utility knife or caulk remover tool.
- Gently pry up a section with a plastic scraper or putty knife and peel away as much as possible.
- Repeat until the joint is free of old caulk; remove lingering bits with the scraper.
Cleaning the Surface
- Wipe the area with rubbing alcohol or mineral spirits to remove residue and soap scum.
- Allow the area to dry completely—moisture will prevent new caulk from adhering properly.
- Use a vacuum or brush to clear dust and debris.
Step 2: Surface Prep for Long-Lasting Results
- Inspect for damage (e.g., rot, loose tiles) and repair before recaulking.
- For tubs, fill with water to slightly flex the joint—this prevents caulk from cracking later.
- Apply painter’s tape along both sides of the joint, leaving a gap as wide as you want your caulk bead (typically 1/8″ to 1/4″).
Step 3: Choosing and Applying the Right Caulk
Which Caulk Should You Use?
- 100% Silicone: Best for wet areas (tubs, showers, window exteriors). Highly waterproof and flexible, but can’t be painted.
- Acrylic Latex (Painter’s Caulk): Good for dry, paintable joints like window interiors. Easier to work with but less flexible.
- Siliconized Latex: Combines paintability with some water resistance—suitable for window interiors near kitchens or baths.
Loading the Caulk Gun
- Cut the tip of the caulk tube at a 45-degree angle with a sharp utility knife.
- Pierce the inner seal (most tubes have a puncture tool in the handle of the caulk gun).
- Load the tube into the gun, ensuring a snug fit.
Applying a Smooth, Even Bead
- Hold the gun at a 45-degree angle to the joint.
- Pull the trigger steadily, moving the gun smoothly along the seam.
- Aim for a continuous bead; don’t stop and start.
- If you over-apply, don’t worry—excess can be smoothed out or removed.
Smoothing the Caulk
- For latex caulk, dip your finger in soapy water and run it along the bead for a smooth finish.
- For silicone, use a caulk finishing tool or a gloved finger; avoid excess water.
- Remove painter’s tape while the caulk is still wet, pulling away from the joint for a crisp line.
Step 4: Drying, Curing, and Cleanup
- Allow caulk to cure as directed (usually 24 hours for silicone, less for latex).
- Avoid getting the area wet until fully cured—this ensures a long-lasting seal.
- Clean tools immediately; dried caulk is much harder to remove.
- Dispose of old caulk and cleaning materials safely, especially if mold is present.
Pro Tips for a Professional Finish
- Work in sections no longer than 3–4 feet at a time to prevent the caulk from skinning over before smoothing.
- Keep a damp rag handy to wipe up mistakes or stray caulk instantly.
- Use colored caulk to match grout or trim for a seamless look.
- Practice on a scrap surface if you’re new to caulking—technique improves fast with a little repetition.
Troubleshooting: Common Problems and Fixes
Bubbles or Gaps
These occur when air gets trapped or caulk isn’t pressed into the joint. Remove the affected section and reapply, pressing firmly.
Uneven Bead
Too much or too little pressure causes this. Move slowly and keep constant pressure on the trigger. Use painter’s tape to guide the bead width.
Caulk Not Sticking
This is usually due to dampness, dust, or soap residue. Clean and dry the area thoroughly before applying new caulk.
Maintenance Best Practices
- Inspect caulked joints around windows and tubs every 6 months for cracks or discoloration.
- Keep areas well-ventilated to reduce mold and mildew growth, especially in bathrooms.
- Clean caulk lines with a mild detergent—avoid harsh chemicals that can degrade the caulk.
- Address leaks or drafts promptly to prevent water damage and costly repairs.
When to Call a Professional
While most caulking jobs are DIY-friendly, call a pro if you notice:
- Extensive mildew or mold behind or under caulked surfaces
- Persistent leaks after recaulking
- Structural damage (rot, soft spots, crumbling tiles or trim)
- High or hard-to-reach areas (e.g., second-story windows)
Conclusion: The Value of Replacing Old Caulk
Replacing old caulk around your windows and tubs isn’t just about appearances—it’s a proactive strategy for protecting your home against leaks, drafts, mold, and hidden deterioration. With the right tools, materials, and careful attention to each step, even novice DIYers can achieve durable, attractive results that rival the pros. This relatively quick project pays real dividends, from improved energy efficiency and healthier indoor air to peace of mind knowing your home is sealed tight against the elements.
Remember, the keys to success are meticulous removal, thorough cleaning, and using the appropriate caulk for each location. Don’t rush—take time to tape off straight lines and smooth the bead for a flawless finish. Regular inspections and timely touch-ups will keep your caulk in top shape, reducing the risk of extensive repairs down the line. If you encounter more serious issues or feel uncertain at any stage, don’t hesitate to consult an expert. But for most homeowners, this is a satisfying, confidence-building project that can be completed in a single weekend. Give your home the protection it deserves and enjoy the fresh, clean look of perfectly sealed windows and tubs for years to come.
You mentioned doing regular inspections twice a year for failing caulk. Is there a specific season or weather condition that is best for removing and applying new caulk around windows?
The best time to remove and apply new caulk around windows is during mild, dry weather—typically in spring or early fall. Temperatures between 50 and 80 degrees Fahrenheit help caulk cure properly. Avoid working during rainy or very humid conditions, as moisture can prevent the new caulk from adhering and drying well.
What should I do if, after re-caulking my window, I still notice a persistent draft? Is it likely an issue with my technique, the type of caulk, or could it mean there’s a larger problem with my window installation?
If you still feel a draft after re-caulking, it could be due to a few reasons. Sometimes, missed gaps or improper adhesion can let air through, so double-check your caulking for any spots that may need touch-ups. If the caulk is intact and you used the right type for windows, the draft might be from a bigger issue like gaps in the window frame or poor insulation. In that case, you may want to have a professional assess your window installation.
Your guide mentions energy efficiency improvements from new caulk. Do you have any practical tips for small business owners on which type of caulk offers the best insulation for older, drafty windows?
For older, drafty windows in small businesses, polyurethane or high-quality silicone caulk is often the best choice for insulation. Both types create a strong, flexible, and weather-resistant seal. Make sure to use caulk labeled for exterior use around windows, and consider one with added insulation properties. Always clean the surfaces thoroughly before applying for the best result.
How long should I expect the whole process to take for a beginner doing both a standard bathtub and two average-sized windows in a single day? Should I set aside an entire weekend or can this be done in a few hours with breaks?
For a beginner, replacing caulk around a bathtub and two windows will likely take most of a day, especially with breaks and cleanup. Expect about 1–2 hours per window and 2–3 hours for the bathtub. It’s possible to finish in one day, but if your old caulk is stubborn or you want to work carefully, consider setting aside the whole weekend just in case.
Can you suggest any specific budget-friendly tools for removing stubborn old caulk without damaging tub enamel or window frames, especially for someone tackling this as a first DIY project?
For a first-time DIY project, a plastic caulk removal tool is both affordable and gentle on surfaces like tub enamel or window frames. These tools usually cost just a few dollars at hardware stores. You can also use a plastic putty knife, which is inexpensive and less likely to scratch. Avoid metal blades, and consider a caulk softener gel to make removal easier and safer for delicate finishes.
The article mentions energy efficiency improvements from re-caulking windows. Can you provide any rough estimate of potential energy savings or how quickly faulty window caulk can lead to noticeable drafts or increased energy bills?
Replacing old or cracked caulk around windows can reduce air leaks and help maintain indoor temperatures, potentially saving you 5–10% on energy bills, depending on how leaky your windows were. Drafts from faulty caulk can become noticeable in just a few months, especially in extreme weather, and you might see a rise in heating or cooling costs soon after the caulk fails.
Can you clarify how to tell the difference between normal discoloration and actual mold on old caulk around a bathtub? I want to be sure I’m not overlooking a bigger issue if I just see yellowing instead of black spots.
Yellowing on caulk is usually just due to age, sun exposure, or cleaning product residue and tends to appear evenly across the surface. Mold typically looks like black, green, or brown spots that may be patchy or fuzzy and often develop in moist, poorly ventilated spots. If a spot doesn’t lighten after using a bleach-based cleaner, it’s more likely to be mold than just discoloration.
After re-caulking, how soon can I use my bathtub or open and close my windows without risking damaging the fresh caulk? The drying times always confuse me.
Drying times can vary based on the type of caulk you use. For most latex or acrylic caulks, you should wait at least 24 hours before using your bathtub or touching the caulked windows. For silicone caulk, 24 hours is usually safe, but check the label—some fast-drying versions set in 3–6 hours. Always follow the manufacturer’s instructions for best results.
I have some spots with mildew stains on my bathroom caulk. Before removing it, should I try treating the mold first, or is it better to just cut it out right away as the guide suggests?
If the mildew stains are only on the surface and the caulk is still in good condition, you can try treating the area with a mold and mildew cleaner first. However, if the caulk is cracked, peeling, or the stains persist after cleaning, it’s best to remove and replace the caulk as the guide suggests. This ensures a clean, long-lasting seal.
You mention that regular inspections are important. For a building that gets a lot of foot traffic, would you suggest sticking to the twice a year schedule or checking caulk more frequently to prevent water damage?
For buildings with heavy foot traffic, it’s a good idea to inspect caulk more often than just twice a year. Increased use can lead to faster wear and tear, so checking every three to four months is advisable. This helps catch any cracks or gaps early, reducing the risk of water damage and costly repairs down the line.
About the regular inspections you suggest, do you recommend any particular method or checklist for business owners like me to quickly check multiple windows and tubs in a property for caulk issues?
For business owners managing multiple windows and tubs, a simple checklist can make regular inspections efficient. Look for cracks, gaps, discoloration, mold, or peeling along the caulk lines. Gently press the caulk in a few spots to check for softness or detachment. It helps to carry a notepad or use a checklist app, noting locations needing repairs so you can address all issues in one go.
The article mentions needing certain tools and materials for the job, but as someone with a tight maintenance budget, are there any affordable alternatives that still get good results, or is it worth investing in premium products for high-traffic areas around tubs?
You can get good results using basic, budget-friendly tools like a utility knife, putty knife, and painter’s tape for caulk removal and application. When it comes to caulk itself, it’s best to invest a bit more in mold-resistant, waterproof varieties for tubs and showers, since these areas see a lot of moisture. For less exposed windows, standard latex or silicone caulk works well and is more affordable.
Are there any budget-friendly tools or substitutes you’d recommend for homeowners who might not already have a utility knife or specialized caulk removal tools on hand?
If you don’t have a utility knife or a specialized caulk removal tool, you can use a sturdy plastic putty knife or an old credit card to help scrape away old caulk. For cutting, a sharp kitchen paring knife can work in a pinch, but be careful to avoid scratching surfaces. These common household items can help you tackle the project without needing to buy extra tools.
How long should I expect the entire process to take for a standard bathroom tub? I need to plan this around my kids’ bath time, so knowing an average timeframe for removal and reapplication would be helpful.
For a standard bathroom tub, removing the old caulk and applying new caulk typically takes about 2 to 3 hours in total. Most of that time is spent carefully removing all the old caulk, cleaning the area, and allowing it to dry before applying the new bead. After re-caulking, it’s important to let it cure—most products need 24 hours before the area can get wet.
The article highlights using either a utility knife or specialized tools for caulk removal. If I’m on a tight budget, can I get by with just a basic utility knife, or are the specialized caulk removal tools really worth the investment?
A basic utility knife can definitely get the job done if you’re on a budget. Just take your time and work carefully to avoid scratching surrounding surfaces. Specialized caulk removal tools can make the process easier and a bit quicker, but they aren’t absolutely necessary for most DIY projects. If you’re careful, a utility knife should suffice.
Can you explain how often caulk around windows and tubs should be replaced on average? If I do regular inspections twice a year but don’t see obvious signs of damage, is there still a suggested replacement timeframe?
For most homes, caulk around windows and tubs typically lasts about 5 to 10 years, but this can vary based on exposure to moisture and movement. If you inspect twice a year and see no cracking, peeling, or gaps, you don’t need to replace it on a strict schedule—just keep up the inspections and replace the caulk whenever you spot signs of wear or water infiltration.
How much should I budget for replacing caulk in both my bathroom and a couple of windows? Are there any reasonably priced tools or kits you recommend for a one-time project?
For a basic caulk replacement in your bathroom and around a couple of windows, you should budget around $20 to $40. This covers a couple of tubes of good-quality caulk, a caulk gun, and a basic caulk removal tool. Many hardware stores offer affordable caulking kits that include all the essentials for a one-time project. Look for a kit with a removal tool, caulk gun, and smoothing tool for convenience and value.
If the old caulk is only slightly discolored but not cracked or peeling, is it still necessary to remove and replace it, or are there ways to clean or touch up the existing caulk for a fresher appearance without a full replacement?
If the caulk is just discolored but still intact, you don’t have to fully replace it. You can clean it using a mixture of bleach and water or a dedicated mildew remover to brighten it up. For minor touch-ups, you might apply a thin layer of new caulk over the old, but only if the old caulk is firmly attached and not peeling. Make sure the surface is clean and dry before applying anything new.
If I only have a few small cracks and not complete separation, can I patch just those spots or do I need to remove all the old caulk as the article suggests?
If the cracks in your caulk are small and the surrounding caulk is still well-adhered and in good condition, you can usually patch just those areas. Make sure to clean the surface thoroughly before applying new caulk to ensure it sticks well. However, if you notice signs of mold, major separation, or peeling, it’s best to remove all the old caulk for a longer-lasting repair.
If the caulk keeps cracking or peeling after I redo it, what could be causing that problem? Is there a step in the prep or application process I might be missing?
Cracking or peeling caulk is usually caused by poor surface preparation or using the wrong type of caulk. Make sure you remove all old caulk and thoroughly clean and dry the area before applying new caulk. Also, check that you’re using caulk suitable for the location (bathroom, exterior, etc.) and give it enough time to cure without disturbance. Applying caulk in a thick, even bead and smoothing it out can also help prevent issues.
How long should I plan to set aside for fully removing and re-caulking a standard bathroom tub, including drying times? I want to make sure I don’t rush the process and end up with leaks or poor adhesion.
For a standard bathroom tub, you should plan for about 3–4 hours to remove the old caulk, clean the area, and apply new caulk. After applying, allow at least 24 hours for the caulk to fully cure before using the tub or getting it wet. This timeline helps ensure proper adhesion and a watertight seal.
This mentions drafts near windows—if I recaulk them, will it actually help lower my energy bills, or is that mostly for stopping moisture? I’m trying to decide if it’s worth prioritizing.
Recaulking windows can absolutely help reduce drafts, which means your heating and cooling system won’t have to work as hard, potentially lowering your energy bills. While caulking does stop moisture, it’s also an important step for improving energy efficiency in your home. If you feel drafts around your windows, prioritizing recaulk is a smart move.
What’s the typical timeframe for a beginner tackling both a window and a tub in one weekend? I’m trying to schedule this project without underestimating how long it might take.
For a beginner, replacing caulk around both a window and a tub in one weekend is realistic. Expect to spend 2–3 hours per area, including removal, surface prep, application, and drying time between steps. Some caulks require 12–24 hours to fully cure, so plan your schedule to allow drying time before using the tub or window. Set aside most of a day for the hands-on work, then let everything cure overnight.
Could you explain a bit more about what kind of utility knife or specialized tool is best for removing old caulk without damaging my tile or window frame? I’m worried about scratching the surfaces.
For removing old caulk without scratching tile or window frames, a plastic caulk removal tool is a great choice—these are available at most hardware stores and are less likely to cause damage compared to metal blades. If you prefer a utility knife, choose one with a sharp, retractable blade and use it gently, keeping the blade parallel to the surface. Always work slowly and avoid using excessive pressure to protect your surfaces.
When you’re replacing caulk around tubs, is it necessary to completely remove every bit of the old caulk, or can you apply new caulk over any spots that are still in good shape?
It’s best to remove all of the old caulk before applying new caulk around tubs. Even if some areas look fine, old caulk can prevent the new layer from adhering properly and create spots where moisture can get in. Use a caulk remover tool or a utility knife to carefully take out all the old material, clean the surface, and then apply fresh caulk for the best seal.
If I accidentally damage the surface beneath the old caulk when removing it, what’s the best way to repair minor chips or gouges before applying new caulk around windows or tubs? Any products or tips that work well for this situation?
If you accidentally chip or gouge the surface while removing old caulk, start by cleaning the area to remove dust and debris. For tubs or tiles, use a waterproof patching compound or epoxy filler. For wooden window frames, a wood filler works well. After filling, let it dry completely, sand it smooth, and ensure the surface is level before applying new caulk. This creates a strong, even base for the new seal.
If I’m on a tight budget, are there any essential tools I can substitute with basic household items when removing old caulk, or are the specialized tools really necessary for good results?
You can definitely substitute some specialized tools with household items if you’re on a budget. A sturdy plastic putty knife, old credit card, or even a flathead screwdriver can help scrape off old caulk. For smoothing new caulk, your finger or a plastic spoon works well. Just be careful not to scratch surfaces, and take your time for the best results.
After re-caulking, how long should I wait before using the tub or exposing the area to water? I want to avoid damaging the new seal but also minimize disruption.
It’s best to wait at least 24 hours before using the tub or letting water come into contact with the freshly applied caulk. Some fast-drying caulks may be ready in 12 hours, but 24 hours is safest to ensure a watertight seal and prevent premature damage. Always check the manufacturer’s directions on the caulk packaging for the most accurate drying time.
Is it possible to recaulk over old caulk in a pinch, or is full removal always necessary? Sometimes the old stuff is really difficult to get out, especially in tight corners around tubs.
While it’s best to fully remove old caulk before applying new, you can recaulk over old caulk in a pinch if the existing caulk is still well-adhered and free from mold or damage. However, the new caulk may not adhere as well or last as long. In tough corners, try to remove at least as much as possible to ensure a better seal.
What should I do if new caulk starts peeling or lifting soon after application? Are there common mistakes that cause this, or certain surfaces that need extra prep before re-caulking?
If new caulk starts peeling or lifting soon after application, it’s often due to improper surface preparation or applying caulk to damp or dirty areas. Make sure all old caulk is removed, and clean the surface thoroughly, removing dust, soap residue, and moisture before re-caulking. Glossy or non-porous surfaces may also need light sanding for better adhesion. Allow the area to dry completely, and follow manufacturer instructions for the caulk you are using.
In the tools section, do you recommend using a caulking gun for both windows and tubs, or are there situations where one type of applicator works better than another for beginners?
A caulking gun works well for both windows and tubs, especially for standard caulk cartridges. For beginners, squeeze tubes can be easier to control in tight spaces or for small touch-ups, like around a bathtub edge. However, for larger jobs or longer seams, a caulking gun gives more consistent results. Choose based on the job size and your comfort level.
The article suggests regular inspections twice a year—what are the signs that indicate an urgent need for replacement versus small issues that can wait a while longer?
Signs that call for urgent caulk replacement include visible cracks, gaps, peeling, or mold growth, as well as any spots where water is clearly leaking through. These issues can lead to water damage if not addressed quickly. Minor discoloration, slight shrinkage, or surface dirt usually aren’t emergencies and can be monitored until your next inspection, but keep an eye out for any worsening.
If my shop is only closed one day a week, how long does the caulk around a window or tub typically take to cure before it’s safe to use the area or open up for business again?
Most caulks need about 24 hours to fully cure, though some fast-drying varieties may be ready in 4 to 6 hours. For best results, check the product label, but planning for a full day of closure is usually safe. This ensures the caulk sets properly and resists moisture when you reopen your shop.