

Introduction: Why Seasonal Roof Inspections Matter
Your roof stands as the primary barrier between your home and the elements, yet it’s often ignored until a leak or visible damage occurs. Routine seasonal inspections are a critical, but frequently overlooked, part of home maintenance. By systematically checking your roof at least twice a year—ideally in spring and fall—you can catch problems early, prevent expensive water damage, and extend the lifespan of your roofing materials. This guide provides a detailed, actionable checklist to help homeowners of all experience levels inspect their roofs safely and thoroughly. You’ll learn what to look for, which tools to use, and how to address minor issues before they escalate into major repairs. Whether you’re preparing for heavy rains, snow, or summer heat, a little preventative maintenance goes a long way in protecting your most valuable investment—your home.
Understanding the Risks: What’s at Stake with Neglected Roofs?
Many homeowners underestimate the risks associated with skipping roof inspections. Over time, small issues—like a missing shingle, clogged gutter, or cracked flashing—can lead to significant structural damage. Water infiltration doesn’t just affect the exterior; it can undermine insulation, promote mold growth, and even damage electrical systems within your home. The cost of emergency repairs far exceeds the time and modest expense of routine inspections. Regular maintenance can also preserve your roof’s warranty and improve your home’s resale value.
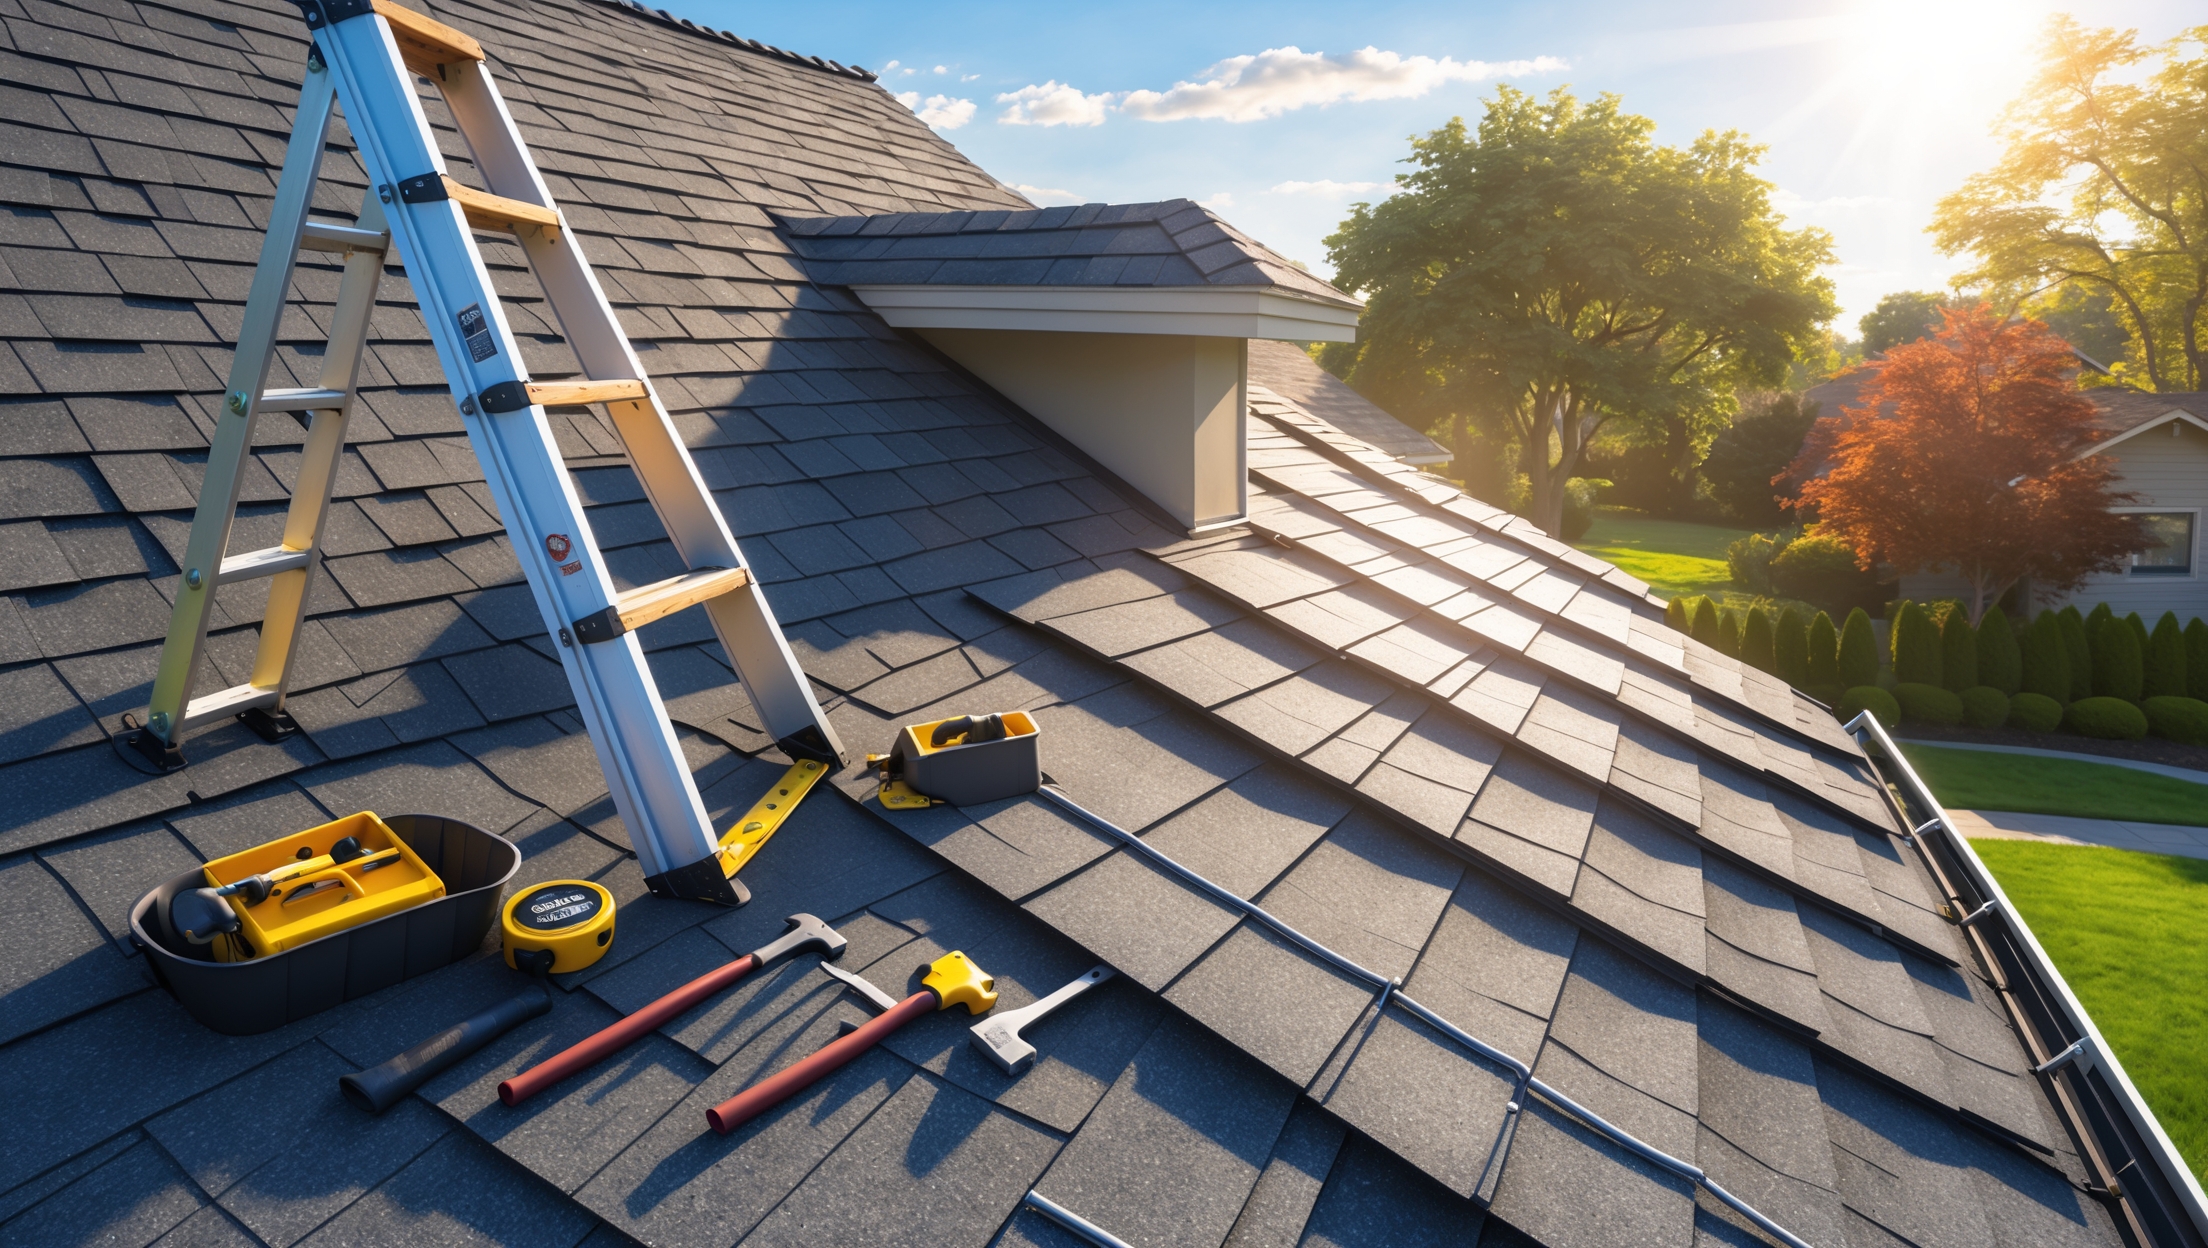
Tools and Safety Gear for Effective Roof Inspections
- Sturdy ladder: Choose a ladder tall enough to reach the roof safely without overreaching.
- Non-slip shoes: Wear footwear with good traction to prevent slipping.
- Work gloves: Protect your hands from sharp edges and debris.
- Binoculars: Helpful for ground-level inspections if you’re not comfortable climbing.
- Roofing harness: If inspecting steep or high roofs, always use a safety harness.
- Flashlight: Useful for checking attics and dark corners.
- Notebook or inspection app: Document findings for future reference.
- Caulk or roofing cement: For minor, immediate repairs.
Seasonal Roof Inspection Checklist
1. Ground-Level Assessment
- Examine overall roofline: Check for unevenness, sagging, or visible dips.
- Look for missing or damaged shingles: Use binoculars to spot curling, cracked, or missing sections.
- Inspect gutters and downspouts: Ensure they are securely attached and not overflowing or clogged.
- Check for moss or algae: Green patches may indicate moisture retention and potential shingle decay.
- Spot debris accumulation: Leaves or branches can trap moisture and accelerate deterioration.
2. On-the-Roof Inspection (If Safe)
- Shingles: Walk carefully and check for loose, buckled, blistered, or missing shingles. Replace any that are compromised.
- Flashing: Inspect metal flashing around chimneys, vents, and skylights for rust, cracks, or separation from the roof surface. Reseal or replace as needed.
- Sealant and Caulking: Look for cracking or peeling around penetrations; reapply high-quality roofing sealant if necessary.
- Roof Valleys: Ensure valleys are clear of debris and shingles are securely fastened, as these are prime leak zones.
- Soffits and Fascia: Check for signs of rot, water stains, or animal intrusion.
- Drip Edge: Make sure the metal edging along eaves is intact and not bent or corroded.
3. Attic and Interior Inspection
- Water stains: Look for discoloration on rafters, insulation, or ceilings—possible indicators of leaks.
- Mold or mildew: Check for musty smells or visible growth, especially after heavy rain.
- Daylight penetration: Turn off lights and look for daylight streaming through the roof boards—an obvious sign of gaps or holes.
- Insulation: Inspect for dampness or clumping, which signals water intrusion.
Seasonal Focus: What to Watch for in Each Season
Spring
- Check for winter damage: Ice dams, heavy snow, and freeze-thaw cycles can crack shingles and flashing.
- Clean gutters: Remove leftover debris to prepare for spring rains.
- Inspect for animal nests: Birds and squirrels often seek shelter in attics or under eaves during winter.
Summer
- Look for sun damage: UV rays can cause shingles to become brittle and blistered.
- Trim overhanging branches: Prevent storm damage and reduce debris accumulation.
- Check ventilation: Proper airflow in the attic prevents heat build-up and moisture problems.
Fall
- Prepare for storms: Secure loose shingles and flashing before seasonal winds and rains.
- Clear gutters and downspouts: Falling leaves can cause blockages.
- Install gutter guards: Consider adding protection to keep gutters clear during heavy leaf fall.
Winter
- Monitor for ice dams: Check for icicle formation, which can indicate poor insulation or ventilation.
- Remove light snow loads: Use a roof rake to prevent accumulation if safe to do so from the ground.
- Check attic for condensation: Excess moisture in winter signals inadequate ventilation.
Common Red Flags: Issues to Address Immediately
- Active leaks: Any sign of water entering your home requires urgent attention.
- Missing or sliding shingles: Even a single missing shingle can lead to leaks.
- Large patches of moss or algae: These can undermine shingle integrity.
- Cracked or rusted flashing: Replace to prevent water from entering at joints and seams.
- Sagging roof deck: May indicate extensive water damage or structural issues—consult a professional immediately.
- Persistent granule loss: Excessive shingle granules in gutters is a sign of aging or defective roofing materials.
DIY vs. Professional Roof Inspections: When to Call an Expert
While many homeowners can safely conduct basic roof inspections, certain situations demand professional expertise. If your roof is steep, high, or made from specialty materials (like tile or slate), or if you spot significant damage, always call a licensed roofing contractor. Professionals have the equipment and knowledge to identify hidden problems, such as sub-surface moisture, and can provide a more detailed assessment, including infrared scans or moisture meters. Annual professional inspections are also recommended for older roofs or before listing your home for sale.
Quick Repairs and Maintenance Tips
- Replace missing shingles: Use matching material and proper nailing techniques to prevent leaks.
- Reseal flashing: Apply roofing cement to minor cracks or separations in metal flashing.
- Clear gutters regularly: Prevent water overflow that can damage roof edges and foundations.
- Treat moss and algae: Apply zinc or copper strips, or use a specialized roof cleaner.
- Trim overhanging limbs: Reduce wear and tear from rubbing branches and falling debris.
Documentation: Tracking Your Roof’s Health Over Time
Keep a dedicated notebook or digital record of each inspection, including dates, findings, photos, and any repairs made. This documentation is invaluable for warranty claims, resale, and identifying recurring issues. Include receipts for professional inspections and repairs as part of your home maintenance file.
Cost Considerations: Budgeting for Maintenance and Repairs
Routine inspections are a low-cost way to avoid expensive repairs. Most homeowners can perform visual inspections for free, using basic tools they likely already own. Professional roof inspections typically cost between $150 and $400, depending on roof size and complexity. Minor DIY repairs, such as replacing a few shingles or resealing flashing, can cost under $100 in materials. However, delaying necessary repairs can lead to extensive water damage, structural repairs, and even full roof replacement, which can run into the thousands or tens of thousands of dollars. Allocate a small annual budget for roof maintenance to avoid unpleasant surprises.
Safety First: Essential Precautions for Roof Inspections
- Never inspect the roof in wet, icy, or windy conditions.
- Always use a stable, properly positioned ladder and have someone spot you if possible.
- Wear non-slip shoes, work gloves, and eye protection.
- If you feel uncomfortable or unsafe at any point, stop and consult a professional.
- Be mindful of power lines and other hazards near your roof.
Conclusion: Proactive Maintenance for Peace of Mind
A well-maintained roof is your home’s first line of defense against the weather, and regular seasonal inspections are the best way to ensure its longevity and reliability. By following a systematic checklist, you can catch small issues before they escalate into major headaches, prevent costly leaks, and even boost your home’s value. The process doesn’t require advanced skills—just attention to detail, proper safety precautions, and a commitment to routine care. Document your findings, act promptly on repairs, and don’t hesitate to call in a professional for complex or hazardous situations. Over time, these small investments in time and effort will pay off, protecting both your property and your peace of mind. Remember: A leak-free, well-cared-for roof means a safer, healthier, and more comfortable home for years to come.
If I’m running a small daycare business out of my home, are there any additional roof inspection steps I should take to ensure everything is safe for the kids, or does your checklist already cover commercial-type considerations?
Since your daycare hosts children, it’s a good idea to go a bit beyond the basic checklist. Make sure to check for loose shingles, secure all gutters and downspouts to prevent falling debris, and look for interior ceiling stains that could signal hidden leaks. Also, consider scheduling professional inspections more frequently, especially after severe weather, to ensure everything stays safe and secure for the kids.
If I find a few cracked shingles or some minor flashing damage during my spring inspection, is it safe to wait until fall to make repairs, or do certain issues need to be addressed immediately to prevent leaks?
It’s best to address cracked shingles or minor flashing damage as soon as possible rather than waiting until fall. Even small issues can allow water to seep in, potentially causing leaks or further damage, especially during spring and summer storms. Prompt repairs will help protect your roof and prevent more expensive problems down the line.
Could you give an estimate of how much time a typical seasonal roof inspection should take for an average-sized commercial building? I want to make sure it fits into our maintenance schedule without causing disruption.
A seasonal roof inspection for an average-sized commercial building usually takes between 2 to 4 hours. The exact time depends on the roof’s size, accessibility, and any unique features. Scheduling during off-peak hours or slower business periods can help minimize any disruption to your operations while ensuring the inspection is thorough.
I’m a renter, not a homeowner, but I want to avoid water damage in my apartment. Are there any steps from this checklist that I can adapt or should discuss with my landlord before the rainy season?
Absolutely, as a renter, you can still play a role in preventing water damage. From the checklist, you can regularly check for water stains or damp spots on ceilings and walls, especially after storms, and report any signs to your landlord right away. Also, ask your landlord if gutter cleaning, roof inspections, or attic checks are scheduled before rainy months. Bringing up these preventative steps shows you’re proactive and can help prevent costly issues for both you and your landlord.
Can you break down approximately how much money a typical homeowner might expect to spend on the basic tools and gear listed here, like harnesses and binoculars? I want to make sure I budget for this.
Absolutely, here’s a general breakdown: a basic roofing harness set can range from $70 to $150. Binoculars are usually $25 to $60 for a decent pair. Add about $20 to $40 for rubber-soled shoes, $10 to $20 for work gloves, and $20 to $50 for a sturdy ladder if you don’t already own one. So, budgeting around $150 to $300 should cover the essentials for most homeowners.
Could you provide some guidance on what ‘modest expense’ means for seasonal roof inspections? I’m trying to budget for both DIY tools and possible professional help if I spot issues.
A ‘modest expense’ for seasonal roof inspections means basic DIY tools like a sturdy ladder, safety harness, gloves, and binoculars, which could cost around $100–$200 upfront. If you notice issues and need professional help, a routine inspection from a roofing specialist usually ranges from $150 to $400 depending on your location and roof complexity. Factoring in minor repairs or gutter cleaning may add a bit more to your budget.
How expensive is it typically to buy all the tools and safety gear you listed for someone just starting out? Is borrowing or renting equipment a reasonable alternative for occasional inspections?
For someone just starting out, buying all the basic roof inspection tools and safety gear can cost a few hundred dollars, depending on quality. This usually includes a sturdy ladder, non-slip shoes, gloves, a harness, and a few hand tools. If you only plan to inspect your roof occasionally, borrowing or renting equipment is definitely a reasonable and cost-effective alternative, especially for items like extension ladders or harnesses that you may not use often.
If my roof is still under warranty, does doing my own routine inspections affect that? Are there any documentation steps I should take in case I need to make a warranty claim later?
Doing your own routine inspections usually does not void a roof warranty, as most warranties require regular maintenance. However, it’s important to avoid causing any damage during your inspections. To protect your warranty, document each inspection with dates, notes on what you checked, and clear photos. Keep these records organized, so you can provide proof of maintenance if you ever need to make a warranty claim.
If a minor issue like a cracked flashing is found during a roof inspection, what are the first steps a homeowner should take to address it before it turns into a major repair?
If you spot a cracked flashing during your roof inspection, start by cleaning the area and removing any debris. Next, apply roofing cement or a sealant over the crack as a temporary fix. If you’re comfortable, you can replace the flashing piece yourself; otherwise, it’s wise to contact a roofing professional soon to properly repair or replace it, preventing further damage.
Could you give a rough estimate of how much basic tools and safety gear, like a harness and non-slip shoes, might cost if someone is starting from scratch? It would help me budget for doing these inspections myself.
For a basic setup, expect to spend around $100 to $150 for a sturdy harness and safety lanyard. Non-slip shoes typically range from $40 to $80. Adding a basic ladder ($100-$200) and a few hand tools (like a hammer, caulking gun, and flashlight) might bring your total to about $300–$400. Prices vary by brand and quality, but this gives you a reasonable starting point for budgeting.
How much time should a thorough seasonal inspection take for an average-sized home, and do you recommend splitting it into multiple sessions or tackling it all in one go for best results?
A thorough seasonal roof inspection for an average-sized home usually takes 1 to 2 hours if you’re familiar with what to look for. If you’re new to roof inspections or have a complex roof, allowing up to 3 hours might be better. It’s generally best to complete the inspection in a single session so you don’t miss anything, but you can split it over two days if time or weather is an issue.
You list work gloves and non-slip shoes as essential gear. For someone just starting out with roof inspections, is there a particular brand or type of glove and shoe you’d recommend, especially on a tight budget?
For beginners on a budget, look for basic leather work gloves—they offer good grip and protection without costing much. Brands like Wells Lamont or CLC are reliable and often available at hardware stores. For non-slip shoes, sturdy sneakers or work shoes with rubber soles are a good start; Skechers or Fila often have affordable options with decent traction. The key is comfort and a solid grip rather than picking a specific expensive brand.
You mention using binoculars for ground-level inspections if someone isn’t comfortable climbing a ladder. Are there specific signs of damage that are easy to spot from the ground, or would it be easy to miss important issues this way?
Using binoculars from the ground can help you spot obvious problems like missing or curling shingles, large debris, sagging areas, or visible moss and algae. However, small cracks, loose flashing, or minor leaks are much harder to detect without getting closer. While binoculars are useful for a general check, more detailed issues can easily be missed, so consider having a professional inspect your roof periodically.
What’s the typical cost for hiring a professional to do these seasonal roof inspections compared to doing them myself with the tools listed?
Hiring a professional for a seasonal roof inspection usually costs between $150 and $400, depending on location and roof size. Doing it yourself mainly involves investing in basic tools like a sturdy ladder, gloves, and perhaps binoculars, which may cost between $50 and $200 upfront. While DIY is cheaper in terms of money, professionals can spot issues you might miss, potentially saving on repairs later.
Regarding minor issues found during these seasonal checks, like a missing shingle or clogged gutter, what are the best immediate steps a homeowner can take themselves versus cases when it’s better to call in a professional?
For minor issues like a missing shingle or a clogged gutter, many homeowners can safely clear debris from gutters or replace a single shingle if they’re comfortable using a ladder and basic tools. However, if the roof is steep, slippery, or damaged in several areas, or if you’re unsure about the repair process, it’s safer and more effective to call a professional. Always prioritize your safety when deciding which approach to take.
With the checklist focusing on spring and fall inspections, is there a particular season that’s more critical for spotting leaks or damage? For example, should I be more diligent after a harsh winter or following heavy summer storms?
Both spring and fall inspections are important, but after a harsh winter, it’s especially critical to check for leaks or damage. Snow, ice, and freezing temperatures can cause hidden issues like cracked shingles or ice damming. However, if your area experiences intense summer storms, inspecting after those events is also wise. Staying diligent in both seasons helps catch problems early before they become costly.
If someone isn’t comfortable climbing ladders, how effective are ground-level inspections with binoculars for spotting early roof problems, and are there limitations to this method?
Using binoculars from the ground can help you spot some visible issues like missing shingles, sagging, or debris buildup. However, this method has limitations—you might miss smaller problems like minor cracks, popped nails, or early-stage leaks that are only noticeable up close. For thorough inspections, especially before or after severe weather, consider hiring a professional if you’re not comfortable climbing ladders.
You mention routine inspections can help preserve the roof’s warranty. Does performing these yourself with the suggested tools meet most warranty requirements, or do some warranties require documentation from a licensed contractor instead?
Some roof warranties do require inspections and repairs to be documented by a licensed contractor to maintain coverage, while others may allow homeowner-performed inspections if you keep detailed records and photos. It’s important to check the specific terms of your warranty. If in doubt, contacting the manufacturer or your installer can help ensure you’re meeting all requirements.
You listed a bunch of tools, but what would be the minimum gear for someone who just wants to do a quick check without getting up on the roof? Are binoculars and gloves enough for a basic biannual inspection?
For a basic biannual inspection from the ground, binoculars and gloves are usually enough. Binoculars help you spot missing shingles, damaged flashing, or debris without climbing up. Gloves are handy if you need to clear gutters or move branches. For a quick check, just make sure you can see the whole roof, and look for anything unusual or out of place.
You talk about catching small issues early, like missing shingles or clogged gutters. How do I know which problems are urgent and which ones can wait a few weeks before I deal with them?
Urgent issues are those that could let water into your home or cause rapid damage. For example, missing or cracked shingles, sagging areas, leaks, or severely clogged gutters should be addressed right away to prevent bigger problems. Minor things like small amounts of debris in gutters or a few granules in the downspout can usually wait a few weeks, but you should keep monitoring them. When in doubt, prioritize repairs that protect your roof’s waterproofing.
The checklist mentions preserving the roof’s warranty through regular inspections. Could you clarify how often most warranties require these inspections, and whether photo documentation is needed?
Most roof warranties recommend or require professional inspections at least once a year, often after severe weather events as well. Many also specify that you should keep records of these inspections, including photos and written reports, as proof of maintenance. Photo documentation is generally helpful and sometimes mandatory to support warranty claims, so it’s a good idea to photograph any repairs or issues found during each inspection.
Could you expand on what minor issues can safely be fixed by a homeowner without voiding a warranty, or does it make more sense to contact a professional for every small concern?
Homeowners can typically handle minor tasks like clearing debris from gutters, checking for loose nails, or removing moss with gentle cleaning methods. These actions usually don’t affect warranties. However, repairs involving shingles, flashing, or structural elements should be left to professionals, as DIY fixes in these areas can risk voiding your warranty. Always check your specific warranty terms first, and when in doubt, consult a professional for more significant concerns.
For someone on a tight budget, which tools or safety gear from your checklist would you consider absolutely essential, and which items could be optional if I’m just doing a basic inspection?
For a basic roof inspection on a tight budget, the most essential items are a sturdy ladder, non-slip shoes, and work gloves for safety and grip. A flashlight is very helpful for checking attic spaces. Optional items from the checklist, like binoculars, a moisture meter, or a full-body harness, are useful but not strictly necessary for a simple, ground-level or visual inspection.
I’m wondering about the average cost of the safety gear and tools you listed. For a homeowner on a budget, are there any essentials you’d prioritize, or are all these items necessary to get started?
For homeowners on a budget, you can prioritize a sturdy ladder (usually $100–$200), a basic safety harness (about $50–$100), and work gloves (around $10–$20). These are the minimum essentials for safety and effectiveness. Other tools like roof brushes or binoculars are helpful but not absolutely necessary at first. Always make safety your top priority, even if it means postponing some tasks until you have the right gear.
Do you have any advice for budget-conscious homeowners about the most essential safety gear for roof inspections? Is a roofing harness absolutely necessary for houses with low-sloped roofs?
For budget-conscious homeowners, the most essential safety gear includes sturdy, non-slip shoes, heavy-duty gloves, and a stable ladder with someone to spot you. For low-sloped roofs, a full roofing harness may not be necessary, but you should use extreme caution and avoid working in wet or windy conditions. If your roof is steeper or higher, investing in a harness is a good idea, but for most single-story, low-slope roofs, careful movement and good footwear can be sufficient.
What’s the average cost for the basic tools and safety gear you listed? I’m on a college budget, so I’m wondering if there’s a way to do most of the checklist affordably.
For a college budget, you can often get the basics for under $60 total. A decent ladder and work gloves are the bigger investments, but you may be able to borrow them from friends or neighbors. Basic safety gear like non-slip shoes and a dust mask are inexpensive, and a flashlight or binoculars can be found for under $10 each. Check local hardware stores or borrow tools to save even more.
If I find a few missing shingles or notice my gutters are starting to clog after a heavy storm, is it better to deal with these right away or can some issues wait until the scheduled bi-annual inspection?
It’s best to address missing shingles and clogged gutters as soon as you notice them, rather than waiting for your scheduled inspection. Missing shingles can lead to water damage, and clogged gutters may cause overflow or damage to your roof and foundation. Prompt attention to these issues can help prevent more expensive repairs down the road.
The article lists several tools like ladders, binoculars, and harnesses. For college students or renters on a tight budget, are there any low-cost alternatives or essential tools you’d recommend focusing on first for a basic but effective inspection?
If you’re on a tight budget, start with just a sturdy step stool or small ladder to safely view as much of your roof as possible. Binoculars are helpful, but you can often use your phone’s zoom camera to spot visible issues. Gloves are the main essential for protecting your hands if you check gutters or clear debris. Prioritize safety and only inspect from the ground if climbing isn’t possible.
Are there any budget-friendly options for essential safety gear like roofing harnesses, or is it worth investing in a higher-end setup for occasional inspections by a homeowner?
For occasional inspections by homeowners, there are budget-friendly harness kits available at most hardware stores. These typically include a harness, lanyard, and anchor and meet basic safety requirements. If you only inspect your roof once or twice a year, an entry-level kit should suffice. However, always ensure the gear has proper certification and inspect it for wear before each use.
Could you clarify what minor issues are safe for a homeowner to address themselves versus what should be left to a professional? For example, is replacing a few missing shingles manageable without expert help?
Homeowners can usually handle minor maintenance like clearing debris from gutters, checking for loose nails, or replacing a few easily accessible shingles if they’re comfortable working safely on a roof. However, anything involving significant shingle damage, flashing repairs, leaks, or signs of structural issues should be left to professionals. If you’re unsure about your ability or the extent of damage, it’s best to consult an expert to avoid injury or further roof problems.
The checklist mentions using a roofing harness for safety, but how do you know when it’s necessary versus when ground-level inspection with binoculars is enough? I have a fairly low-sloped roof and want to avoid unnecessary risks.
For a low-sloped roof, many common issues like missing shingles, debris, or damaged flashing can often be spotted using binoculars from the ground or a ladder. A harness is necessary if you need to step onto the roof for closer inspection or repairs. If you’re unsure or see signs of damage that aren’t clear from the ground, it’s safest to call a professional rather than risk climbing up yourself.
Since the article suggests checking roofs in both spring and fall, is there a particular season when issues like clogged gutters or flashing cracks are most likely to develop? I want to prioritize my efforts based on the biggest seasonal risks.
Clogged gutters are most likely to become a problem in the fall, as leaves and debris accumulate during that season. Flashing cracks, on the other hand, often develop or worsen after winter because freezing and thawing can stress the materials. Prioritizing gutters in the fall and checking flashing after winter or early spring makes sense for addressing the biggest seasonal risks.
For someone working with a limited budget, are there essential tools from your checklist that offer the best value for safety and effectiveness, or are some of the suggested items mainly for advanced inspections?
If you’re on a limited budget, focus on essentials like a sturdy ladder, work gloves, a flashlight for dark areas, and binoculars for safe ground inspections. These tools cover the basics for safety and effective roof checks. Items such as moisture meters or drone cameras are helpful but more suitable for advanced or professional inspections and aren’t necessary for most homeowners.
As a small business owner, I’m curious if your checklist includes any special tips for inspecting flat roofs as opposed to sloped ones. Are there different tools or risks I should be aware of when checking a flat commercial roof?
Yes, the checklist highlights some unique considerations for flat roofs. With flat commercial roofs, it’s important to look out for pooled water, clogged drains, and membrane punctures, as these issues are more common than on sloped roofs. A long-handled squeegee or roof broom is useful for clearing debris and standing water. Safety is also a bigger concern, so non-slip shoes and a harness are recommended if the roof edge isn’t protected.
With the list of tools you provided, what would you estimate is the initial cost for a homeowner to purchase all the necessary gear for a proper DIY roof inspection?
Based on the typical tools mentioned—such as a sturdy ladder, safety harness, work gloves, flashlight, binoculars, roofing boots, and a moisture meter—the initial investment for a homeowner usually ranges from $200 to $400. This can vary depending on the quality and brands you choose, but most can expect to stay within this range for all the basic equipment.
If a homeowner finds minor issues like a missing shingle or cracked flashing during a seasonal inspection, do you recommend handling these repairs themselves or should a professional always be called in even for small problems?
For minor issues like a missing shingle or a small crack in the flashing, homeowners with some DIY experience and proper safety equipment can often handle these repairs themselves. However, if you’re unsure about the extent of the damage or don’t feel comfortable working on the roof, it’s safer to call a professional. Addressing small problems quickly is key, but always put safety first.
I noticed you suggest using binoculars for ground-level inspections if someone is uncomfortable climbing. Are there certain signs of damage that can only be spotted up close, or is a ground-level check with binoculars sufficient for most homeowners?
A ground-level inspection with binoculars is very effective for spotting major issues like missing shingles, sagging areas, or obvious debris. However, some subtle problems—such as small cracks, minor shingle curling, or early signs of granule loss—might only be visible up close. For most homeowners, binoculars will catch the big concerns, but if you suspect damage or want a more thorough check, consider a professional roof inspection every couple of years.
If I find a couple of missing shingles during my fall inspection, do I need to fix them right away, or can that wait until spring? I’m trying to balance urgency with budget and scheduling.
If you find missing shingles during your fall inspection, it’s best to address them before winter arrives. Missing shingles can let water in, potentially causing leaks or damage when snow and ice build up. Even a temporary patch or small repair now can help you avoid bigger, more expensive problems come spring.
How much should I expect to spend on the basic safety gear listed here, like a roofing harness and sturdy ladder? Any recommendations for budget-friendly but reliable brands for homeowners just getting started?
For basic safety gear, expect to spend about $100 to $250 for a good roofing harness kit and $100 to $300 for a sturdy ladder. For budget-friendly, reliable options, Guardian and Werner are reputable brands to consider for harnesses and ladders, respectively. You can often find starter kits at home improvement stores or online that meet safety standards without breaking the bank.
For homes with solar panels installed on the roof, are there any extra steps or precautions you recommend adding to this seasonal roof inspection checklist?
When your roof has solar panels, it’s important to include a few extra steps in your inspection. Check for debris or leaves trapped around the panels, as this can retain moisture and cause damage. Look for any signs of wear or damage to the mounts and wiring. Also, make sure the panels haven’t shifted and that all hardware remains securely fastened. Avoid stepping on the panels, and if in doubt, consider a professional inspection to avoid damaging your solar setup.
The article mentions that regular inspections could help preserve my roof’s warranty. Are there specific steps or documentation I should keep in case I ever need to file a claim, or is just doing the inspection enough?
Doing the inspection is important, but keeping detailed records is just as crucial for preserving your warranty. Be sure to document the date of each inspection, what was checked, any issues found, and any repairs done. Photos before and after repairs can be very helpful. Also, keep receipts for any professional inspections or repairs. This documentation will support your claim if you ever need to use your warranty.
Running a business, I don’t always have a lot of time. Which inspection steps from your list should I absolutely prioritize if I can only do a quick check each season?
If you’re short on time, focus on these key steps: check for obvious damage like missing or damaged shingles, clear any debris from gutters and downspouts, and look for signs of leaks or water stains inside your building. These checks can catch the most common problems early and help prevent costly repairs later.
What would you estimate as the typical cost for the tools and safety gear listed for DIY roof inspections, and are there any budget-friendly alternatives you recommend?
For a DIY roof inspection, basic tools and safety gear like a sturdy ladder, work gloves, a harness, nonslip shoes, and a flashlight can range from $100 to $300 in total, depending on quality and where you buy them. For budget-friendly alternatives, consider borrowing tools from a neighbor or local tool library, or purchasing secondhand equipment in good condition. Always prioritize safety, even if you’re looking to save money.
Once a homeowner identifies possible mold growth or insulation damage after a roof inspection, what immediate steps should they take before the repair process begins to help prevent further damage?
If you find mold or insulation damage after a roof inspection, act quickly to limit moisture exposure. Cover affected areas with plastic sheeting to prevent water intrusion, improve ventilation if possible, and avoid using the attic until repairs are done. Document the damage with photos for your contractor and insurance. Promptly scheduling professional assessment will help prevent the problem from getting worse.
You mention roof inspections can affect the roof’s warranty. What sort of documentation or steps should I take during my seasonal checks to make sure I stay compliant with typical warranty requirements?
To stay compliant with most roof warranties, keep detailed records of each inspection, including dates, notes on the roof’s condition, and any maintenance or repairs performed. Take clear photos before and after maintenance. If you hire a professional, save their inspection reports and invoices. Review your warranty’s specific requirements, as some may ask for annual professional inspections to remain valid.
The checklist mentions using a roofing harness for steep roofs, but are there any alternatives for homeowners who aren’t comfortable getting up on the roof themselves? Would hiring a professional once a year be enough?
If you’re not comfortable or equipped to safely get on your roof, hiring a professional for an annual inspection is a smart choice. Many roofing companies offer this service and can spot issues you might miss. You can also do a visual check from the ground with binoculars, and look inside your attic for signs of leaks or water stains. Combining both approaches offers good protection.
When inspecting the roof in the spring and fall, how can I tell the difference between damage that needs immediate repair and something I can just keep an eye on? Are there warning signs I should look for before leaks actually start?
When inspecting your roof, damage needing immediate repair usually includes missing, cracked, or curled shingles, obvious holes, sagging spots, or large areas of granule loss. You should also look for dark spots, moss, or soft areas, which can signal moisture problems. Small issues like minor discoloration or isolated, small blisters can be monitored, but always address anything that seems to let water through or might worsen quickly. Early warning signs before leaks include loose flashing around chimneys or vents, clogged gutters, and damp areas in the attic.
If a homeowner finds a small leak or missing shingle during their inspection, what would you suggest as immediate next steps before they can get a professional roofer out?
If you spot a small leak or missing shingle, try to temporarily cover the area with a waterproof tarp to prevent water from entering. Secure it tightly to avoid wind lifting it off. Inside, place a bucket or container to catch any drips and move belongings away from the affected area. Document the damage with photos, then contact a professional roofer as soon as possible for repairs.
Your checklist mentions using a roofing harness for steep roofs. Can you recommend an affordable, easy-to-use harness system for someone who’s not a professional but wants to inspect safely?
For non-professionals inspecting steep roofs, look for a basic fall protection kit that includes a full-body harness, a shock-absorbing lanyard, and a roof anchor. Brands like Guardian and Malta Dynamics offer entry-level kits that are easy to set up and typically cost between $100 and $200. Always read the instructions carefully, ensure a secure anchor point, and avoid going up in bad weather.
For someone in a climate with heavy snowfall, are there any extra steps you recommend adding to the seasonal roof inspection checklist, especially when checking after winter?
After a heavy snow season, it’s wise to check for ice dams along the eaves, inspect for damage from snow load, and look for signs of water intrusion in your attic. Also, make sure gutters and downspouts are clear of ice and debris so they can handle spring melt. If your roof is steep or difficult to access, consider having a professional handle the inspection for safety.
The checklist suggests inspecting roofs at least twice a year, but if I live in a region with extreme weather like hurricanes or heavy snow, should I increase the frequency of inspections? How soon should I check the roof after a major weather event?
If you live in an area with hurricanes or heavy snow, it’s wise to inspect your roof more often than twice a year. After any major weather event, such as a hurricane or a heavy snowstorm, you should check your roof as soon as it’s safe. Early inspection helps catch damage before it becomes a bigger problem.
If my roof is still under warranty, do I need to use certain products or document my seasonal inspections to make sure my warranty stays intact?
Yes, to keep your roof warranty valid, it’s important to follow the manufacturer’s or installer’s guidelines. Some warranties require you to use specific products or approved contractors for maintenance and repairs. It’s also a good idea to document your seasonal inspections with photos and notes, and keep any receipts or service records as proof of proper upkeep.
If my gutters clog pretty often, could that actually void my roof’s warranty or affect my home insurance? I didn’t realize clogged gutters could impact more than just drainage.
Clogged gutters can cause water to back up under your roof, leading to leaks and damage. Some roofing warranties and home insurance policies may exclude coverage if poor maintenance, like clogged gutters, contributes to roof problems. It’s a good idea to check your warranty and insurance documents to see what maintenance is required, and keep your gutters clean to stay protected.
I see the article talks about preserving the roof’s warranty with regular maintenance. If we do these inspections ourselves and fix minor issues, does that usually satisfy warranty requirements, or do we need a professional inspection for it to count?
Many roof warranties require that inspections and repairs be done by certified professionals to keep the warranty valid. While doing your own inspections and minor fixes helps with roof care, it usually doesn’t meet official warranty terms. It’s a good idea to check your warranty’s fine print or contact the manufacturer to confirm whether DIY work is allowed, or if you need documented work from a licensed roofer.
I’m a bit nervous about climbing on the roof myself, even with the right tools. Is it effective enough to do roof checks from the ground with binoculars, or am I likely to miss important issues?
Using binoculars from the ground can help you spot obvious issues like missing shingles, sagging, or large debris. However, some problems, such as small cracks, loose flashing, or early signs of water damage, are harder to see without a closer look. If you’re uncomfortable climbing up, consider hiring a professional for a thorough inspection to ensure smaller issues aren’t missed.
I noticed you mention using a roofing harness for steeper roofs. As someone with no prior experience, are there affordable harness options that are still safe for occasional DIY inspections, or is it better to hire a pro for steep roofs?
For steep roofs, safety should always come first. While there are affordable harness kits designed for homeowners, proper use requires careful setup and understanding. If you’re unfamiliar with working at heights or using safety equipment, it’s much safer to hire a professional. Professionals have the training and gear to handle steep roofs safely, reducing the risk of injury.
The checklist suggests having binoculars for ground-level inspections. Are there any types of roof damage that really require you to get up close, or can most issues be caught from the ground safely?
Binoculars are great for spotting obvious issues like missing shingles or large debris from the ground. However, some problems—such as small cracks, soft spots, or minor flashing damage—can be hard to detect without a closer look. For a thorough inspection, especially after severe weather or if you suspect leaks, it’s best to have a professional safely check your roof up close.
The checklist talks about using a roofing harness for safety, especially on steeper roofs. For someone who’s not very experienced with heights, is there a recommended harness style or brand that fits most average homeowners’ needs without breaking the bank?
For homeowners new to roof work, a basic fall protection kit with a full-body harness, lanyard, and roof anchor is usually enough. Look for an OSHA-compliant kit, often sold at hardware stores under brands like Guardian or 3M. These are designed for occasional use and tend to be more affordable, while still prioritizing safety. Always follow the kit’s instructions and, if you’re uncomfortable with heights, consider hiring a professional for anything beyond simple checks.
What are some signs I should look for during a spring inspection that indicate potential trouble before the rainy season? Are there early warning signs unique to businesses on flat roofs?
During your spring inspection, watch for cracks or blisters in the roofing material, standing water that doesn’t drain within 48 hours, and loose or damaged flashing around vents and edges. For flat roofs especially, look for clogged drains or scuppers, worn seams, and any pooling water, as these are early warnings that need prompt attention before heavy rains arrive.
If a homeowner finds mold or mildew while inspecting their roof or attic, what steps should they take immediately before a professional can come out? I’m curious about interim safety or prevention measures.
If you notice mold or mildew during your inspection, keep the area well-ventilated by opening windows or vents if possible. Avoid disturbing the growth, as this can release spores into the air. Keep children and pets away from the affected spot and avoid using fans that could spread spores. If safe and dry to do so, you can place plastic sheeting over the area to help contain it until a professional can assess and treat the problem.
I’m concerned about the cost of tools and safety gear listed. For someone on a tight budget, which items are absolutely essential for a basic and safe inspection, and can any be safely skipped or substituted?
For a basic and safe roof inspection on a tight budget, the most essential items are a sturdy ladder in good condition, non-slip shoes, and gloves. A safety harness is highly recommended if your roof is steep or high, but for single-story, gently sloped roofs you might manage without it if you exercise caution. Other tools like binoculars can substitute for climbing in some cases, letting you inspect from the ground.
The article mentions using a roofing harness for steep or high roofs. Are there specific brands or safety standards I should look for when purchasing safety gear for my employees who do the inspections?
When choosing safety gear like roofing harnesses, look for products that meet OSHA (Occupational Safety and Health Administration) and ANSI (American National Standards Institute) standards. Trusted brands in the industry include 3M, Guardian, and FallTech. Make sure the harnesses are rated for fall protection, include secure lanyards, and that your employees are trained in correct usage and inspection of the equipment before each use.
Can you give an estimate of how much time a typical spring or fall roof inspection should take for an average-sized home following your checklist?
For an average-sized home, a thorough roof inspection using our checklist usually takes between 60 to 90 minutes. This allows enough time to carefully check shingles, flashing, gutters, vents, and the attic for any signs of leaks or damage. If you’re familiar with the process, it might take a bit less time, but it’s best not to rush to make sure nothing important is missed.
Does doing these seasonal inspections myself affect my roof’s warranty? I’m not sure if I’m supposed to hire a pro to keep the coverage valid, or if a DIY checklist like this is enough for most warranties.
Whether you need a professional for roof inspections often depends on your specific warranty. Some warranties require certified inspections or repairs to keep coverage valid, while others simply need regular maintenance, which you can do yourself. It’s best to check the terms of your warranty or contact the manufacturer to confirm if DIY inspections are acceptable or if a professional is required.
Your checklist mentions inspecting at least twice a year, but as someone running a small retail shop, is there a more efficient way to spot early issues without climbing up every season?
You can monitor your roof from the ground using binoculars to check for missing shingles, debris buildup, or sagging areas. Also, look inside your shop for water stains on the ceiling or walls, which can signal leaks. Scheduling a professional inspection once a year can also help catch issues early without needing to climb up yourself.
You mention that routine inspections help preserve a roof’s warranty. Are there specific inspection steps or documentation that most roofing warranties require in case of a future claim?
Most roofing warranties do require evidence of regular inspections and maintenance. Typically, they ask for dated inspection reports, photographs documenting the roof’s condition, and records of any repairs performed. Inspection steps often include checking for missing or damaged shingles, inspecting flashing and sealants, clearing debris, and ensuring proper drainage. Keeping a detailed log with dates, findings, and actions taken will help support any future warranty claim.