

Introduction: Why Weatherproofing Matters
Weatherproofing your windows and doors is one of the most cost-effective home improvement projects you can undertake, yet it’s often overlooked. Whether you live in a region with harsh winters, scorching summers, or unpredictable seasonal changes, properly sealed windows and doors are essential for maintaining indoor comfort and reducing energy costs. Unsealed gaps and cracks not only allow drafts to enter but also provide an open invitation for moisture, pests, and even pollutants. If you’ve noticed rising utility bills, chilly rooms, or condensation near your windows, it’s time to address the issue head-on.
This comprehensive, step-by-step guide will walk you through everything you need to know about weatherproofing your windows and doors, from choosing the right materials to avoiding common mistakes. You’ll learn practical techniques for assessing your home’s vulnerabilities, applying weatherstripping and caulk, and ensuring your hard work lasts through the seasons. Whether you’re a DIY enthusiast or a first-timer, this guide will help you achieve professional-quality results without breaking the bank.
Understanding the Impact of Poorly Sealed Windows and Doors
Energy Efficiency and Utility Costs
On average, up to 30% of a home’s heating and cooling energy can be lost due to air leaks around windows and exterior doors. These leaks force your HVAC system to work overtime, leading to higher energy bills and unnecessary wear on expensive equipment. Weatherproofing is a straightforward way to improve your home’s efficiency and comfort year-round.
Moisture and Structural Damage
Gaps and cracks don’t just let in air—they also allow moisture to seep in. Over time, this can cause wood rot, mold growth, and damage to interior finishes or insulation. Preventing water intrusion is critical for preserving the structural integrity of your home.
Pest and Allergen Entry
Small openings provide easy access for insects, rodents, and outdoor allergens. Sealing these gaps improves indoor air quality and helps keep your space pest-free.
Assessing Your Home: Where to Start
Tools and Materials You’ll Need
- Flashlight
- Incense stick or smoke pen
- Measuring tape
- Putty knife or scraper
- Utility knife
- Weatherstripping (various types)
- Caulking gun and caulk (silicone or acrylic latex)
- Foam sealant (for larger gaps)
- Cleaning supplies (mild soap, water, rags)
How to Identify Problem Areas
Begin with a visual inspection of all windows and exterior doors, looking for visible gaps, worn seals, cracked caulk, and signs of moisture damage. Use a flashlight to highlight gaps and a smoke pen or incense stick on windy days to detect drafts—if the smoke wavers or is pulled toward the window or door, you’ve found a leak.
Common Vulnerable Points
- Window sashes and frames
- Door frames and thresholds
- Sliding glass door tracks
- Mail slots, pet doors, and vents
- Attic and basement windows
Weatherstripping: Types, Selection, and Application
Choosing the Right Weatherstripping
- Foam Tape: Inexpensive, easy to install; best for windows and door stops.
- V-Seal (V-Strip): Durable, flexible; ideal for double-hung and sliding windows.
- Door Sweeps: Attach to the bottom of doors to block drafts; available in metal, vinyl, or brush forms.
- Rubber or Vinyl Gaskets: Good for irregular gaps and high-traffic doors.
- Felt: Affordable, but less durable; suitable for low-use areas.
Step-by-Step Weatherstripping Guide
- Measure the Gap: Use a measuring tape to determine the width and length of the gap you need to seal.
- Clean the Surface: Wipe down the area with mild soap and water; allow to dry fully for optimal adhesion.
- Cut the Weatherstripping: Using a utility knife or scissors, cut strips to match the length of the gap.
- Apply: If adhesive-backed, peel and stick firmly, pressing along the length for a tight seal. For nail-on or screw-on types, use a hammer or screwdriver as required.
- Test: Open and close the window or door several times to ensure smooth operation and a snug fit.
Tips for Optimal Results
- Replace any old, brittle, or compressed weatherstripping before adding new material.
- Don’t overlap strips—this can interfere with proper closure.
- If using a door sweep, ensure it just touches the threshold without dragging, which can cause premature wear.
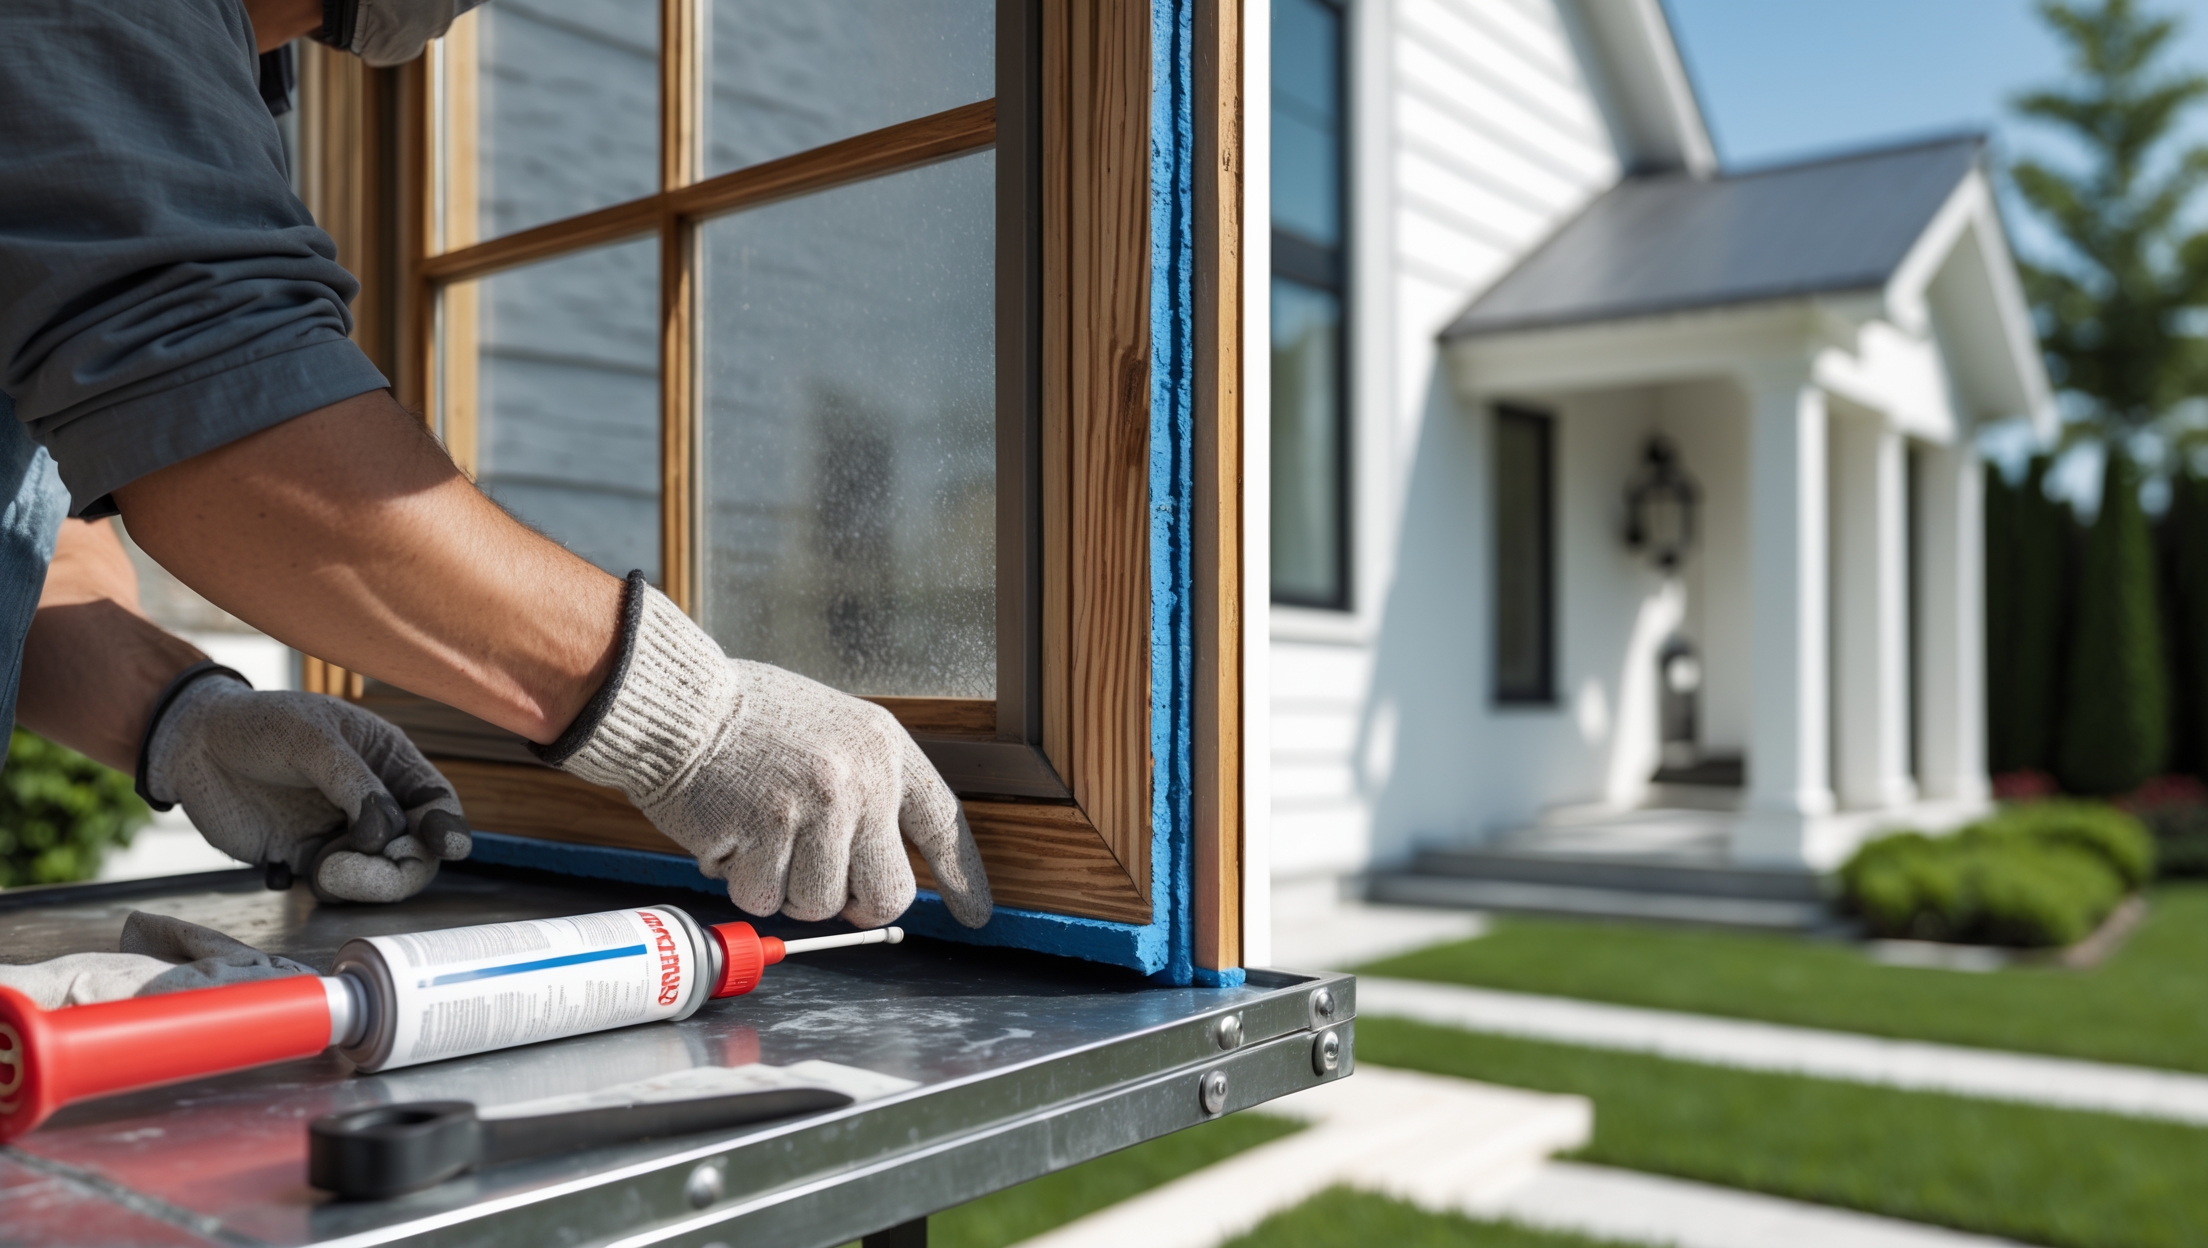
Caulking: Sealing Exterior and Interior Gaps
Choosing the Right Caulk
- Silicone Caulk: Best for non-porous surfaces exposed to weather (like exterior window frames). Highly flexible and long-lasting.
- Acrylic Latex Caulk: Paintable, easy to clean up, ideal for interior gaps and trim work.
- Polyurethane Caulk: Very durable and flexible, suitable for large exterior joints.
Preparation Steps
- Remove old caulk using a putty knife or specialized caulk remover.
- Clean the area thoroughly and allow it to dry.
- Mask off areas with painter’s tape for neat lines if desired.
How to Apply Caulk Like a Pro
- Cut the tip of the caulk tube at a 45-degree angle, matching the width of the gap.
- Load the tube into your caulking gun.
- Apply steady pressure, moving the gun smoothly along the joint.
- Smooth the bead with a damp finger or caulk finishing tool for a clean finish.
- Allow the caulk to cure as per manufacturer instructions before painting or exposing to moisture.
Where to Apply Caulk
- Where window or door frames meet siding or masonry
- At interior trim joints
- Around baseboards near exterior walls
- Where pipes or wires enter the home
Dealing with Larger Gaps and Damage
Foam Sealant for Expanding Gaps
For gaps larger than 1/4 inch, expanding foam sealant is the solution. It comes in aerosol cans with a straw applicator and expands to fill cavities. Once cured, trim any excess with a utility knife and cover with trim or paint as needed. Always wear gloves and use sparingly; overfilling can make windows or doors difficult to operate.
Repairing Damaged Frames
- Wood Rot: Remove all affected material, treat with wood hardener, and patch with epoxy wood filler before sanding and repainting.
- Metal Corrosion: Sand away rust, apply rust-inhibiting primer, and repaint with exterior-grade paint.
Weatherproofing Special Cases
Sliding Glass Doors
Clean and lubricate tracks, replace old seals, and use foam weatherstripping for vertical gaps. Install a new door sweep if the bottom seal is worn.
Historic or Older Homes
Preserve character by using removable weatherstripping (like V-seal or flexible gaskets). Avoid permanent alterations that could damage antique finishes or violate local preservation codes.
Basement and Attic Windows
Use foam backer rod and caulk for large, uneven gaps, then add weatherstripping for moveable parts. Consider storm windows for added insulation in harsh climates.
Common Mistakes to Avoid
- Skipping surface preparation—adhesives and caulk won’t stick to dirty or wet surfaces.
- Using the wrong type of caulk or weatherstripping for the location.
- Overfilling gaps with foam, which can warp frames or prevent proper closure.
- Neglecting to test doors and windows after installation.
- Forgetting to check and maintain seals annually.
Maintenance and Longevity: Keeping Your Seals Strong
Annual Inspection Checklist
- Visually inspect all windows and doors each spring and fall.
- Look for peeling, cracking, or missing weatherstripping and caulk.
- Test for drafts on windy days using the smoke method.
- Clean tracks, frames, and seals to prevent dirt buildup that can compromise adhesion.
When to Replace Weatherstripping and Caulk
Most weatherstripping lasts 5-10 years; caulk should be replaced every 5 years or as soon as you notice cracking or peeling. High-traffic doors and windows exposed to extreme weather may require more frequent attention.
Cost Breakdown and Budgeting Tips
Material Costs
- Weatherstripping: $10–$25 per door or window, depending on type
- Caulk: $3–$8 per tube (one tube typically seals 2–3 windows)
- Foam sealant: $5–$7 per can
- Tools and prep supplies: $20–$40 if you don’t already own them
For a typical single-family home with 10 windows and 2 exterior doors, expect to spend $120–$300 for a complete DIY weatherproofing project, much less than the annual energy savings you’ll enjoy.
Where to Save and Where to Spend
- Invest in high-quality, durable materials for frequently used doors and windows.
- Use budget-friendly options like foam tape for less critical areas.
- Borrow or rent specialty tools if you don’t plan to use them regularly.
Frequently Asked Questions
Can I weatherproof in any season?
Weatherproofing is best done in dry, mild weather. Avoid applying caulk or adhesive-backed materials in freezing temperatures or during high humidity for best results.
Will weatherproofing affect window and door operation?
Proper installation should not interfere with normal operation. If you notice sticking or difficulty closing, adjust or trim the material as needed.
How do I check if my weatherproofing is still effective?
Test for drafts using the incense or smoke method, and look for visible signs of wear or water intrusion.
Conclusion: Lasting Benefits for Your Home
Weatherproofing your windows and doors is a straightforward project that delivers significant returns in comfort, energy savings, and peace of mind. By following the detailed steps outlined in this guide, you can confidently tackle drafts, leaks, and moisture problems, no matter your skill level. Remember, proper preparation and material selection are keys to success. By investing a few hours and a modest budget, you’ll not only lower your utility bills but also extend the life of your windows, doors, and HVAC system.
Don’t let another season pass with avoidable energy loss or water damage. Make weatherproofing part of your annual home maintenance routine and enjoy a healthier, more efficient living space. If your home is older or you’re unsure about tackling extensive repairs, consult a professional for advice or assistance. With a little effort, you’ll create a barrier that keeps the elements out and comfort in—all year long.
I’ve noticed condensation near only one window, but all my utility bills have gone up. When assessing vulnerabilities, should I focus on the entire house or just the problem areas first to save time and money as a beginner?
If you’re new to weatherproofing, it’s smart to start by closely inspecting the window with visible condensation, as this is a clear problem area. However, since your utility bills have increased, it’s worth checking other windows and doors for drafts, gaps, or worn seals. Focusing on obvious trouble spots first can save time and money, but a quick scan of the whole house ensures you don’t miss less visible issues.
When choosing between different types of weatherstripping or caulk, are there specific materials that work better for really humid climates? I want to avoid mold or issues down the line.
For humid climates, silicone-based caulk is a top choice because it resists moisture, doesn’t crack easily, and is mold-resistant. When it comes to weatherstripping, closed-cell foam or vinyl are good options since they don’t absorb water and hold up well against humidity. Avoid felt or open-cell foam, as they can trap moisture and promote mold growth.
Since weatherproofing helps with both energy savings and pest prevention, are there specific products that work best for blocking both air leaks and bugs at the same time?
Yes, there are products designed to seal gaps and keep out both drafts and pests. Look for silicone or high-quality latex caulks for sealing cracks, as they provide an airtight, flexible seal. For door bottoms and window sashes, consider weatherstripping materials like foam tape or rubber strips that create a tight barrier. Some door sweeps and threshold seals are specifically labeled for both energy efficiency and pest control—choosing those can help you achieve both goals.
In terms of long-term results, how often should I expect to redo caulking and weatherstripping? The article mentions making sure the work lasts, but I’m not sure what maintenance schedule is realistic.
For long-term effectiveness, caulking around windows and doors usually lasts about 5 to 10 years, but it’s a good idea to check it annually for cracks or gaps. Weatherstripping often needs replacement every 2 to 5 years, depending on exposure and wear. Inspect both once a year and reseal or replace as soon as you notice any damage or loss of flexibility.
I’ve tried sealing my windows in the past, but I still get condensation near them during colder months. Could this be a sign of deeper problems, or am I just missing a step from your guide?
Condensation near your windows in colder months could indicate more than just gaps or poor sealing. It might suggest issues with indoor humidity, insufficient insulation, or even the type of window glass. Make sure you’ve addressed not just sealing drafts, but also improving ventilation and managing moisture levels indoors. Double-check our guide for steps on insulation and moisture control, as well as caulking and weatherstripping.
Once I’ve weatherproofed my windows and doors using your guide, how often should I check and redo the sealing to keep everything in good condition year after year?
After weatherproofing your windows and doors, it’s a good idea to inspect the seals at least once a year, preferably before seasonal changes like winter or heavy rains. If you notice any cracks, gaps, or peeling in the weatherstripping or caulking, reapply or replace those sections right away. Regular annual checks help ensure your weatherproofing stays effective and your home remains energy efficient.
You mention that up to 30% of heating and cooling energy can be lost through leaks around windows and doors. If my utility bills are higher than normal but I don’t feel obvious drafts, what’s the best way to check for hidden air leaks?
Hidden air leaks can be tricky to find even if you don’t feel drafts. Try holding a lit incense stick or a thin piece of tissue near window and door frames on a windy day or while your HVAC is running. Watch for the smoke or tissue to move, which indicates air movement. You can also gently run your hand along edges to sense subtle temperature changes. For a more thorough check, consider a home energy audit with a professional using a blower door test.
How often should I recheck or reapply caulk and weatherstripping to maintain the results throughout the changing seasons? I’m in the Midwest, so my windows face both hot summers and freezing winters.
In the Midwest, it’s wise to inspect your caulking and weatherstripping at least twice a year—once in the spring and again in the fall. Extreme temperature changes can cause materials to expand and contract, so check for cracks, gaps, or peeling. Reapply caulk or replace weatherstripping whenever you notice wear to keep your windows and doors sealed tight year-round.
In the section about using caulking and weatherstripping, do you recommend any specific brands or types that work best in places with really humid summers? I’m not sure if all materials hold up well under those conditions.
For humid climates, look for 100% silicone caulk, as it remains flexible and resists mold and mildew better than latex options. Brands like GE Silicone II or DAP Silicone Plus are reliable. For weatherstripping, closed-cell foam or EPDM rubber holds up well in moisture and humidity. Avoid felt or open-cell foam, as they can absorb water and deteriorate more quickly in humid conditions.
How long does a typical weatherproofing job last before it needs to be redone? Are there any signs I should watch for that indicate it’s time for new materials or repairs?
A well-done weatherproofing job usually lasts 5 to 10 years, but this can vary depending on the materials and local weather conditions. Look out for cracked, peeling, or missing caulk and weatherstripping, as well as drafts, moisture, or fogging around windows and doors. These are good indicators it’s time to reapply or repair your weatherproofing.
When sealing gaps around older wooden windows, do you recommend any specific type of caulk that holds up well through both freezing winters and humid summers? I want to make sure my efforts last but I am a bit overwhelmed by all the options at the hardware store.
For sealing gaps around older wooden windows, look for a high-quality, paintable exterior-grade silicone or silicate acrylic latex caulk. These types provide excellent flexibility and adhesion, handling temperature swings and moisture without cracking or shrinking. When shopping, check the label for ‘weatherproof’ or ‘window and door use’ and avoid basic indoor caulks. This will help your seal last through harsh winters and humid summers.
After weatherproofing, how often should I recheck or replace weatherstripping and caulk to make sure everything stays sealed, especially in places with big seasonal temperature changes?
It’s a good idea to inspect your weatherstripping and caulk at least once a year, preferably before the extreme temperatures of summer or winter arrive. If you live in an area with big seasonal changes, check for cracks, gaps, or peeling more often—twice a year is even better. Replace any damaged material right away to keep your home well-sealed and energy efficient.
Since condensation near windows was mentioned as a warning sign, do you have tips on whether this is always a sign of a sealing problem, or could it be caused by other issues like indoor humidity levels?
Condensation near windows isn’t always a sign of a sealing problem. While drafts or poor seals can allow cold air in and cause moisture buildup, high indoor humidity is also a common cause. Try using a dehumidifier or improving ventilation, especially in kitchens and bathrooms. If condensation is mainly on the inside pane and persists after lowering humidity, then checking and resealing your windows may be necessary.
For someone who’s never tackled weatherproofing before, what’s a reasonable budget to set aside for a typical three-bedroom home? Are there areas where spending a bit more really pays off?
For a typical three-bedroom home, setting aside $150 to $400 for basic weatherproofing supplies like weatherstripping, caulk, and door sweeps is reasonable for a DIY approach. It’s worth spending a bit more on high-quality weatherstripping or sealants, especially for older windows and doors, since these offer better durability and longer-lasting protection. If you notice significant drafts, investing in better materials for those trouble spots often pays off in energy savings.
With energy costs rising, I’m trying to stick to a tight budget. Could you suggest which weatherproofing steps give you the best results for the least amount of money?
If you’re watching your budget, start with weatherstripping doors and windows and using caulk to seal gaps and cracks around frames—these steps are inexpensive but make a noticeable difference. Draft stoppers for doors are also a low-cost option. Focus on these basic measures first for the best return on your investment before considering pricier upgrades.
The guide talks about improving energy efficiency by sealing windows and doors. Will these steps also help reduce outside noise, or would I need to consider additional measures for soundproofing?
Sealing windows and doors as described in the guide can help reduce some outside noise, especially if there were gaps or drafts before. However, for significant soundproofing, you might need extra measures like installing heavier curtains, adding window inserts, or using acoustic caulk. Weatherproofing is a good start, but it won’t block all noise on its own.
The guide says weatherproofing doesn’t have to be expensive. For a small business on a tight budget, can you recommend which materials or steps can be prioritized to get the biggest impact without overspending?
For small businesses watching costs, start by sealing gaps with affordable weatherstripping and caulk—these give an immediate improvement in draft and energy reduction. Focus on the frames of doors and windows, as well as any noticeable cracks. Door sweeps for exterior doors are also inexpensive and effective. You can always upgrade to more advanced solutions later, but these basics deliver the most noticeable benefits for minimal investment.
You mentioned sealing both windows and doors, but is there a difference in technique or materials I should keep in mind when dealing with older wooden windows versus newer vinyl ones?
Yes, there are some differences to consider. Older wooden windows often need flexible, paintable caulk and sometimes weatherstripping that can accommodate minor warping or movement in the wood. You may also need to scrape off old paint or sealant before applying new materials. For newer vinyl windows, use a silicone-based caulk since it adheres better to non-porous surfaces and remains flexible. Vinyl windows usually have fewer air gaps, so focus on sealing where frames meet the wall. Always clean surfaces first for best results.
After weatherproofing, how long can I expect the results to last before maintenance or reapplication is necessary, especially in regions with extreme seasonal changes?
The longevity of weatherproofing depends on the quality of materials used and local climate conditions. In areas with extreme seasonal changes, weatherstripping and caulking may require inspection and possible touch-ups every 1 to 2 years. Regularly check for cracks, gaps, or wear—especially after harsh weather—to ensure continued protection.
You mentioned that weatherproofing can help reduce energy costs by sealing gaps and cracks. Is there a particular material or product you recommend for older wooden windows to get the best results?
For older wooden windows, a high-quality silicone or acrylic latex caulk works well to seal gaps and cracks, as both are flexible and long-lasting. For larger gaps, consider using weatherstripping such as V-strip or adhesive-backed foam tape. These products are easy to apply, effective for uneven surfaces, and help maintain the look and function of classic wooden windows.
How long does the typical weatherproofing job last before you need to redo it? I’m wondering if there are any maintenance tasks I should plan for each season to make sure the seals stay effective.
A typical weatherproofing job on windows and doors usually lasts between 3 to 5 years, depending on the materials used and exposure to weather. To keep seals in good shape, check the caulking and weatherstripping at least once per season for any cracks, gaps, or wear. Clean the seals regularly and replace damaged sections promptly to ensure ongoing protection.
For someone on a tight budget, which step in the weatherproofing process would you prioritize to make the biggest impact on preventing drafts and saving on energy costs?
If you’re working with a limited budget, sealing gaps with weatherstripping or caulk around windows and doors is the most impactful and cost-effective step. This simple fix can immediately reduce drafts and improve energy efficiency. Start by identifying any leaks, then apply weatherstripping to movable parts and caulk to stationary cracks or gaps.
When you mention moisture causing wood rot and mold, what are the signs I should look for to catch these problems early around our storefront windows?
To catch wood rot and mold early around your storefront windows, watch for peeling or bubbling paint, soft or spongy wood when you press gently, dark spots or discoloration, a musty smell, or visible mold growth. Cracks or gaps in caulking can also let in moisture, so inspect those areas regularly.
If I’ve noticed increasing condensation on my storefront windows but can’t spot obvious gaps, what troubleshooting tips would you suggest before investing in caulk and weatherstripping?
Condensation on windows often points to high indoor humidity rather than just air leaks. Before buying caulk or weatherstripping, try improving ventilation by using exhaust fans or opening windows briefly. Check for blocked vents and ensure heating or cooling systems are working properly. You can also use a dehumidifier to help control moisture. If condensation persists after these steps, it’s worth inspecting the windows more closely for less obvious gaps or consulting a professional.
When you mention applying caulk to seal gaps, do you recommend a certain type or brand for beginners like me? I want to make sure I pick something that’s both easy to use and durable, especially since I’m worried about moisture getting in around my window frames.
For beginners, a paintable acrylic latex caulk with added silicone is a solid choice. It’s easy to apply and clean up, adheres well, and holds up against moisture. Look for products labeled as window and door caulk. Brands like DAP or GE make user-friendly options. Just ensure the surface is dry and clean before applying for best results.
For someone on a tight budget, which weatherproofing materials offer the best balance of price and durability? Are there any DIY tips to get professional-level results without spending too much?
For a tight budget, self-adhesive foam weatherstripping and clear silicone caulk are both affordable and durable options for sealing gaps around windows and doors. For DIY success, make sure surfaces are clean and dry before applying materials, and measure gaps carefully to avoid waste. Taking your time to press foam strips firmly into place and smoothing caulk lines with a damp finger or tool can help you achieve a professional-looking finish without extra cost.
I understand that gaps can cause energy loss, but can you recommend budget-friendly weatherproofing techniques for renters who may not be able to make permanent changes to their windows and doors?
Absolutely, there are several renter-friendly options for weatherproofing. Removable weatherstripping tape, draft stoppers (door snakes), and temporary caulks are all affordable and don’t cause permanent changes. For windows, plastic insulation kits are easy to install and remove without damage. These solutions help reduce drafts and energy loss while respecting rental agreements.
The article talks about moisture leading to wood rot and mold if gaps are left unsealed. Are there any extra steps I should take to protect wooden window frames specifically, especially in humid climates?
For wooden window frames in humid climates, it’s a good idea to apply a high-quality, exterior-grade sealant after filling any gaps. You should also use a paint or stain designed for exterior wood, which adds a protective barrier against moisture. Regularly inspect the frames for signs of wear, and touch up the sealant or paint as needed to prevent moisture from seeping in.